How to install a mod on Minecraft, installing mods on Minecraft, instructions for installing mods on Minecraft.
The Mojang team has slightly changed the modification installation system. Now there is no such thing as uploading a mod to /minecraft/bin/minecraft.jar. Everything has become different and a little more difficult, so we ask you to read carefully and do everything exactly so that the modification is successfully installed.
Step 1
First of all, let's go to the Minecraft version directory. You can enter this in Explorer:
%appdata%/.minecraft/versions
Now the contents of the files in this folder need to change the name of all files to the same folder name.

Step 3
You need to be careful in this step, now open the .json file in the same folder with any text editor. In the “ID” line you need to enter the name of our folder.

Step 4
Create a new profile in Lanucher (Game Launcher). In the new profile, select that folder, Save and Voila, everything should work.

Step 5
Now to install mods on Minecraft— download the mod from our website, move it to Minecraft.jar (open this file using an archiver). In the same archive, delete the META-INF folder
Now you have all patched your version of Minecraft, which means that you can continue to install mods yourself (repeat step 5). If the game does not start or if an error occurs, this is most likely due to a mismatch between the version of the mod and the game. Or during the installation process, you made some mistake.
How to install a mod on Minecraft:

Monstrously Massive Seaside Village - have you seen in the pictures in which there are a lot of residents, most likely all these residents were added to Minecraft using mods. But you can do without mods; in Minecraft version 1.11 they found a territory in which there are more than a hundred inhabitants in one village. This is a giant village with many friendly residents living inside.

Another place that contains a large number of rare resources is the Sunken Temple located in the desert. Despite this, there are various villages nearby. Well, if you want to find gold bars, golden apples, saddles, emeralds and other rare resources, then you definitely need to come here.

A very interesting area which is a small village that our team discovered during the game. This village contains very rare resources that can be useful for many players. There are such rare resources as: obsidian blocks, steel ingots, steel pickaxe, diamonds, etc.
Every real Minecrafter has installed mods at least once, because they can add absolutely anything, the main thing is to choose the most interesting one. But the problem is that not everyone knows how to install them. That's why this guide appeared: How to install mods in Minecraft !
Video guide:
The guide will be for versions higher (1.6.*, 1.7.*, 1.8.* 1.9.* and so on), because before it was a little different.
(You can click on the pictures, they will take their full size)
1) Download and install if you are using something else. It is much better, you can read about the features on our website on the launcher page. For installing mods, it is good because Forge (If you don’t know what this is, it will be described later in the article) can be installed in one click.
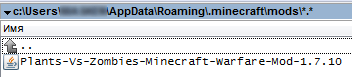
2) Select the mod you want to install, we have a directory: . Let’s remember what version of the game it was developed for; our example will be Plants Vs Zombies: Minecraft Warfare 1.7.10, that is, version 1.7.10.
3) Go to the launcher and select the version of Forge (This is an intermediate mod that processes all others) for the version for which you chose the mod (In our case, Forge 1.7.10) and click "Install", then wait for the installation to complete and the first launch.

4) Next, we proceed to install the mod itself; to do this, click on the “Open folder” button in the launcher and a folder with all the game files will open.

5) Find the folder " mods"(It will appear by itself, if it is not there, then you have not installed Forge, but you can try to create it manually if you are sure that Forge is installed) and copy the mod file there, it will have a .jar or .zip extension (Perhaps it will be packed in .rar, which means you need to unpack it and transfer the file with the desired extension to the folder).
6) Launch the desired Forge from the launcher again. To make sure that the mod works properly, in the main menu, click the mods button and see the new mod there:

Done, now you can play with the new mod! We hope you understand now, how to install a mod in Minecraft!
Installing mods in Minecraft is a simple, but at the same time responsible process that almost every player encounters. You just need to do each action according to the instructions, and you can independently install the modification into your game client in order to edit the world around you and add features to it through add-ons in the form of plugins and mods. All these updates bring a very different amount of content to the game: from small decorative flowers to incredibly complex mechanisms and new mobs.
Instructions for installing mods
Let's move directly to the instructions for installing modifications in Minecraft:
1. Pay attention to the version of the game client.
The first step involves paying attention to the version of the game you are using. To do this, launch the game client and look at the version in the lower left corner, it looks like this:
2. Installation of additional utilities
Most modifications use Forge for their normal operation and error-free installation into the world. There is a small percentage of add-ons that work based on Liteloader, but Forge is the priority.
Difference between Forge and LiteLoader:
It should be understood that both programs are created for one thing - installing and running mods. They cannot work at the same time; loading a mod from a “zip” or “jar” format is carried out using Forge.
In the case of the “litemode” format, use a light loader, but the number of such modifications is negligible, so you may not need it.
There are no more differences between the programs; they work on the same principle and are installed in the same directory.
Now just go to Forge for Minecraft on our website and download the appropriate program for your version. For Windows, an installer is provided in “exe” format.
3. Launch Forge and Minecraft
Before you start working on mods and installing them, you should open the launcher or restart it if it was previously launched. Select your client version next to the program name “Forge” as in the screenshot.

Select your version of the game, wait for the client to launch and close the program.
To find the most current and popular mods for minecraft, look for them in the available sections 1.12.2, 1.7.10, 1.13.2 or. Usually mods install without any problems or additional steps, but always pay attention to the notes, which may indicate how the add-on will be implemented into the game.
5. The final stage of installing mods
Now that the necessary program is installed and the required modification has been found, you should go to the folder in which the game data is located, its most common form:
\UserName\AppData\Roaming\.minecraft
In the last folder “minecraft” you need to find “mods”; if such a folder is not in this directory, create it yourself.
From the very first versions Minecraft Pocket Edition, some developers began to create many different add-ons for Android version of the game. But mods were recognized as an official part of the game quite recently. Now each mod is supported on any resource, regardless of what platform the game is installed on. Today we'll figure it out how to install Minecraft PE mod on Android?
Addons
In this guide, written by us, you will learn how to install mods for your Android phone.
MCPack, .MCWorld
Most mods on the Internet will have file extensions .mcpack / .mcworld. This type of file will automatically install add-ons into your Minecraft PE.
1. First, make sure that you have the latest version of ES File Explorer installed
2. After downloading the mod, open ES File Explorer
3. Go to your downloads folder
4. Find the file with the extension .mcpack or .mcworld, click on it and wait until the file itself installs the necessary elements in your . The screen may go black for a few seconds, but don't worry, it's just loading a little
5. But that's not all: after adding the mod you need to go to the settings MCPE change the resource package and/or mob behavior package when creating a new world
ZIP, .RAR
If your installed add-on has the extension .ZIP or .RAR, then do the following:
1. Check that you have the latest version installed. Versions before 0.16.0 do not support installing mods.
2. To select mods, go to the “Mods” tab on the website; for example, a mod will be used More Chairs Add-on.
3. Now you need to find the required file in the download folder. But use ES File Explorer or any other file manager. Use a long press on the archive with the mod. A "More" button will appear in the lower right corner. Click it to extract files from the archive using the "Extract to.." button. 
4. Next, a small window will appear in which you need to click the button 
5. When extracting, the program creates a folder with the extracted files. Open this folder to continue working. 
6. If the mod has textures, then the mod folder will contain two folders, as happened in our example.
We copied the folder More Chairs by Genta by long pressing on the folder and the "Copy" button. 
7. Now you need to go to the /games/com.mojang/ folder. You will get there very simply: go to “Internal memory”, open the “games” folder and then “com.mojang”. This folder contains files. But to continue studying, you need to figure out what the folder names mean:
- behavior_packs- the main purpose of the folder is installation
- minecraftpe- don't even try to touch this folder
- minecraftworlds- purpose: for installation
- resource_packs- purpose: for installation or texture mods

9. Textures for the mod have been added, now it's time for the behavior package. To install this file type, go to the "Downloads" folder again, copy "More Chairs by Genta". And again in the folder with, namely “/games/com.mojang/”, where you will find the “behavior_packs folder” folder, where you paste the previously copied folder.

10. Launch Minecraft PE.
You need to create a new world or edit an old one.

11. As usual, select all the necessary settings and click Resource Packs where you need to select More Chairs Add-on.

12. Well, after that, as you guessed, select Behavior Packs and accept More Chairs Add-on.

13. We enter the created world. Each mod adds different features and items. In our example, noteworthy armchairs and stools are added.
ModPE (BlockLauncher)
The following instruction only works for extensions like .js and .modpkg.
1. First, download BlockLauncher Free or BlockLauncher Pro.
2. Go to the "Mods" tab on the website. Download the required mod. In the example below we will use the addition Achievements Mod.
3. Enter the game and launch the BlockLauncher menu and select "Manage ModPE Scripts". 
4. Click "Import". 
5. Click "Local storage". 
6. Click the "Download" or "Downloads" folder. 
7. In this folder you will find the file "Achievements v1.1.js", clicking on which will begin the installation. 
8. The add-on is already installed! 
Good day, dear site visitors. You have already learned how to play Minecraft and now you want to learn how to install modifications on it. Therefore, in this article I will tell you how to install mods on minecraft using programs ModLoader And Minecraft Forge.
But first, we’ll figure out what a mod is and why it’s needed for the game. Mods- these are additions to the game that are made by the players themselves; mods change, complement and improve the game. Therefore, it is much more interesting to play with them and the game itself will never get boring because each mod brings something new to the world of Minecraft. For example, you can add cars, planes, new mobs, biomes, worlds, weapons, tools, armor and many other things that will diversify the already interesting world of minecraft.
Where can I get these mods? You ask. The answer is very simple. On my website you can download any different versions.
Well, now let’s get down to the actual description of how to properly install mods on the game. First you need to install these ModLoader and MC Forge mods. You can’t do without them; 95% of all mods require the installation of these add-ons, which are needed to install robot mods.
On my website you can find instructions for installing it in the description of each mod. Because the installation of mods is not the same, but individual.
And so we will continue. If the description for the mod says that Forge is needed for installation, then download and install it. It is the easiest way to install mods for the game.
Let's look further installation using forge everything in order:
1) To do this, you need to install this software first;
2) Then download the mod;
3) Now you need to find the directory with the Minecraft game:
- For Windows XP - "C:/Documents and Settings/*Your profile name*/Application Data/.minecraft/"
- For Windows 7,Vista - "C:/Users/*Your profile name*/AppData/Roaming/.minecraft/"
4) Find another folder in the game folder called .minecraft mods, it appears after installing forge
5) Transfer the archive with the downloaded mod or jar file to the mods folder
6) Launch the game and MC Forge will install the mod for the game.
Installation using this program is different in that it is automatic and simpler.
But if the description for your favorite mod says that it needs ModLoader then let’s take a look at installing mods using Modloader:
1) From the beginning, download and install ModLoader itself.
2) Now you need to find the folder and the minecraft game again:
For Windows 7,Vista - "C:/Users/*Your profile name*/AppData/Roaming/.minecraft/bin"
For Windows XP - "C:/Documents and Settings/*Your profile name*/Application Data/.minecraft/bin"
3) Go to the bin folder where you will find a file called minecraft.jar. This is where you will install your mods.
4) Open minecraft.jar using WinRaR or 7zip (this can be done by right-clicking on the file and selecting the "open with" function)
5) Next, open the archive with the mod and replace the files with its contents in the middle of the minecraft.jar file
6) After these manipulations, delete the META-INF folder from minecraft.jar. This is necessary for the mod to work properly.
That's it, if you did everything right, I can congratulate you, you installed your first mod! Then you can simply remember this information and install them yourself or save this page so you always know how to install mods.
If something is not clear, you can watch the video:
Video on how to install a mod for Minecraft version 1.15, 1.14.4, 1.13.2, 1.12.2, 1.11.2, 1.10.2, 1.9.4, 1.8.9, 1.7.10 and 1.5.2 from our visitor:
But I think that I described everything specifically and well in the article! I really hope that I helped you solve the issue of installing mods. I wish you a pleasant and interesting game! Keep visiting my site I work for You!


