Many people are interested in knowing what is inside your smartphone and its hidden capabilities. To do this, use monitoring programs for your system. Moreover, many will need such applications in the event of a device failure or incorrect operation. Today we will analyze the most useful and high-quality ones.
System Monitor


This is one of the best, perhaps the best application for monitoring your system, with a beautiful, intuitive design. The application consists of various tabs where you can view almost all the basic information about the smartphone with beautiful monitoring animations. There are also various ring charts available. For example, the GPU frequency graph displays the number of hours the device spent at various frequencies and in deep sleep in descending order - very informative, useful and stylish and beautiful. When charging the device, the application predicts its full charge based on the analysis performed.


OS Monitor is functionally completely different from System Monitor - there are only four tabs: “Processes”, “Connections”, “Miscellaneous”, “Log”. The “Processes” tab, as you guessed, displays all running processes and their processor load as a percentage. The “Connections” tab displays a log of all connections that were made: the protocol is indicated, as well as local/external IP. The “Miscellaneous” tab contains all the main characteristics of the device, and the “Journal” displays all the events that occur on your smartphone.
The application is suitable for those who are interested in Internet connections and various actions performed by programs on your device.


This application is more like firmware for developers. Yes, the interface is clearly not made with “rest” for the user’s eyes in mind. The main objective of this application is to be informative. Here you can find out much more information than in any other similar application: the temperature of your battery, analysis of the free space of the internal/external drive, processor and memory load, network quality, Wi-Fi connection speed, NFC/Bluetooth status information, your exact location and more. And all this is just about the device. But there is still information about the software in stock. You can also install widgets on the desktop or in the notifications section, and you can check the operation of various sensors built into the device.


It consists of various mini-widgets that analyze your device in real time and are displayed on the screen in a place convenient for you. Almost everything can be customized. You can add a huge amount of information to the mini-widget, from processor load to network connection type. You can also add/remove various indicators, which represent a multi-colored scale: processor frequency indicator, download speed, Wi-Fi signal level, etc.
You can edit the appearance of the widget: set different colors for the text, adjust the width/height of the tiles, etc.


The application serves to inform the user about the memory status of your device. It is an advanced file manager where you can view the memory statistics of your device in detail. In the “disk diagram” tab there is an advanced diagram that has sublevels that represent a transition from one folder to another, inside the pie chart there are diagrams of the next, “lower” level, when you go to which a pie chart also appears divided into levels until until we reach our destination. In all other respects, the application has standard features.
Application: Disks, Storage and SD cards Developer: Mobile Infographics Category: Job Version: 1.7.3.3 Price: Free/99 rub. Download: Google PlayIt is running Android.

No matter how fast our phones, we always wish they were a little faster. Luckily, Android allows you to do this. This process is called "overclocking" - it means that the main processor will run a little faster than usual. Overclocking a processor is very easy and will allow you to gain an additional 30 percent of its power. Below are tips on how to overclock your Android. phone so that it becomes really powerful phone ohm
How to overclock Android
Read this before you start
First of all, we want to give you a standard warning. Overclocking your main processor telephone is associated with certain risks. Increasing the processor clock speed will cause more heat and increased power consumption. Of course, you shouldn't assume that your The phone will feel like a device stuck in a fire or your battery will be ruined, but the excess heat generated can cause instability and affect battery life.
The main point is to reserve time. Don't try to increase the processor frequency by 30 percent at once. Do this slowly, and after each increase, evaluate the stability of the system. If Android works flawlessly, and the level of allocated The phone's heat and battery life are acceptable, and plus there are no lags or strange behavior, you can continue to increase the processor clock speed. If things get weird, go back to the last stable clock speed.
Getting the right core for overclocking
Are you happy with the results? Let's continue. The only thing you need to configure your Android's main processor settings is phone a is the so-called OS kernel, which supports a higher clock speed. Note that CPU overclocking is a staple in the modding community, so there certainly won't be a shortage of good cores. So, you just need to choose the right kernel for your specific model phone a.
Spend a little time finding the right kernel for your device
First of all, find out the model number of your phone a. To do this, go to the “Settings” section, then to “About” phone e" and see what it says. You'll also probably want to record the version of Android installed on your phone e. An important nuance: to overclock the main processor, your The phone must have root rights!
Read also: 14 Useful Tips and Tricks for Android Marshmallow
It goes without saying that this process will not be covered by warranty, so you will proceed at your own risk. Among other things, you will also need to install in phone custom recovery mode (also known as “custom recovery”). See below for more details.
You need to install a custom recovery mode like TWRP or CWM
Replacing a core and overclocking a processor doesn't take much time, but it's worth spending some time finding the right core. Some sites, such as XDA Developers, are a great place to start. There are four things you look for in a kernel: 1) that the kernel supports overclocking the processor; 2) so that it is compatible with your model phone a; 3) so that it works in your version of Android; 4) so that it has positive reviews.
The more popular the kernel is, the easier it will be to get help from the community if necessary, or to find any suggested parameters (if you prefer to receive knowledge from the efforts of other people, rather than spending on knowledge of your own). In general, the more reviews there are about a kernel, the more informed decision you can make.
Overclocking software for your kernel
Some kernels have associated software that has been designed specifically to help you get the most out of the kernel. Such software may include a regular overclocking slider, a main processor settings regulator, options for reducing voltage, etc. If the kernel you are using has an additional application, you can use it. If not, then look in the Play Store for a general overclocking app (or a manager for the main processor) with a good rating and positive reviews.
Some custom kernels have software that allows you to easily change the clock speed of the main processor
Once you have the kernel for your specific model phone and you are sure that it is compatible with your version of Android and supports overclocking the processor, you can move on. For this hands-on tutorial, we will be overclocking a rooted Nexus 6 running stock Android 6.0 Marshmallow using the ElementalX kernel.
Note that many custom ROM kernels natively support overclocking the main processor, so if you are using a custom ROM kernel, take a closer look at it to determine whether you need to change your OS kernel.
We're installing the ElementalX kernel on our stock Nexus 6
How to overclock your Android telephone
Your The phone must be rooted to install a custom kernel. You also need to install a custom recovery mode (due to the fact that you will not be able to install kernels using the stock recovery mode). If you need help with this, check out our guide on how to set a custom recovery mode. Even though the guide in this link is for Nexus 5, the process is the same.
- Make sure you have a backup of your data. You can make such a copy using custom recovery, using any application or PC-based solutions.
First download the kernel on your Android
- Once you have selected the appropriate kernel, download it (as well as any software that comes with it) to your Android (you can download it to the “Downloads” folder). You can also download the kernel to your computer and then copy the zip file to the root directory of your phone number (if you wish), but this is easy to do on your phone e and through recovery.
Reboot to enter Fastboot mode, then enter Recovery mode
- Disable your phone and enter Fastboot mode. This can be done by pressing the “On” buttons simultaneously. and "Volume Down", although some manufacturers specify a different key combination.
- While in Fastboot, use the Volume keys to highlight Recovery mode and press the On button. for his selection.
Click on the “Install” icon
- Now you can enter your “custom recovery”. We use TWRP type.
- Click on the “Install” icon (or “install ZIP” in CWM) and go to the folder where the saved kernel zip file is located.
Find the kernel you downloaded earlier
- Install the kernel zip file and wait until a message appears indicating that the installation was successful. Some kernels (like Elemental X in our case) will launch through a series of dialog boxes, much like the Install Wizard application on your computer.
Note that there are also kernels that allow you to assign the clock speed of the main processor during installation. Later, you can make changes where necessary using the installed manager application for the main processor. Read the instructions below on how to do this.
Install the kernel
- Clear the cache after successfully installing the kernel.
Clear your cache
- Go to the “Advanced settings” subsection in recovery mode and click on the “Correct access rights to files and partitions” icon.
Icon “Correct access rights to files and partitions” after installation
- Reboot your system.
Changing the main processor frequency
If you did not change the main processor settings when installing your custom kernel, you can now launch the processor manager (or kernel application). If you do not already have software compatible with your kernel installed, you will need to find the appropriate application in the Play Store.
Basically, there are many similar applications, and they work great, but we use the free application Kernel Adiutor. You'll have to give the kernel app permission to use root, and you'll probably have to install the BusyBox app (which will also need root privileges).
As you can see we have installed a custom kernel
Find the settings that control the clock speed of the main processor. Depending on what application you are using, you can select the maximum processor frequency from the drop-down menu, or use the slider. Remember that you need to use it slowly. Run each clock speed level for a while to see how it affects stability, battery life, and heat output. To start, increase the clock speed by 10 percent above your current speed and increase it little by little from there.
Select the maximum clock speed of the main processor and enjoy the increase in its power
Don't be surprised if your main processor speed doesn't reach the new setting too quickly. What do you do when you overclock a processor? Change its maximum clock frequency. So the processor can achieve greater performance when needed.
By the way, you can also change the minimum frequency, although this puts unnecessary strain on the processor and battery of your phone a. But at the end of the day, there's no need to overclock your processor to, say, read emails.
If you encounter any instability with your new settings, just go back and lower the CPU clock speed a little and then see how things go.
As you can see, our Nexus 6 now runs 20 percent more powerful than usual
If you encounter any unusual problems, visit the forums or the site where you downloaded your kernel and read the information to see if anyone else has already solved your problem. If you don't find anything useful, ask the community for help. If nothing helps, then you can install the previous original kernel that was installed on your device earlier.
Tell us what you've achieved and how much better your overclocked Android is now
How to overclock and increase the processor clock speed in an Android phone or tablet.
SetCPU - application for controlling the processor frequency ( CPU) on the device Android. In most cases, changing the CPU frequency is used to increase system performance (overclocking) or to increase battery life by fine-tuning the processor frequency and voltage. SetCPU has long become an integral part of custom settings in third-party firmware (, etc.). The application is a set of settings and preset profiles for the operation of the processor, but this does not mean that after installing the application you will be able to find the “overclock” button there; patience and understanding of the principles of operation of the application and the processor are required.
Updated to latest apk versions (Updated 02/07/2016)
Access is required for the application to work! If you are the owner of a popular Android device, then most likely you can get root using or use the site search, as well as 4pda and xda.
To overclock and increase the frequency of the processor, as a rule, you also need a custom kernel with the ability to overclock the processor. Where to get it and which kernel is suitable for your device, you can also look at 4dpa and xda, if you are using the latest version of one of the popular third-party firmware, then most likely you already have everything you need to use Set CPU.
Preset processor operating modes Set CPU (presence or absence depends on the core)
- Interactive- interactive mode, the system itself determines the frequency, changes it often, in most situations the processor operates at full capacity
- Smartass- Interactive is taken as a basis. A distinctive feature is a faster decrease in CPU frequency when idle and a reduction in frequency to a minimum when the screen is turned off
- Conservative- the processor permanently operates at the lowest possible frequency, gradually increasing it if necessary
- Userspace- allows you to change the CPU frequency for each application individually or manually
- Powersave- lowering the CPU frequency to the minimum possible value
- Ondemand- the system operates at the minimum frequency, increases to the maximum frequency when the CPU load is 100%
- Performance- setting the maximum frequency and prohibiting its reduction
More detailed information about setting up the program, proper use, individual settings for each device, how to overclock and not break it, how to reduce power consumption can be found in the topics on our favorite forums and off. application website.
Using SetCPU you can cause real harm to the system! Read forums and manuals, be smart and vigilant!
Owners of less-than-performing Android devices have probably wondered more than once how they can speed up their smartphone or tablet. In fact, there are quite a few options, and one of them is overclocking the processor using special applications. One of the best of its kind is SetCPU.
SetCPU requires root rights to operate. How to obtain them is written in these articles:
On our website we have already published a post about using the AnTuTu Cpu Master application. We recommend you take a look.
In addition to obtaining root rights, you need to download and install a custom kernel for your device. In stock firmware with a stock core, the processor frequency is limited and you will not be able to overclock it.
Instructions: overclocking the processor of an Android smartphone or tablet
1. So, download SetCPU for Root Users from Google Play.
2. Open the application. When you launch the program for the first time, it will require root access. Provide it.
3. The main program window will appear in front of you. You will see two sliders: the top one is responsible for the maximum processor clock frequency, and the bottom one is for the minimum.
4. By swiping left and right you can increase and decrease values.

5. The checkbox next to the “Set on Boot” item allows you to save your settings when you reboot the device.
If you want to achieve maximum performance not only in games and applications, but also in the system, increase the minimum processor frequency, and if you want to save battery, lower it.
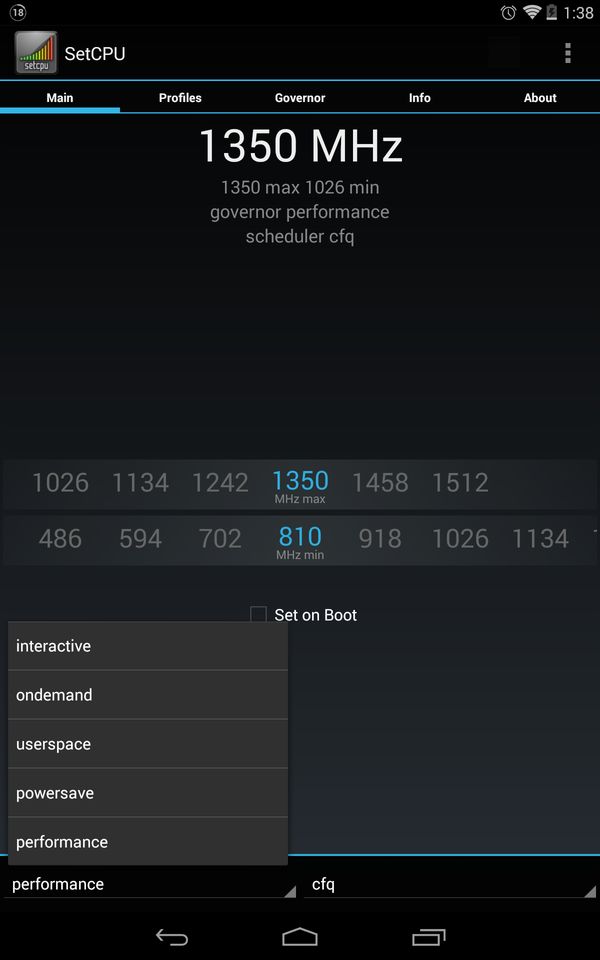
In addition, the program contains separate operating modes:
- Interactive— the system itself determines the processor frequency and often changes it. The CPU almost always runs at maximum performance.
- Smartass- a mode based on Interactive, but in this case the processor frequency decreases faster when idle, and even decreases to a minimum when the screen is off.
- Conservative— The CPU operates at the lowest frequency and it increases if necessary.
- Userspace— this mode allows you to adjust the processor clock frequency either manually or specifically for specific software.
- Powersave— as the name implies, this is a battery-saving mode. CPU frequency is minimum.
- Ondemand— the processor operates at a minimum clock frequency and it increases only with maximum CPU load.
- Performance— the maximum CPU frequency is set when working both in games and applications, and in the system. Frequency reduction is blocked.
The presence of certain modes depends on the installed kernel, and not on the program.
If we talk correctly about the modes of the Android kernel, then it would be correct to call it - AProcessor frequency control algorithms or kernel CPU governor. Not all modes listed here may be available on your Android device. Android runs on the Linux kernel.
What are there CPU governor
- OnDemand
- OndemandX
- Performance
- Powersave
- Conservative
- Userspace
- Min Max
- Interactive
- InteractiveX
- Smartass
- SmartassV2
- Scary
- Lagfree
- Smoothass
- Brazilianwax
- SavagedZen
- Lionheart
- LionheartX
- Intellidemand
- Hotplug
- Wheatley
- Lulzactive
- AbyssPlug
- BadAss
- Ktoonservative
- AssWax
- Sleepy
- Hyper
- SmartassH3
- Smartmax
Details about each mode
OnDemand- “neutral” kernel operating mode, used by default in many Android devices. This mode balances performance and energy consumption, but unfortunately there is no energy saving mode.
OndemandX- an improved version of the ondemand kernel, with the addition of a sleep and wake profile. The quality of its work largely depends on the I/0 scheduler.
Performance- “productive” kernel mode, as you understand from the name. In this governor (mode), the processor almost always operates at the maximum frequency or maximum. Turns on when the device is charging. Not suitable for everyday use, it drains the battery so quickly.
Powersave— “energy-saving” core mode. Unlike Performance, it raises the core frequency very slowly, or rather practically does not raise it and operates at the very minimum frequency. This mode can only be used when the screen is off to save energy. Not suitable for everyday use, as Android becomes unresponsive or freezes.
Conservative— “energy-saving” core mode. Ondemand raises the processor clock speed 2 times slower. At the same frequencies, the performance of ondemand is 2 times lower. Without load, sets the minimum processor frequency. It is also recommended to use when the screen is turned off or on.
Userspace— “neutral” mode of kernel operation. Configured by the user himself. Very rare.
Min Max— “neutral” mode of kernel operation. A modified Conservative kernel mode, but unlike it, it is more productive. Uses either the maximum or minimum core frequency, there are no intermediate ones!
Interactive- “productive” kernel mode. A modified ondemand kernel mode that changes the core frequency faster, but unlike ondemand, allows you to spend more time at the maximum frequency. Therefore less energy efficient.
InteractiveX- “productive” kernel mode. As the name suggests, the modified Interactive kernel mode. More energy saving.
Smartass- “productive” kernel mode. Modified InteractiveX kernel mode. Very popular among Android users.
SmartassV2- “productive” and “energy saving” core mode. Modified Smartass kernel mode, or rather its second version. Many call it ideal. Perhaps it is so.
Scary- “productive” and “energy saving” core mode. The modified mode with Smartass and Conservative enabled slowly raises and slowly lowers the processor frequency, but still works more often at minimum frequencies.
Lagfree— “energy-saving” core mode. Was created as an alternative to ondemand. More economical, but in necessary situations quickly raises the maximum frequency. Not recommended for heavy gaming or watching videos.
Smoothass— was developed as an alternative to Smartass. More productive, therefore less energy efficient.
Brazilianwax— was developed as an alternative to SmartassV2. More productive, therefore less energy efficient.
SavagedZen- “energy saving”, developed as an alternative to Smartass. More energy efficient, therefore less productive.
Lazy— ondemand mode with faster frequency increase.
Lionheart- “productive” kernel mode. Similar to Performance, but with faster frequency rise.
LionheartX— an improved version of Lionheart with Smartass inclusions.
Intellidemand- intelligent OnDemand option. Similar to Interactive. Actively increases the frequency in demanding tasks and smoothly in less demanding ones.
Hotplug- another OnDemand option. Disables processor cores when idle
Wheatley- another OnDemand option.
Lulzactive- a mixture of Interactive and Smartass. Increases the frequency by one step when the system load is more than 60%. Decreases by one step if less than 60%.
AbyssPlug—
BadAss— without load, a fairly economical mode; when a large task appears, it quickly raises the frequency.
Ktoonservative— an improved version of Conservative.
AssWax- Interactive option.
Sleepy- another option to achieve productivity and autonomy.
Hyper - another version of the main OndemandX
SmartassH3- designed to save battery
Smartmax- is a combination between OnDemand and Smartass2 This is configured by default to save battery power.
What types of I/0 schedulers are there?
Schedulers I/0- I/O schedulers perform two basic operations: merging and sorting. Merging is the process of taking two or more adjacent I/O requests and combining them into a single request. (taken from opennet.ru).
In a nutshell, these are ways of accessing memory.
- Anticipatory
- Deadline
- Simple or SIO
Details about each I/0 scheduler
Noop- the safest and simplest scheduler, since it only combines requests but does not sort.
Anticipatory— issues requests when the previous one has been processed, after which it waits for some time for the next request; if there is none, it moves on to another request.
CFQ— combines tasks into goals and goes around them in a circle. A balanced and productive option for Android.
Deadline— stores a sorted queue for writing, new requests are sorted and moved to the end of the queue. It surpasses CFQ in its capabilities.
VR— with elements of Deadline. The most unstable scheduler, but still the most productive.
SIO— performs quick queries first, then more capacious ones. Stable, simple and productive.
BFQ- productive, but still worse than VR and SIO
Android kernel modes and I/0 scheduler are worth using
Planners— SIO, VR or Noop
Kernel modes:
For energy saving - InteractiveX, Smartass, SavagedZen (conservativ and powersave were not taken into account since they are not suitable for work)
In terms of performance - SmartassV2, Lionheart, MinMax.


