A laptop, computer or tablet with Windows 10 can be used as a Wi-Fi router that distributes the Internet to other wireless devices. Such a software Wi-Fi access point can be used to organize a local wireless network or share the Internet connection (wired or mobile 3G/4G connection) available on a Windows computer with several devices (phones, tablets and other devices). In the first releases of Windows 10, it was possible to create and manage such an access point only from the command line. Windows 10 1607 introduced a simple graphical interface for creating an access point - “Mobile Hotspot”.
So, today we’ll look at how to create a virtual access point based on Windows 10 without using additional third-party programs. We assume that your computer has two network adapters: a wired Ethernet adapter (connected to the network of the provider through which you access the Internet) and a wireless Wi-Fi adapter. We want a computer with a Wi-Fi network card to be able to be used by other devices as a Wi-Fi hotspot and share its Internet connection.
Advice. Instead of a wired connection, a 3G / 4G connection via a USB modem or phone can be used to access the Internet.
Checking support for Ad-Hoc mode by the Wi-Fi adapter driver
Before you start creating an access point, you need to make sure that the driver of your Wi-FI adapter can operate in virtual access point (Ad-Hoc) mode. To do this, run the command on the command line:
netsh wlan show drivers
The command line will display information about the Wi-Fi adapter driver used and supported technologies (more information about supported Wi-Fi driver standards in the article). Availability of line Hostednetworksupported: Yes ( Hosted Network Support – Yes ) , indicates that this driver supports operation in access point mode. Otherwise, try updating the driver version or installing a different Wi-FI adapter.
Mobile hotspot in Windows 10
Window 10 1607 (Creators Update) and higher introduced a simple graphical tool for distributing the Internet via Wi-Fi. This function is called " Mobile hotspot"(Mobile Hotspot). The function is located in a separate section Options -> Network and Internet -> Mobile hotspot. On this tab, with just a couple of clicks, you can launch an access point on your Windows 10. All you need to do for this is to turn on the switch “ Allow the use of my Internet connection on other devices" The name of the new Wi-Fi network and password will be generated automatically (you can change them) and select the Internet connection to which you will provide access to other devices (list Internet connection sharing). If your computer has only one Internet connection, it will be selected automatically.

Limitation. This way, you may not be able to share all types of connections. For example, a PPPoE connection cannot be distributed this way.
The same window will display a list of devices that are currently connected to your access point. The device name and MAC address are displayed, as well as the IP address assigned to it. As you can see, up to 8 devices can be connected to the access point on Windows 10 at the same time.

Common Windows 10 errors when creating a mobile hotspot
In the event that an error appears when trying to create an access point ‘ Cannot configure mobile hotspot. Turn onWi-Fi‘, try updating the driver of your Wi-Fi adapter and/or removing the Microsoft Wi-Fi Direct Virtual Adapter according to (it is through this virtual adapter that the Internet is distributed). After that, restart your computer and try turning on the mobile hotspot again.

Another common mistake is ‘‘. Try simply restarting your Internet connection.

Another error: ‘ Could not set up mobile hotspot because the computer is not connectedEthernet,Wi-Fior connection to a cellular network‘. Most likely there are problems with your Internet connection (no network). Check the connection. This error also appears if you are connected to your provider via PPPoE; this type of connection is not supported by the mobile hotspot.

Create a virtual Wi-Fi network from the command line
Let's look at how to create a virtual Wi-Fi access point from the command line.
Let's say we want to create a wireless network called Hotspot(this is the network SSID) and connection password 3 i3iPass. Open a command prompt (with administrator rights) and run the following command:
 If everything is correct, the command will return the following text:
Hosted network mode is enabled in the wireless network service.
The hosted network SSID has been successfully changed.
The hosted network user key passphrase was successfully changed.
This command will create a new virtual Wi-FI adapter in the system, Microsoft Wi-Fi Direct Virtual Adapter, which will be used by other wireless devices as an access point. Now let's enable the created virtual adapter:

Line Thehostednetworkstarted(Host Network Started) indicates that the software Wi-Fi access point has started successfully.
A new wireless connection named Hotspot.
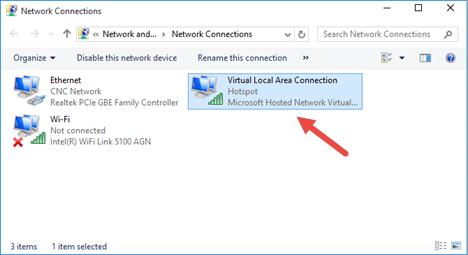
Other Wi-Fi devices can now see and connect to the created access point. Within such a network, devices can use shared documents and peripherals, but access to the Internet through such an access point is not yet possible.
Allow connected devices to use the Internet connection
Now let's allow all devices connected to our virtual Wi-FI hotspot to use a wired network connection to access the Internet. To do this, in the Network and Control Center, click on the name of the network adapter through which you can access the Internet. In our example, this is a connection named Ethernet.
 In the network adapter statistics window, click the button Properties.

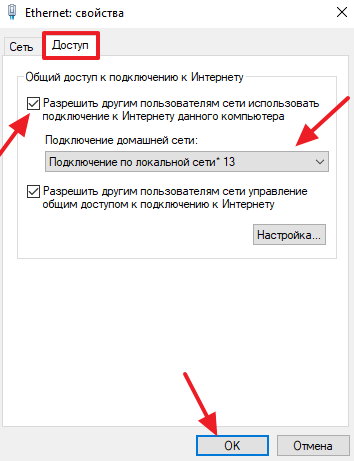
In the network adapter properties window, you need to allow general Internet access through this connection. To do this, go to the tab Sharing(Access). Check the box next to " Allowothernetworkuserstoconnectthroughthiscomputer'sInternetconnection» (Allow other network users to use this computer’s Internet connection), and in the drop-down list, select the name of the virtual adapter that we created earlier.

Save your changes. In the Network and Sharing Center window, the Hotspot network type will change to Internet, which means that this network (and all devices connected to it) now have access to the Internet.

Now all devices connecting to the Windows 10-based access point we created gain access to the Internet through the external network interface of the computer. Try connecting to the created hotspot from your phone, tablet or other laptop.
View current virtual access point settings
You can view the current settings of the access point you created using the command.
Netsh wlan show hostednetwork

The command will display the name (SSID) of the network, supported types of authentication and encryption, the maximum number of devices that can simultaneously use this access point (Max number of clients) and the current number of connected clients (Number of clients).
The following command displays your Wi-Fi hotspot's various security settings and connection keys:
Netsh wlan show hostednetwork setting=security

The access point on Windows 10 cannot work in hidden SSID mode.
Possible errors and solutions with a Wi-Fi access point on Windows 10
Question. After restarting Windows, the Wi-Fi access point does not turn on.
Answer. To restore the wireless network, you need to start the hosted network with the command
netsh wlan start hostednetwork
There is no need to re-enter the network name and password.
Question. When trying to start a hosted network, the error “The Wireless AutoConfig Service (wlansvc) is not running. The hosted network couldn’t be started.”
Answer. Start the service WLANAutoConfig(Wlan AutoConfig Service) from the services.msc console or from the command line:
net start WlanSvc
and restart the virtual access point
Question. When starting a Wi-Fi network, the error “The hosted network could not be started. The group or resource is not in the correct state."
Answer. Check if your Wi-Fi adapter is turned on. Then open device Manager, on the menu View select item Show hidden devices. In the network adapters section, find MicrosoftHostedNetworkVirtualAdapter and turn it on (Engage). If it doesn’t help, run the commands sequentially:
netsh wlan set hostednetwork mode=allow
Then recreate the access point:
netsh wlan set hostednetwork mode=allow ssid=Hotspot key=3i3iPass
netsh wlan start hostednetwork
Question. How can I view the status and settings of the access point?
Answer
netsh wlan show hostednetwork
Answer. You can stop the access point with the command:
netsh wlan stop hostednetwork
The access point is deleted (the SSID and network password are deleted) like this:
netsh wlan set hostednetwork mode=disallow
Question. The device has connected to a Wi-Fi access point, but the Internet does not work on it.
Answer: Check whether your device has received the DNS server settings (try manually specifying the Google public DNS server address - 8.8.8.8 in your client settings. Also try restarting the Internet Sharing Service (ICS), or disabling and re-enabling sharing for the adapter through which your computer / laptop with Windows 10 connected to the Internet.
A few more common problems due to which your access point may not work on Windows 10:

Today, Wi-Fi technology is very popular among users of the World Wide Web. Free wireless network access points are installed at airports, train stations, cafes and shopping centers. Sometimes it is necessary to create such a network in an office or home. This is relevant if you have several working devices - PCs, laptops, smartphones, etc. Below we will look at how to create wifi access on a laptop with Windows 7 for subsequent distribution of the connection to the above devices.
First, let's work with the command line. It opens with Administrator rights. To do this, call the “Start” menu and enter the “cmd” command in the search field. Then on the shortcut, right-click and select the “Run as Administrator” column. A window appears where you need to enter the following commands: “netshwlansethostednetworkmode=allowssid=”EVRIKAK” key=”MYPASSWORD”keyusage=persistent”. Here “EVRIKAK” is the network name, and “MYPASSWORD” is the password.After pressing “Enter”, a message indicating the successful creation of the network is displayed. Now you should launch it. In the same window we write the command “netshwlanstarthostednetwork”. That's it, the first step of creating a wifi access point is done, let's move on.


By clicking “OK” our created network will be connected to the Internet. The work, as you can see, is simple and even a novice user can do it. Good luck surfing the web!
Nowadays, modern gadgets have become very affordable and technologically advanced. They have several data transmission modules, including Wi-Fi. Such a module allows you to connect to the worldwide network and even connect several modules at the same time.
Creating an access point using standard Windows tools
This option is possible due to standard Windows features. The procedure is almost the same, so let’s look at the instructions using the “Seven” as an example.
Click on the Win+R icon, write cmd in the search and open a special window where we carefully enter
netsh wlan set hostednetwork mode=allow ssid=”New Name” key=”New Pass” keyUsage=persistent.
Using the Latin alphabet, enter the name of our network (instead of New Name) and password (instead of New Pass). At the end, we confirm and wait for a message that the procedure was successful. To launch we use a text phrase
and confirm again.

In response, a text indicating the successful completion of the process will appear. Now go to the Network Connection Center and find the icon for connecting to your home network or “Ethernet”. Turn on the mouse context menu and select “Properties”. Now we allow other users to use Internet access by selecting the new network connection “Wireless Network 2” in the second tab and confirm by clicking “OK”.

Now everything is ready, let's check the work.
*Notes for newer versions of Windows 8, 10
The command line is launched by right-clicking on the Windows icon in the corresponding item. Select launch in admin mode.
In network connections, the network you created is displayed as “Local Area Connection* 2”. Instead of the number 2 there may be another one.
When we use the command line, after rebooting the laptop we need to do the same operations. You can make your life easier by saving the necessary settings to startup.
Open notepad and copy the text phrase
netsh wlan set hostednetwork mode=allow ssid=” New Name ” key=”New Pass” keyUsage=persistent
netsh wlan start hostednetwork
and edit the name and password according to the above instructions. Save the text file and write “.cmd” at the end of the name.
Go through Start to Startup and copy the created file there.
*Notes for newer OS versions
Startup opens by pressing the “Win” + “R” keys and entering the text shell:Startup. After this, press “Enter”.
Also pay attention to the netsh wlan start hostednetwork control command - start distribution. Replacing the word start with stop will stop the distribution. netsh wlan set hostednetwork mode=disallow – destroy the distribution (to re-enable it, you need to create the access point again)
Creating an access point using programs
The connection issue is solved with the necessary software. Download one of the special utilities.
Setting up an access point in Windows 7
— Switch Virtual Router is perfect for Windows 7. Its feature is low consumption of system resources and the ability to configure auto-shutdown of the computer. This program prompts you to enter the name of the virtual router and password in special fields. When you have entered everything, just click “OK” and the program will create a new access point with the specified name.
Download Switch Virtual Router— https://yadi.sk/d/lfp2ynkTg3jr2


Setting up an access point in Windows 8
— The program with an intuitive interface, MyPublicWiFi, which is suitable for Windows 8, works on the same principle. After installing it, you need to restart the laptop and open it as an administrator. In the Settings tab, activate the Automatic HotSpot configuration checkbox. In the lines Network Name and Network Key, enter the name of the new connection and password, respectively. The last step is to select permission for Internet distribution and indicate the network connection for distribution. Click “Set up and Start Hotspot”, the virtual router has been created.
Download MyPublicWiFi - http://www.softportal.com/get-38317-mypublicwifi.html

Setting up an access point in Windows 10
— Virtual Router Plus is a good alternative to previous programs, it is easy and fast to set up, and most importantly, it is suitable for versions 7,8,10 of Windows. For the access point to work, you need its name, a password to connect and select a standard network connection for Internet distribution. The program is easily minimized and very conveniently monitored in the notification panel.
Download Virtual Router Plus - http://awesoft.ru/virtualrouter-plus.html

We looked at many options for distribution via Wi-Fi. I hope you find the optimal and most comfortable method for yourself, because both the manual method and the software method have their advantages.
How to create a WiFi access point using Windows 7. Instructions, step by step with illustrations. Although people are mostly interested in the question of how to make a laptop a wifi access point, it doesn’t really matter whether it’s a laptop or a regular desktop computer. Creating a wifi hotspot is the same in both cases.
Similar articles for other operating systems:
How to create a WiFi hotspot on Windows 7
We need to create a software wifi router based on Windows 7 that will receive the Internet in some way and be able to distribute this Internet via wifi.
What do we need?
- Windows 7 Basic or higher. Windows 7 Starter (initial) will not work. More precisely, on Windows 7 Starter you will have to solve the routing issue using a third-party program ( for Windows 7 Starterseparate note at the end of the article).
- Old wifi adapter. For example, the TP-Link TL-WN722NC USB wifi adapter was used for this article.
- Internet connection. For this article, a GSM connection was used through the MTS operator (MTS USB modem). But it can be any connection - PPPoE, VPN, Dail-Up, Ethernet, WiFi.
The first step is to install the wifi adapter, if it is not already installed, and make sure that it is turned on and working.
After this, you need to check whether the “WLAN AutoConfiguration Service” service is running. Usually its launch mode is “Manual”, which means it can be stopped. If you plan to use the created access point constantly, then it is better to switch this service to the “Automatic” startup mode.
You also need to check that the Internet Connection Sharing (ICS) service also has an Automatic startup mode.
These checks are done through "Control Panel - Administration - Services".
After this, you need to open the Windows console (cmd.exe) with administrator rights. This can be done through the menu "Start - Programs - Accessories - Command Prompt", then right mouse button and "Run as administrator".
In the console, type and execute the command:
netsh wlan set hostednetwork mode=allow ssid="winap" key="123456789" keyusage=persistent.
Instead of winap And 123456789 enter your access point name and password:
Note. Important! The password must be at least 8 characters long, this is a requirement for the WPA2 security type that is used in Windows when creating an access point. It is better not to use the Cyrillic alphabet in your password. Letter case matters - A And A These are different symbols!
Next, check that the connection for the access point has been created. Open "Start - Run - ncpa.cpl" and after opening the "Network Connections" window, in this window find the wireless connection for which the physical adapter is not specified:

Right-click, then "Properties" and look there - it should be "MicroSoft Virtual Miniport Adapter":

At the same time, you can remove unnecessary connections and protocols.
Immediately rename this connection in ncpa.cpl - for example, to “winAP”:

Next, here, in ncpa.cpl, you need to share (enable Windows ICS) the Internet connection. Select this connection, right button - “Properties”, “Access” tab. Enable ICS and specify the connection to which the Internet will be distributed - to the wifi connection of the access point ("winAP"):

Now you need to connect to the Internet. Or reconnect if the connection was established previously.
After that, type and execute the command in the console:
netsh wlan start hostednetwork.
That's it, the access point should already be working. Now you can connect the client to this access point (this illustration is from the client’s computer):

How to connect a wifi client to:
- Laptop (or computer) under Windows - Setting up WiFi in Windows 7.
- Laptop (or computer) running Linux - Laptop (or computer) running Ubuntu.
Client connected:

On the computer where the access point is running, you can check its status. To do this, enter the command in the console:
netsh wlan show hostednetwork

It can be seen that one client is connected.
Stopping an access point with a command netsh wlan stop hostednetwork
Complete destruction of the access point by command netsh wlan set hostednetwork mode=disallow
If you want the access point to turn on automatically when Windows boots, then the start command needs to be added to autorun. It's about the team netsh wlan start hostednetwork. The command can be written into a cmd script; you must specify “Run as Administrator” in the properties of this script. Then include the script in autorun.
It is necessary that the connection to the Internet is also established when Windows starts. Otherwise, you will have an access point, but there will be no Internet through it.
Of course this is a very simple access point. But everything is at hand. No third party programs needed. Just Windows 7. And everything can be configured in a couple of minutes. Yes, there are programs like Connectify and Virtual Router. However, you need to understand that they only do the work that is done by two commands in the Windows console. These are just add-ons to the functionality of Windows 7. It’s easier to write two commands in the console than to download and install some gadgets.
Some may say that this option does not have many of the capabilities that an access point should have. Well yes, that's true. Only this is an option when you need to make a wifi router very quickly and without problems. And Windows 7 provides just such an opportunity - with a minimum of body movements, what is called “on the knee,” to create an access point.
And if your needs are broader and deeper, if you need an access point for every day, or in complex configurations, then you don’t need to use Windows, but buy a decent, or even good WiFi router. A decent WiFi router now costs less than a thousand rubles. And in such a situation, sculpting a design based on a computer and Windows is somehow absurd.
It’s another matter if you need an access point once a month, for a day or for a couple of days. Or on a business trip. Or on vacation. This is where Windows helps us out. You can quickly distribute the Internet via WiFi from a laptop to a tablet, smartphone or other laptops.
But if there is a need to make a permanent access point on a computer, then it is better to do it under Linux. This is how this is actually implemented in WiFi routers. For example, as in this article - Access point on Ubuntu.
Hotspot on Windows 7 does not work
There is no need to swear at Microsoft, at Windows - in general, look for the guilty on the side. The problem in such cases Always on your own computer (or laptop). It could be:
- Drivers for the WiFi adapter on which you are creating an access point.
- The WiFi adapter itself.
- You did something wrong.
- Any "left" services or drivers/programs that use the WiFi adapter or USB port (if your adapter is connected via USB).
- You have Windows 7 Starter.
- One of the necessary services has stopped, for example, see the article “Windows 7 Routing and Remote Access Service Stops”.
For example, during Windows startup, the WiFi adapter driver can put the adapter into standby mode. And when Windows starts the service hostednetwork the adapter does not wake up.
With a normal WiFi adapter and if you haven’t messed up your Windows with crooked programs and drivers, everything will work fine.
In general, always look for the source of the problem on your computer.
WiFi network protection
Access point on Windows 7 Starter (initial)
Microsoft did something weird with it. ICS is blocked on it, but you can create an access point as such. Paradox. Why do you need a hostednetwork mechanism if there is no routing? Be that as it may, you can make a wifi access point on Windows 7 Starter. You just need to find a program with which to perform routing between the Internet and winAP interfaces. There are many options here, for example you can use a proxy server, like 3proxy.
Ivan Sukhov, 2013, 2014
Nowadays, Wi-Fi wireless networks are supported by a huge variety of devices, from wristwatches to TVs. Typically, such devices use a Wi-Fi router. But, if you don’t have such a router, then you can get by with a regular laptop or a computer with a Wi-Fi adapter. In this article you will learn how to create a Wi-Fi access point on a computer or laptop running Windows 7 or Windows 10.
Creating a Wi-Fi hotspot on Windows 7
First, let's look at a more complex way to create a Wi-Fi access point. This method is based on using the command line, so it works perfectly in both Windows 7 and Windows 10. Although in the case of Windows 10 it is better to use the second method, which is described at the end of the article.
So, in order to create a Wi-Fi access point on a Windows 7 computer, you need to open a command prompt with administrator rights. To do this, open the “Start” menu, enter the phrase “Command Prompt” into the search, right-click on the found program and select “Run as administrator.” This is the simplest option though.
Once the command line is launched, you can begin creating a Wi-Fi access point. To do this you need to run the following command:
Netsh wlan set hostednetwork mode=allow ssid="wifi_name" key="wifi_password" keyUsage=persistent
Please note that this command contains the parameters “wifi_name” and “wifi_password”. This is the name of the Wi-Fi access point to be created and the password for connecting to it. In order to create a secure access point, it is better to change these parameters.
After running the above command, a message should appear at the command prompt to enable hosted network mode and to change the SSID and passphrase.

Now you need to run a command that will launch only the previously created Wi-Fi access point:
Netsh wlan start hostednetwork
After running this command, you should receive the message “The hosted network is running.” If you receive the message “The hosted network could not start,” then you have problems with your Wi-Fi adapter. It may be disabled or not working due to driver issues. Solve the problem with the Wi-Fi adapter and run the command “netsh wlan start hostednetwork” again.

At this stage, the Wi-Fi access point has already been created and is working. You can even connect to it, but there will be no Internet access. In order to enable Internet distribution, you need to open the “Network Connections” window. To do this, you can press Windows-R and run the command “ncpa.cpl”.

In the “Network Connections” window, you need to find the connection through which you connect to your Internet provider. Right-click on this connection and go to “Properties”.

Next, you need to go to the “Access” tab and enable the “Allow other network users to use this computer’s Internet connection” function there. Also here you need to open the drop-down list and select the Wi-Fi connection that was created earlier by executing the commands. In the screenshot below this connection is called “Local Area Connection 13”, but in your case the name will be different.
This completes the creation of a Wi-Fi access point on Windows 7. Close the window using the “Ok” button and check how Wi-Fi works. To connect to the created access point, use the password you specified earlier.
It should be noted that the “netsh wlan start hostednetwork” command must be executed after each start of Windows 7. In order to stop the access point, use the “netsh wlan stop hostednetwork” command.
Creating a Wi-Fi hotspot on Windows 10
If you have Windows 10, then you are in luck; in this operating system, the process of creating a Wi-Fi access point is greatly simplified. Here you do not need to execute any commands, everything is done in a couple of mouse clicks.
So, in order to create a Wi-Fi hotspot on a Windows 10 computer, you need to open the Settings window. To do this, you can open the Start menu and click on the gear icon. You can also right-click on the “Start” button and select “Options” from the menu that appears.

In the “Settings” window, go immediately to the “Network and Internet” section.

And then we open the “Mobile hotspot” subsection. Here at the very top of the window there will be an available “Mobile hotspot” function. Enable this feature and a Wi-Fi access point will be created automatically.

Just below you can select the connection that will be shared through the Wi-Fi access point, as well as view or change the access point name and password.


 - express delivery service - reviews")


