It happens that a PC owner is faced with excessively noisy operation of the device. In this case, the device was just purchased or recently cleaned, the cooler is lubricated, and there should be no reason for noise. Noisy operation of a laptop or system unit is almost always the fault of the fan. Its speed must be adjusted in such a way that the node can efficiently cope with the work, that is, cool the chipset or video card, but at the same time do this not at its maximum capabilities. However, automatic speed control does not always work correctly, and users adjust the parameters manually, reduce or, conversely, increase the number of revolutions. Find out how to do this in the article below.
Fan rotation speed is not a random indicator. He installed by motherboard, which receives information from the BIOS. Accordingly, the BIOS has settings that regulate the speed based on the temperature indicators of a particular node. This should be so, but, as practice shows, intelligent adjustment is not effective, and often the blades rotate, if not at maximum, then close to it.
In this regard, it occurs to users to reduce the rotation speed of the processor cooler manually. This can be done in the BIOS, through third-party utilities, or by cleverly manipulating the fan power supply. Obviously, many will not like the last option, and only advanced users can resort to it.
Important! It is worth noting that all methods can not only reduce, but also increase the speed of the cooler if it seems that it copes with cooling ineffectively.
Another reason why you may need to overclock a cooler is to force the processor clock speed to increase. Many gamers decide to overclock the chipset to get more performance, and this invariably causes an increase in TDP (heat dissipation indicator), which means that when overclocking the processor, you need to overclock the cooler.
Ways to overclock a CPU cooler
Adjusting cooler speed is a useful procedure that can reduce operating noise or improve cooling quality. It was mentioned above that this process is carried out by the motherboard along with the BIOS. Therefore, the obvious solution would be to change the BIOS settings to control the cooler.
Adjustment in BIOS
The first stage is Login to Bios. In most situations on a laptop, when booting, you should press the Del button or one of the F buttons. Often during boot, a black screen with white inscriptions flashes, where you can see the desired button in the corner.

Next, it is required enter the Advanced item and take a closer look at what is written. It is worth understanding that different BIOS versions may differ in the names of certain modes, so this text contains common solutions. In addition, the BIOS has several speed control modes. Which one to choose depends on the personal needs of the users.
- CHA Fan Duty Cycle – setting the cooler speed as a percentage (from 60 to 100%).
- Chassis Fan Ratio is a mode that allows you to configure the operation of an additional cooler, provided that the internal temperature of the system unit is not higher than the set one. Auto – speed will be adjusted automatically. 60-90% - manual adjustment, based on the maximum possible.
- Chassis Q/ System FAN (Speed) Control is the same utility that “intelligently” selects the speed of the blades. It has two states – Disabled and Enabled. If the utility is disabled, the rotation is performed at maximum.
- CPUFAN2 Tmax sets the chipset temperature, after reaching which the cooler will accelerate to the maximum level (adjustable from 55 to 70 degrees).
- CpuFan Start Temperature sets the minimum temperature at which the blades rotate at low speed.
- CpuFan Duty Cucle is a direct adjustment that will help increase or decrease rotation speed. The setting is carried out as a percentage of the maximum (60-100%). May also be called ManualFanSpeed.
- CpuFan Control is an intelligent control that can lower or increase the speed of the cooler on the processor depending on the heating level of the latter. There are no settings here; the function can be enabled or disabled.
- CPU Fan Ratio – setting the number of rotations of the blades before the chipset heats up to the set (initially) maximum temperature. Percentage setting – from 20 to 90%. That is, in this case, you can reduce the speed of the cooler if it is very loud, but at the same time the chipset does not heat up.
- Smart FAN Idle Temp – ability to set the lowest speed.
- Smart Fan Target is similar to point 7. Found in motherboards from the MSI brand. Additionally, here you can set the parameter from which processor temperature the BIOS begins to independently adjust the speed.
As the list above shows, there are many settings for fan operation in the BIOS, but practice shows that using them is not very useful, since most often they do not work correctly. In addition, to change the settings, you will have to enter the BIOS each time and change something, then start the device and check the effectiveness of the changes. It’s much easier to install special software and adjust the speed without unnecessary complications and immediately see the result.
Another point that makes it impractical to configure via BIOS is that the fan is not always connected to the motherboard. Some not-so-successful assemblies are made in such a way that there is no connection between the board and the cooler, which means that it will definitely not be possible to regulate its operation in the BIOS. In this case, special programs will come to the rescue, and the most popular of them is SpeedFan, which is described below.
Important! To set up a computer cooler for accurate operation using third-party utilities, it is recommended to disable automatic adjustment in the BIOS, otherwise it will interfere with the operation of special software.
Setting the speed in SpeedFan
It is much more convenient to regulate the speed of the processor cooler in special programs. If you study the forums, most often experienced users mention SpeedFan. The software is free, takes up minimal space, but works very effectively. The only drawback of the program is it is not Russified, however, this should not be a serious problem since the interface is intuitive.

After installing the program, the user will see a small window with several tabs. In order to change the rotation speed of the cooler, you do not need to go anywhere. All the necessary information is contained in the first window, which is called Readings.
The CPU Usage line shows the load on the chipset and cores. Next to it is the inscription Automatic fan speed with the ability to check a box - this will activate the automatic adjustment mode, but it is not interesting, since there was no point in installing the software in this case.
It's important to understand that Fan 1 does not necessarily correspond to the CPU fan.. It all depends on which socket it is connected to. This could be a fan on the power supply or video card. You can only understand what belongs to what empirically: By adjusting the speed, see which node’s temperature is changing. You can do this visually by removing the cover of the system unit and monitoring which cooler accelerates as the speed increases.
Having calculated the correspondence between the inscriptions and the fans, we look at the second block with the inscriptions Temp 1-5. The current temperature of the node that corresponds to the cooler is displayed here.

Next, we lower our eyes and see the inscriptions Pwm 1-6 (the inscriptions may change in different versions of the program, for example on Speed 01-06) with up and down arrows. It is very simple to understand how to lower and increase the speed - just click on the desired arrow and select the appropriate values. There is no need to save the result or reload anything. The utility immediately changes momentum, and this is its beauty - you can understand how the indicators change directly at the time of setup.
Important! It is not recommended to set the minimum and maximum cooler speeds - in the first case something may burn out, in the second it will be too loud.
Adjusting the video card fan
Experienced users and especially gamers sooner or later come to the decision to adjust not only the rotation speed on the processor, but also want to fine-tune the operation of the video card cooler.
Nvidia setup
One of the best utilities for tuning the cooler on an Nvidia video card is the RivaTuner application. A lot of new programs have grown out of it, but experienced users agree that none has been able to surpass the pioneer in the field in terms of convenience and efficiency.
Installation of RivaTuner proceeds traditionally without any special nuances, except for the appearance of a window with two inscriptions:
- processor memory protection... (uncheck the box).
- protection of those allocated for... (check the box).

At the very end, another window will appear in which the software will say that unknown driver found. Here we mark “ignore” and continue the installation. Next, the adjustment algorithm looks like this.

Question from a user
Good afternoon.
After playing one computer game for 40-50 minutes (note: the name has been cut out), the processor temperature rises to 70-80 degrees (Celsius). I changed the thermal paste, cleaned it from dust - the result was the same.
So I’m thinking, is it possible to increase the rotation speed of the cooler on the processor to the maximum (otherwise, in my opinion, it rotates poorly)? Temperature without processor load - 40°C. By the way, is this possible due to the heat? Otherwise, it’s about 33-36°C outside our window...
Arthur, Saransk
Good day!
Of course, the temperature of the components and the load on the cooling system greatly depend on the temperature of the room in which the computer is located (therefore, overheating is most often encountered in the hot summer months). The fact that your temperature reaches 80 degrees is not normal (although some laptop manufacturers allow such heating).
Of course, you can try setting the cooler rotation settings to maximum (if this is not already the case), but I would still recommend taking a set of measures (you can learn about them from the article on measuring and monitoring the temperature of the processor, video card, HDD -).
By the way, the other side of the coin also often arises: coolers spin at maximum and create a lot of noise (while the user does not load the computer with anything at all, and they could spin much slower and quieter).
Below I will look at how you can adjust their rotation speed and what to pay attention to. So...
Increasing/decreasing the rotation speed of coolers
In general, on a modern computer (laptop), the rotation speed of the coolers is set by the motherboard, based on data from temperature sensors (i.e., the higher it is, the faster the coolers begin to rotate) and loading data. Parameters from which the mat is based. The board can usually be set in the BIOS.
How is the rotation speed of a cooler measured?
It is measured in revolutions per minute. This indicator is designated as rpm(by the way, it measures all mechanical devices, for example, hard drives).
As for the cooler, the optimal rotation speed is usually about 1000-3000 rpm. But this is a very average value, and it is impossible to say exactly which one should be set. This parameter greatly depends on the type of cooler you have, what it is used for, the room temperature, the type of radiator, etc.
Ways to regulate the rotation speed:

SpeedFan
A free multifunctional utility that allows you to control the temperature of computer components, as well as monitor the operation of coolers. By the way, this program “sees” almost all coolers installed in the system (in most cases).
In addition, you can dynamically change the rotation speed of PC fans, depending on the temperature of the components. The program saves all changed values, operation statistics, etc., into a separate log file. Based on them, you can see graphs of temperature changes and fan speeds.
SpeedFan works in all popular Windows 7, 8, 10 (32|64 bits), supports Russian language (to select it, click the "Configure" button, then the "Options" tab, see the screenshot below).

Main window and appearance of the SpeedFan program
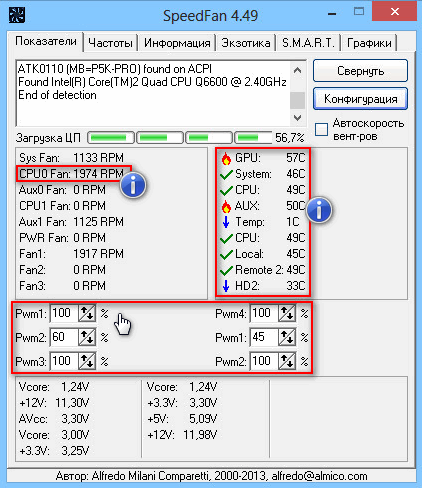
After installing and launching the SpeedFan utility, the Readings tab should appear in front of you (this is the main window of the program - see the screenshot below). In my screenshot, I conditionally divided the window into several areas to comment and show what is responsible for what.

- Block 1 - the "CPU Usage" field indicates the load on the processor and its cores. Nearby are also the “Minimize” and “Configure” buttons, designed to minimize the program and configure it (respectively). There is also a checkbox in this field “Automatic fan speed” - its purpose is to automatically regulate the temperature (I’ll talk about this below);
- Block 2 - here is a list of detected cooler rotation speed sensors. Please note that they all have different names (SysFan, CPU Fan, etc.) and opposite each has its own meaning rpm (i.e. rotation speed per minute). Some sensors show rpm at zeros - these are “junk” values (you can ignore them *). By the way, the names contain abbreviations that some may not understand (I’ll decipher them just in case): CPU0 Fan - fan on the processor (i.e. a sensor from a cooler plugged into the CPU_Fan connector on the motherboard); Aux Fun, PWR Fun, etc. - the rpm of the fans connected to these connectors on the motherboard is similarly shown. board;
- Block 3 - the temperature of the components is shown here: GPU - video card, CPU - processor, HDD - hard drive. By the way, there are also “garbage” values here that you shouldn’t pay attention to (Temp 1, 2, etc.). By the way, it’s convenient to take the temperature using AIDA64 (and other special utilities), about them here:
- Block 4 - but this block allows you to reduce/increase the rotation speed of coolers (set as a percentage. By changing the percentages in the columns Speed01, Speed02- you need to look at which cooler has changed speed (i.e. what is responsible for what).
Important! The list of some indicators in SpeedFan will not always coincide with the cooler it is signed with. The thing is that some computer assemblers connect (for one reason or another), for example, a processor cooler not into the CPU Fan socket. Therefore, I recommend gradually changing the values in the program and looking at changes in the rotation speed and temperature of the components (even better, open the roof of the system side and visually see how the fan rotation speed changes).
Setting the fan speed in SpeedFan
Option 1
- As an example, it will try to adjust the rotation speed of the processor fan. To do this, you need to pay attention to the column "CPU 0 Fan" - this is where the rpm indicator should be displayed;
- Next, change the values in the columns “Pwm1”, “Pwm2”, etc., one by one. When the value has been changed, wait a while and see if show has changed rpm, And temperature (see screenshot below);
- When you find the right one Pwm- adjust the cooler rotation speed to the optimal number of revolutions (about the processor temperature I , I also recommend for review) .
Option 2
If you want the smart operating mode to be enabled (i.e. so that the program dynamically changes the rotation speed, depending on the processor temperature ), then you need to do the following (see screenshot below):
- open program configuration (note: "Configure" button) , then open the "Speeds" tab;
- then select the line that is responsible for the cooler you need (you must first find it experimentally, as recommended in option 1, see just above in the article) ;
- now in the “Minimum” and “Maximum” columns, set the desired percentage values and check the “Auto-change” box;
- In the main program window, check the box next to "Auto fan speed". Actually, this is how the rotation speed of coolers is regulated.

Addition! It is also advisable to go to the “Temperatures” tab and find the processor temperature sensor. In its settings, set the desired temperature that the program will maintain and the alarm temperature. If the processor heats up to this alarming temperature, then SpeedFan will start spinning up the cooler at full power (up to 100%)!
For those who do not have SpeedFan
Setting up automatic adjustment of cooler rotation in the BIOS
The SpeedFan utility does not always work correctly. The fact is that the BIOS has special functions responsible for automatically adjusting the rotation speed of coolers. They can be called differently in each BIOS version, for example, Q-Fan, Fan Monitor, Fan Optomize, CPU Fan Control etc. And I’ll immediately note that they do not always work correctly, at least SpeedFan allows you to very accurately and subtly adjust the operation of the coolers, so that they perform the task and do not interfere with the user ☺.
To disable these modes (the photo below shows Q-Fan and CPU Smart Fan Control), you need to enter the BIOS and set these functions to Disable. By the way, after this the coolers will operate at maximum power and may become very noisy (this will happen until you adjust their operation in SpeedFan).
Hotkeys to enter the BIOS menu, Boot Menu, restore from a hidden partition -

That's all for today, good luck to everyone and optimal fan operation...
By default, the cooler operates at approximately 70-80% of the capacity that is included in it by the manufacturer. However, if the processor is subject to frequent loads and/or has been previously overclocked, it is recommended to increase the rotation speed of the blades to 100% of the possible power.
Overclocking the cooler blades does not harm the system. The only side effects are increased power consumption of the computer/laptop and increased noise. Modern computers are able to independently regulate cooler power, depending on the current processor temperature.
There are only two ways that will allow you to increase the cooler power to 100% of the declared one:
- Perform overclocking via BIOS. Suitable only for users who have a rough idea of how to work in this environment, because any error can greatly affect the further performance of the system;
- Using third party programs. In this case, you need to use only software that you trust. This method is much easier than understanding the BIOS yourself.
You can also buy a modern cooler that can independently regulate its power, depending on the temperature of the CPU. However, not all motherboards support such cooling systems.
Method 1: AMD OverDrive
This software is only suitable for coolers that work in conjunction with an AMD processor. AMD OverDrive is free and great for speeding up various AMD components.
Instructions for accelerating the blades using this solution are as follows:

Method 2: SpeedFan
Method 3: BIOS

It is advisable to increase the cooler speed only if there is a real need for it, because If this component operates at maximum power, its service life may be slightly reduced.
By default, laptop coolers operate in automatic mode. But cases may arise when you have to intervene in the process and regulate the speed of their rotation. For example, the cooler began to spin too quickly for no apparent reason, or, conversely, when there was obvious overheating, the cooling efficiency dropped.
Increased noise may indicate wear and tear on the plastic parts from which the fan is made. If the sound changes gradually, increasing over time, most likely the cooler will have to be replaced.
Sometimes removing dust with a vacuum cleaner helps. The nozzle that sucks up dust should be brought to the ventilation holes of the laptop; if the dust has not yet had time to “fix” itself in the case and there is not very much of it, then there is a chance that the debris will be transferred inside the dust collector.
Important! In other cases, you will have to open the case. This is best done in service workshops. If the laptop is not under warranty, then you can open the case yourself, but at your own peril and risk.
In cases where there is no dust, but for some reason the speed still needs to be increased, you will have to use software methods.
Most laptops have the ability to make various settings in the BIOS Setup program. To enter the BIOS initial setup program, you should:

Important! In BIOS Setup, you can set a password, without which an unauthorized person will not be able to make changes to the settings.
Video - Setting the cooler speed in the BIOS
Changing cooler speed using programs
Speedfan
A small program for Windows, distributed free of charge. Needed to monitor the temperature of the internal components of the PC and the speed settings of the coolers (if there are several of them).
The latest version of the program is Speedfan 4.52. Compared to previous versions, device support has been improved, bugs have been fixed, and the list of supported systems has been expanded.
- Download the program from a reliable site by following the link: http://www.almico.com/sfdownload.php.

- Click on the program name in the text.

- Left click on the downloaded file.

- We accept the terms by clicking on the “I Agree” item.

- In the open window, click on the “Next” option.

- You can leave the path for storing the file or change it by clicking on the “Browse” button, then click on the “Install” button.

- After completion, click on the “Close” button.

- Right-click on the Speedfan shortcut and run as administrator.

How to install Russian language

Setting up the cooler using the Speedfan program
The program itself works simply:

Important! Fans should not be turned off completely as this may cause overheating and damage to processors or other hardware components.
Video - Review of the Speedfan program for beginners
Amd Overdrive and Rivatuner
AMD has developed a program for its devices with which you can not only overclock the processor, but also monitor the temperature conditions of the boards. The Amd Overdrive utility allows, in particular, to control the speed of system fans.

On the “Video” tab, you can change the fan speed of the integrated video card using the slider, but to activate manual mode, you should check the “Enable manual fan control” box, after which you will be able to set a value other than the automatic parameter (20%).

Riva Tuner– a more universal utility that allows you to manage AMD and NVidia devices, created by Russian-speaking programmers.

Allows you to control the video card cooler by setting its rotation speed to a constant speed, or by setting it as a percentage, depending on the system load.

In addition, it is possible to create fan operation profiles that will be connected by the user based on specific situations.

In what cases can you not increase the cooler speed?
Many BIOS versions will not allow you to manually change the fan speed settings. For clarification, you should read the documentation of your PC (laptop).
If in the BIOS Setup settings the “Speed Fan” item is set to “Auto”, you need to try changing it to “Manual”, that is, manual, then press “F10” and save the settings.

It happens that some laptops offer different options for setting up coolers:

You should be very careful about cooling your laptop, since several devices can fail at once, which will make repairs pointless, due to its high cost, and as a result you will have to purchase a new computer.
Mechanical cleaning
If the PC still overheats and nothing helps, you will have to remove the bottom cover of the laptop and remove the dust manually.

Attention! If the laptop is not yet out of warranty, then any internal tampering will result in loss of warranty.
To open it you will need small screwdrivers, usually Phillips.

Important! Before disassembling, you need to remove the media (CD or DVD) from the drive, turn off the laptop and remove the battery.

Video - How to easily increase the speed of the cooler on a laptop
Hello! You, of course, have noticed that the coolers in your computer or laptop do not always rotate at the same speed. When more system resources are used and, accordingly, the heat dissipation of your computer or laptop is higher, the fan speed increases automatically. But sometimes it is necessary to force the fans to spin faster. Today we will touch on the topic, how to increase the rotation speed of the cooler on a laptop or on the computer.
How to increase the rotation speed of the cooler through the BIOS
Almost always, having minimal knowledge of how the BIOS works, In the BIOS you can increase the rotation speed of the cooler(both on a computer and a laptop). What do I need to do?
- Enter BIOS. If you don’t know, then to do this you need to reboot the system and press the “ DEL" or " F2" Try this and that, if it doesn’t work, read the instructions for your motherboard. It says there as in your case.
- Next you need to go to the section called POWER. Please note, however, that you will have to navigate through the BIOS using the ↓→← buttons, and not with the mouse, as you are used to. In the POWER section you need to look through everything and find the item that says FAN. It may be called differently in different BIOSes, but the keyword is always the same – FAN (fan control, Q-fan function, fan speed, etc.). Select this item and change it to Enable mode.
- Next you will need to select the cooler rotation speed. Again, the maximum speed can be called differently everywhere. Turn on your intuition in understanding the English language =)). Possible options: Turbo, Performance, Fast, etc.
- Now all that remains is to exit the BIOS (Esc) and save the changed settings when exiting.
Program for adjusting cooler speed - SpeedFan
Yes, yes, everything can be solved much easier, because there is a special program for adjusting cooler speed. More precisely, there are many such programs. But we will only look at one as an example - SpeedFan(download from the developer's website).
To enable the Russian language, go to “Configure” → “Options” → “Language” and select “Russian” there. But we advise you to work with the program in English so as not to run into “difficulties in translation.”
To change / increase the speed of the cooler, you need to go to Configure, select the “Speed” tab and select the fan you want to control.
Its speed is measured in percentage. 0% fan is stopped, 100% fan is spinning as fast as it can. You set percentages in two modes. When the computer is running in quiet mode and when the computer is overloaded. It is clear that you need to set it to overload 100% intensity of your fans, but in quiet mode you can set it at your discretion.

SpeedFan - a program for adjusting the speed of coolers
What else will be useful to know about fan speed?
The higher cooler rotation speed, which, of course, increases the wear and tear of the device and its noise. More on fan rotation speed depends on the power consumption of your computer. In any case, it's better to sacrifice the fan than other more expensive components, so don't skimp on the fans, because the computer loves the breeze and coolness.


 Getting VKontakte subscribers without registration")
