If you sign in to Windows 10 with a Microsoft account with an Outlook.com, Live, Hotmail, or MSN address, it's added to the Mail and Calendar apps. You can also add many other email accounts to them to send and receive messages, create and manage events.
Notes:
Add a new email account
Adding an account using advanced setup
There are two ways to access advanced setup options for your email account:
Enter the following information in the window Advanced setup:
Your email service provider will be able to provide you with the parameters you need to enter for advanced setup. But keep in mind that the required settings for popular email service providers are provided in our article Links to POP or IMAP Server Names.
When all the required information has been entered, click the buttons To come in > Ready.
Troubleshooting
If you're having trouble setting up your account, try the following:
Special instructions for other accounts
If you have two-factor authentication enabled for your iCloud account, you'll need to create an app password to add it to the Mail app.
Follow the instructions on the screen.
We've added OAuth support for Yahoo! in Windows 10 Creators Update. To install the Creators Update, go to the software download site and click Update. For more information, see the Windows 10 Creators Update article.
Additional steps you can take if Yahoo! Can't sync account with Mail for Windows 10. Can't sync Yahoo! with mail for Windows 10.
If you have a Japanese company Yahoo! Email account, you need to follow the steps below.
To synchronize your QQ mailbox with the Mail and Calendar applications, you must enable IMAP support in QQ.
Login to your QQ account.
Select Options _gt_ Account _gt_ POP3/IMAP/SMTP/Exchange/CardDAV/CalDAV _gt_ find IMAP/SMTP service _gt_ Open.
You may need to send a text message to enable this service. After pressing the button Open In step 2, a dialog box may appear asking you to use your phone to send a message to the displayed phone number.
After sending the QQ text message, a new dialog box will open with an authorization code. Copy the authorization code as needed to add your QQ mail account in the Mail and Calendar applications.
In the Mail and Calendar applications, delete your QQ account and add it again using the authorization code.
Your QQ account should now sync automatically.
GMX.de or WEB.de
When you try to connect your GMX.de or WEB.de account to the Mail and Calendar applications, you will receive an email in your GMX.de or WEB.de mailbox with instructions on how to grant access.
In a web browser, log in to your GMX.de or WEB.de account.
Find the email with instructions for connecting your account to the Mail and Calendar apps and follow them.
Your account should then automatically sync with the Mail and Calendar apps.
Still have questions?
![]()
The Mail app in Windows 10 is one of the best email clients for the Windows operating system. The application, which first appeared in Windows 8, has undergone quite a few changes.
Mail app in Windows 10
The Mail application is very convenient, but many users experience a number of issues when using the application. If you have problems with an application in Windows 10 and are unable to figure out the problem, you can solve the problem by reinstalling the application itself.
Reinstalling the Mail application is quite easy. By using PowerShell either or using third-party utilities. Once the app is uninstalled, a fresh copy of the Mail app can be installed from the official Windows 10 store.
Reinstalling the mail application
In this guide, we will see how to reinstall the Mail app on Windows 10.
- ATTENTION 1: Reinstalling the Mail app can remove any saved emails and credentials in the app itself. You will need to re-add your email account.
- ATTENTION 2: Uninstalling the Mail app will uninstall the Calendar app. Likewise, when you install the Mail app, the Calendar app will also be installed.
The Mail app cannot be uninstalled using Settings from Control Panel. We must use PowerShell or third party tools to remove it. In this example we will use PowerShell.
Step 1: Run PowerShell as an administrator. To do this, right-click on the Start menu and select Windows PowerShell (Administrator).
Step 2: In PowerShell running as administrator, type the following command and press Enter.
Get-AppxPackage -AllUsersThis is a list of all the applications installed on your Windows 10 computer.

Step 3: Scroll down the list and find the entry named microsoft.windowscommunicationapps (see picture below). Copy from line PackageFullName contents as shown in the picture.

Step 4: Finally, run this command to uninstall the Mail app.
Remove-AppxPackage XXXXXXXWhere instead XXXXXXX, paste the line you copied into Step 3.
Press the Enter key to execute the command. The application will be deleted within a few seconds.

The entire Mail application has been completely removed.
Step 5: After you uninstall the Mail application, you must restart your computer.
Installing the Mail and Calendar application
Step 6: Launch the Store on Windows 10.
Step 7: Once the store is launched, type Mail in the search field and select Mail & Calendar to open the page.

Step 8: Click the button Install to install the Mail application. That's all!

Once the app is installed, add your email account to the app. This can help you with a number of problems.
Microsoft Outlook (not to be confused with Outlook Express) is an email program from the developer of Windows 10 and its predecessors. In addition to the actual functions of an email client, the application also has additional tools:
- can be used as a full-featured organizer;
- provides calendar functionality;
- can work as a task scheduler;
- copes with the basic tasks of a notebook;
- replaces the address book.
In addition, Outlook for Windows 10 provides the ability to track the processing of office documents to automatically create a diary to improve work efficiency.
Today we will learn how to configure the Outlook mail part to work with incoming and outgoing mail in Windows 10 more efficiently than through the browser, especially when it comes to multiple email accounts.
Let's start configuring
Setting up Outlook in Windows 10 begins with checking the activity of the network connection. Move the cursor to the tray and click on the network icon.
We check that the Internet connection status in Windows 10 is “Connected”.
The first thing after downloading is that the email client will ask you to create a new account. You should skip this step and move on to the third iteration.
Call the first item of the main menu and select the “Add account” command.
After this, a form will appear that must be filled out correctly.
In the appropriate fields, enter the data required from us: your own name, under which other users will see you, the type address specified during mailbox registration, and enter the password twice, protecting the mailbox from unauthorized access.
If for some reason the connection is not established after checking the entered data and making several attempts to establish it, manually configure Outlook.
See also: After installing Windows 10, the video card does not work
We use the POP3 protocol
- Regardless of the protocol, the setup begins by indicating to the program for Windows 10 that all parameters will be entered manually by the user by selecting the last option in the add a new user window.
- Move the checkbox to the second position, selecting the POP/IMAP protocols.
- In the “Internet Mail Settings” window that opens, fill in the following fields:
- Username;
- mailing address;
- select account type as POP3;
- account password;
- by the incoming mail server we indicate the one received from the certificate located on the site where the mailbox was registered (for Rambler this is pop.rambler.ru, and for Yandex - pop.yandex.ru);
- We also find out the incoming mail server on the mail server website (for example, for Rambler it is rambler.ru).
- Then set “Other parameters” by clicking on the button of the same name.
- In the “Outgoing Mail Server” tab, check the box that activates the need for authentication by the SMPT server.
- In the last tab “Advanced” we specify the following values:
- to use a secure connection, check “Connection encryption required...”;
- in the “Use the following type of encrypted connection” drop-down list, select SSL;
- activate the option “Save copies of messages on the server” if you want to store duplicate messages on a remote server.
- Close all windows using the “OK”, “Next” and “Finish” buttons.
We use the IMAP protocol
Setting up Outlook in Windows 10 to work with mail operating via the IMAP protocol is almost identical to configuring the program for POP3.
- We indicate the manual configuration method.
- We also set the name, postal address and authorization data.
In the drop-down list, select the “IMAP” option, and find out the incoming/outgoing mail servers from the help located on the page of the tested mail server.
- Go to “Other Settings”.
- Click on the tab where you configure the outgoing message server and activate the “SMTP server requires...” option.
- Let's go to "Advanced".
- If necessary, encrypt correspondence, select SSL in the list of encryption algorithms.
See also: When installing Windows 10, will files be deleted from the system?
- We save all the parameters and wait for the connection to the mail server to be established.
This completes the configuration of Outlook in Windows 10. Leave your questions in the comments.
(Visited 6,085 times, 25 visits today)
windowsprofi.ru
How to set up Mail on Windows 10
In the Windows 10 operating system, you can use both built-in software and third-party services as a mail application. Therefore, we will consider several options for setting up and using mail.
Read also: How to properly set up Google calendar in Windows 10
Standard Windows 10 email client and its configuration
The built-in email client of the Windows 10 Metro interface called “Mail” can be configured as follows.
- Click “Start” and select the “Mail” application from the Metro tiles (it is located next to the “Calendar” application).

- A welcome window will open. Click the “Get Started” button.

- A window will appear asking you to add an account. Click “Add”.

- Select a mail service from the list.

- Let's look at an example of setting up mail on a Google account. Enter your email address and click “Next”.

- Enter your mailbox password and click “Login.”

- To make Gmail mail available for viewing from Metro tiles, in the next window, click on the “Allow” button.

- After this, the application will begin synchronizing with Google mail. You can also configure mail from Mail, Yahoo! Icloud.
If you noticed, there is no Yandex account in the list of quick access to mail. It must be added separately. To do this, perform the following steps:
- Click on the gear, which is responsible for calling up the settings and select the “Accounts” section.

- Click “Add account”. Select “Advanced settings” from the list.

- A new window will open. Select “Internet mail”.

- To connect Yandex in Windows 10, you need to go to your mailbox and set the following parameters in the settings. Login is done through a browser.

- Next, you need to decide on the POP or IMAP mail protocol. The first one works on the principle of unloading and deleting letters. The second one is more secure and letters are not immediately deleted after being uploaded to the mail program. To determine the protocol, enter the query “Yandex.Mail IMAP” into the search bar. Open the first link.

- Copy the mail server addresses.

- Let's return to the mail settings. Enter the name of the mailbox, your own nickname, paste the copied address of the incoming mail server, select the IMAP protocol. Click “Next”.

- In a new window, enter the mailbox address, password and insert the outgoing mail protocol. Click “Finish”.

- Synchronization of letters will begin.
Also, the built-in application from Windows 10 allows you to configure temporary settings for receiving mail. You can specify the period for which mail should be downloaded, set the time for downloading letters, and completely disable synchronization.

How to set up Outlook mail on Windows 10?
The Windows 10 operating system works with the following versions of the Outlook email program:
- Outlook 2013
- Office 365
- Outlook 2010
- Outlook 2007
To configure this program, do the following:
- Click “Start”, “Control Panel”, select “Mail”.

- The settings window will open. Select “Accounts”. In the new window, click “Create”.

- To configure Outlook in Windows 10, click “Yes” in the next window.
- In the details window, click “Add account”.

- Check the “Email Account” box and fill in all the information.

- After the system checks the program, Outlook will be configured using the POP3 protocol.

- If you want to configure via IMAP, select “Manual configuration”.


- We indicate the protocols for incoming and outgoing mail, as in Yandex.

- In the same window, click “Other settings”. Go to the “Outgoing Mail Server” tab. We put a mark on checking the server for authenticity.

- In the “Advanced” tab we check the protocols.

- After that, click “Next” and “Finish”. The service is configured.
SoftikBox.com
Setting up Outlook mail in Windows 10 Mobile
In this manual, we will take a detailed look at the process of setting up and adding email service accounts on smartphones based on Windows 10 Mobile.
How to Set Up Gmail in Outlook
Using this example, let's add a Gmail.com account to the email client. So, launch Outlook and click on “Add account” → “Google”.


As you can see, the mail client allows you to add mailboxes of the popular services Mail.ru, Rambler Mail and Yandex.Mail.


Setting up Gmail on your Windows 10 Mobile device is complete. Now, after launching Outlook, you will see incoming messages that you can delete, forward, mark as spam, etc.
To write and send a letter, you need to click on the plus sign in the lower left corner of the application. The email client has a laconic design, user-friendly interface, works quickly and sends messages.
Setting up Outlook Windows 10 Mobile
To personalize your email app, go to Settings. It contains items, each of which is responsible for certain settings. You can change or add something, or you can leave everything as it is and use mail.


win10m.ru
Mail client for Windows 10: a complete guide to setting up standard functionality
 Today it is difficult to do without email as such. Reputable Internet services and reputable sites require authorization, which in turn implies the use of a valid electronic mailbox. If you, dear readers, have several active email addresses, then it is not difficult to imagine how inconvenient it is to manage all of them. At the same time, the standard email client for Windows 10 was created specifically to simplify the overall process of working with electronic correspondence. To learn how to configure it correctly, read this article.
Instead of an introduction: user difficulties - “I can’t find the Mail application in the OS”
Depending on the version of the OS used, and as you know, there are several, the Windows 10 edition may have one of the traditional email tools: outlook or Mail. Due to the release of a large update package in Windows 10 (version 1607), the standard Mail application has been replaced by the Outlook program.

However, in our practical guide we will touch on both email clients - we will tell and show you, dear reader, how to set up and subsequently manage your email boxes for email.
Working with the Mail application
It doesn’t matter which interface is used on your PC: look for a shortcut in the form of a white envelope on a blue background with the inherent name “Mail”.
- Go to the Start menu - All Programs, or use the Start Screen option and find the above-mentioned mail application shortcut in the tiled interface.

- When you launch the application for the first time, you will be prompted to “Get Started” - click on this button.
- On the second settings screen, you need to step by step enter the credentials that are assigned to each individual email address.

For example, if you want to use Google mail, then you should select the item of the same name from the list that contains the main Internet mail services. The process of filling out the registration form is a standard procedure, the implementation of which consists of simple steps: entering the login and password assigned to you at the time of creating the mailbox.

- Next, you agree to the terms of processing of your data.

- After a few seconds of synchronization, all your email correspondence will be downloaded to your computer.

As you understand, in order for an email client to work with several email services, it is necessary to register the appropriate credentials one by one (step by step).
How to set up Outlook
Simply put, linking multiple email accounts to this email client is as easy as in the case of the application described above (the version for mobile devices can be found here). However, everything will become even easier if you already have a Microsoft account, no - go through the short registration process here.
- So, open the Outlook program.
- Next, activate the “File” tab.
- Select “Add account” in the first checkbox.
- Then we step by step fill out the presented forms indicating a valid email address, as well as the accompanying login password.
If something doesn’t work out for you, you should log into your email account and check the boxes next to the “permit” items. You must also specify the appropriate email routing parameters in your email client. In general, this material will help you (click on the link). Good letters to you, dear friends, and only good news!
chopen.net
Installing and configuring Outlook: home mailbox
Having an email address is a critical condition for normal work with most Internet resources and services. Monitoring incoming correspondence using a browser can be tedious, especially if there are several mailboxes.
To optimize work with emails, special programs have been developed - email correspondence managers. The most common among them is Outlook.

The mentioned manager became so widespread thanks to the components that are part of the Microsoft Office office suite.
It is an effective and easy to use email account manager. Its use significantly improves the convenience of working with emails.
Using Outlook significantly increases the efficiency of working with email correspondence:
- All mailboxes are viewable and editable in one program;
- Dynamic updating allows you not to miss an important email;
- Sorting by priority and other parameters organizes a large volume of incoming messages;
- The ability to send messages using the program client makes correspondence more efficient;
- Backing up received and sent messages eliminates the consequences of force majeure.
And this is only a small part of the useful features of the program. If you need to effectively manage large volumes of email, then installing outlook is inevitable.
Operating system compatibility
Since 1997, many versions of the program have been released. The following table will help you correctly determine the compatibility of the program version and operating system:
| Mail client version | Windows version |
||||||
| 95 | 98 | Me | Xp | Vista | 7 | 8 | |
| Outlook 97 | + | + | + | - | - | - | - |
| Outlook 98 | + | + | + | + | - | - | - |
| Outlook 2000 (9) | - | + | + | + | + | - | - |
| Outlook 2002 (10, XP) | - | - | + | + | + | + | - |
| Office Outlook 2003 | - | - | + | + | + | + | - |
| Office Outlook 2007 | - | - | - | + | + | + | + |
| Office Outlook 2010 | - | - | - | - | + | + | + |
| Office Outlook 2013 | - | - | - | - | - | + | + |
There are also several versions of the program for Mac OS. Versions from 2000 to 2010 in MS Office: mac is replaced by the Entourage program. Outlook was returned to the eleventh version of Office for Mac OS.
The process of adding new accounts in Outlook, like in Microsoft, is not complicated. The first launch of the program after installation will prompt you to proceed with the initial setup.
The Windows 10 email program has a number of settings. Some of them concern the program itself, and some of them concern accounts, that is, email boxes that we connect to the program.
In this post we will look in detail at a few Mail settings.
A lot of things in the program are already optimally configured and in most cases no changes are required.
To go to the program parameters, click on the gear icon in the lower left part of its window.
The first parameter item relates to accounts and can also be called up by clicking on the “Accounts” element in the left column.

Here we can create a new account, that is, add another email box to the program, or change existing entries.

Removing mailboxes from the program is also done here. To do this, go to the mail account we need and find a special item - “Delete account”.

Here we can configure accounts. When connecting a mailbox, the Mail program does not always correctly determine its settings, and therefore it is quite possible that you will have to change something manually. This is done in the “Change mailbox synchronization settings” section, then you need to select “Advanced mailbox settings”.

This is where the protocols and ports are prescribed through which the program will connect to your mail service to receive and send mail. The settings for each mailbox can be individual, and if something goes wrong and the program cannot receive or send mail, then you should contact the help system of the service where you have the mailbox open and look for a section there dedicated to setting up mail programs. There must be such a section and it indicates how incoming and outgoing mail servers should be registered.

The next section of “Options” is called “Personalization”. Here we can customize the appearance of the email program itself by setting its color or background image.

As far as I understand, in the “Quick Actions” section you can assign certain operations in the program to your movements.

Here we are talking about touch screens, where you can move the message with your fingers and, depending on the direction of movement, the operation you specify will be performed. For non-touch screens this section is not of interest.
If your email boxes support auto-reply, you can configure them in the next section - “Auto-reply”. In my case there is no such possibility.
In the “Reading” section, the options for viewing messages are changed and the default settings are quite justified and I do not change anything here. And in the next section you can edit some things. You may have noticed that in new messages there is already a line stating that this message was sent from the Windows 10 mail program. This signature can be changed and this is done right here.

You can create your own signature for each account and it will be automatically added when you create a new letter.
In the Notifications section, you can enable an option that displays the message title in the notification center, which is located in the taskbar. If you wish, you can enable a sound message when you receive new mail.

The next section enables grouping of messages by conversation. This means that if you received a letter, then responded to it and again received a response, then all this correspondence in the program will be grouped into one message chain and you can easily view the chronology of your correspondence.

If your account supports the ability to configure security settings, they are set in the next section. Typically, mailbox settings are made directly on the server, so this section in your case will most likely be empty.

In the help section, you can access information about the program, as well as enable or disable the module that diagnoses it.

This module will send the information it collects to Microsoft to improve the program and fix any problems it finds. If you do not want to send data, then disable the module.
In the next section, you can also turn off access to Microsoft online services.

I don’t really understand what the office has to do with it, especially since it may not be on your computer. Previously, a similar setting in the office suite allowed office programs to connect to web services and sites provided by Microsoft, such as Bing Maps, Bing Weather, and so on. I suspect that the situation is the same now, but the purpose of this setting is still not clear, so I think that it can be disabled.
Well, this is where we can finish with the settings and the review of the Mail program.
pc-azbuka.ru
Setting up a mailbox in Windows 10
To set up mail in Windows 10, open the Start menu and select the Mail program. You can find it by the envelope icon or by entering “mail” in the search bar.

The Mail program window will open.
Click the gear icon in the lower left corner. In the settings menu that opens, select Accounts.
Then click on Add account. In the window that opens, select “Advanced settings”.
In the window that opens, select “Internet mail”.
Enter mail settings and enter the following parameters:
- Account name - your mailbox, for example
- Your name is the name that the recipient will see, for example Ivan Ivanov
- Incoming mail server - mx.mesto.biz
- Account type - IMAP4
- Username - your mailbox, for example
- Password - password for your email
- Outgoing mail server - smtp.mesto.biz
Also check all the boxes next to the items, as shown in the image below.
In the window that opens, click “Done”.
Ready! Now your mailbox is in the list, click on it and to receive mail from the server, click on the update icon on the panel (marked with a red frame in the image).
The setup is complete and the mailbox is ready to use.
www.profintel.ru
How to set up Yandex Mail on Windows 10
Hi all! I want to tell you about a very convenient function that the new version of Microsoft's OS offers. This software will be especially useful for business people and users whose lives are closely connected with e-mail correspondence. Yandex Mail is an application for Windows 10 that allows you to connect an arbitrary number of mailboxes from different providers (not only Yandex). I am sure this article will be useful to most of my readers.

Initially, the “ten” has a built-in “Mail” program, which contains many settings and allows you to display information about new letters in the notification area. But in November 2015, an agreement was signed between Yandex and Microsoft corporations, according to which a special version of Windows was developed for residents of the CIS countries - with built-in Yandex search. In addition, the standard email client has been transformed into Yandex mail.
This application is simple in settings (as you will see when reading this article) and is perfectly suited for touch screens.
Adding an account
Immediately after launching the application, a welcome window will appear in front of you, which entices you with the phrase: “This will make your work easier.” All you need to do at this stage is click the “Start” button:

Let me note right away that if you use several mailboxes, then there is no need to visit different sites to check incoming messages. It is enough to add several accounts to this application:

The choice of services may not seem that big. Available: Outlook.com, Yahoo, Exchange, Gmail.
But where is the promised Yandex? - you ask.
It is worth paying attention to the very bottom item in the list – “Other account”:

By selecting this item, you will only need to indicate your e-mail and password. The system will independently determine the settings of the service provider and create a box. But, as always, there is one small “but”. Automatic tuning does not always work normally. As a result, the application may not synchronize with the server.
Therefore, I advise you to select “Advanced settings”:

A window will open with two choices. We are interested in the second one - “Internet mail”. Click on it and proceed to entering parameters:

But first you need to go to the settings of your existing Yandex mail account and indicate there that you allow third-party clients to access the “box”. Here's an example:

Now we return to the application and enter our data:
- The account name can be anything (at your discretion, it does not affect performance).
- The username will be displayed when sending messages.
- We indicate the server address as in the screenshot (for Yandex mail).
- Select the IMAP4 protocol.

The rest of the form is completed as follows:
- Specify the e-mail and password for it;
- Outgoing server (as in the screenshot below);
- We leave the checkboxes unchanged (this is an important point, be careful!)

When all the data has been entered, all you have to do is click on “Login” to establish the connection.

Everything turned out to be extremely simple, wouldn’t you agree? If you have any questions, you can leave a comment on this article, and I will definitely answer.
Now let’s look at the opposite situation of adding an account. For example, you stopped using this or that “box” and want to remove it from the application. How to do it? Now you'll find out.
If for some reason it didn’t work, then Elena suggested this option in the comments. Let's try it.
In the settings you need to specify in full: incoming - imap.yandex.ru:993; outgoing - smtp.yandex.ru:465.
Deleting an account
As they say, “breaking is not building.” You can remove an unnecessary account as follows. Go to the Mail application settings by clicking on the gear icon. Then, on the right side of the window, click on the topmost item (as in the screenshot):

A list of all accounts will open. Select the one we want to delete and click on the button with the corresponding name:

I am sure that you have never seen such simple instructions for setting up the standard Mail application. I note that before this option appeared, I used third-party software from Mozilla Corporation - Thunderbird. Now I am completely satisfied with the built-in tools of Windows 10. Or maybe you know more interesting ways to combine several boxes in one place?
Sincerely, Victor
it-tehnik.ru
How to Add and Set Up Email Accounts on Windows 10
With the default Mail app in Windows 10, you have the ability to consolidate all your mailboxes in one place. And you no longer have to open various sites to view your mail, just open the Mail application and everything will be there :)
Adding and setting up accounts
The Mail application supports all popular email services: Outlook, Exchange, Gmail, Yahoo! Mail, iCloud and other accounts that support IMAP or POP.
Go to "Start" => "All applications" => Mail

If you are logged into the system under a Microsoft account, your Outlook account will be pulled up in the Mail application; if you are logged into the computer under a local account, click “Start”. Go to "Settings" (gear at the bottom of the screen) and click "Accounts"

A list with all your email accounts will open in front of you; to add a new account, click “Add account”

In the window that appears, you will be prompted to “Select an account”, select from the proposed options Outlook, Exchange, Gmail, Yahoo! Mail, ICloud or add an account for any other mail service using POP or IMAP => in the next window, enter the username and password for your account and click “Login”

After these steps, you will receive mail from all linked accounts, they are shown in the panel on the left side

Customizing the appearance of the Mail application
If you go to "Settings" and select "Personalization" you can: change the background color of the application; make the background darker or lighter; replace the background picture from the existing ones, or by clicking on “View” select a picture for the background on your computer
Mail reading settings
If you go to "Options" and select "Reading" you can:
Automatically open the next item (enable or disable this function), if the function is enabled, then when you delete a letter, the next letter will automatically open in front of you, if the function is disabled, when you delete a letter you will see the background image of the application;
You can also choose when to mark mail as read:
- When selecting another message;
- Do not automatically mark the item as read (if the option is selected, you need to manually mark read messages);
- When viewing in the reading area (a letter is marked as read if you read it for a certain number of seconds, you can set how many seconds below).

Configure settings for each account
If you go to "Options" and select another "Options" from the list, you can configure each account individually. First, at the very top, you select the account whose settings you want to change, and then select what you want to change:
- Quick actions (perform frequent actions with simple movements), if the parameter is enabled, then you can configure what to do during certain finger movements: check or uncheck the box; mark as read or unread; delete; move;


- Signature - the text entered in this field will be automatically added when sent to each letter from this account;
- Presentation options (the feature is enabled by default, but can be disabled) - automatically groups messages into dialogs;

- Notifications - you can configure how you are notified of incoming messages for each account. By default, this feature is enabled, you can choose what kind of notification you want to receive: show notification title; sound a beep;
- External content - automatically downloads images sent in messages, if this function is disabled - then when reading a message you will be prompted to download the image manually (if the message contained images in attachments);

You can also pin any account or folder to the Start menu by right-clicking on it and selecting Pin to Start.
Configure synchronization settings
You can configure synchronization settings for each account; to do this, go to “Settings” => Accounts => select the account whose synchronization you want to change => change mailbox synchronization settings

You can choose when to download new messages:
- based on usage level - automatically changes the frequency of downloads depending on how many emails you receive and how often you log into your account;
- every 15, 30 minutes, hour, 2 hours - you choose how often to synchronize;
- manually - synchronization takes place only manually.
If you have limited Internet traffic, you can uncheck the “Always download full messages and pictures from the Internet”, after which truncated messages will arrive and you will, if necessary, download the letters you need in full.
You can also choose how long to download and store letters: last 7 days; last 2 weeks; last month; last 3 months; any time.

It seems like I never forgot, but the Mail application is still in development and they promise to add other functions in the future. Don't forget that you can synchronize your contacts and calendar from these accounts. If you have any additions, write comments! Good luck to you :)
Microsoft Outlook is included in the Microsoft Office suite of office tools and is available with an Office 365 subscription (from RUB 339.00 per month), but can be purchased as a standalone Office 2019 application (RUB 6,699).
To work with the program, it is not necessary to use an address on the Outlook.com domain - Microsoft Outlook supports almost all email services. The user can add all his accounts to the application and conveniently manage them from one workspace. Outlook has calendar and task scheduling integration and offers a rich set of customizable rules to handle your incoming mail flow. Set sound alerts when a specific person sends you a message containing certain keywords, or automatically move an email to the appropriate folder if it comes from a specific recipient - ideal for separating work and personal flows.
Outlook offers an incredible number of different tools that can be confusing for first-time users. Fortunately, the product has received an updated interface in recent years, which has made it possible to organize various functions very conveniently. As you become more familiar with the program, you can also begin using the Visual Basic for Applications (VBA) development environment, which allows you to create macros for your application. There are a large number of ready-made scripts available on the Internet that are designed to automate the workflow.
Mailbird

This application received the very apt name Mailbird, which perfectly characterizes it - the program is lightweight, undemanding of resources, easy to use and visually attractive. Mailbird provides flexible configuration of a huge number of interface parameters - from account icons to text color scheme. Every time you launch the application, it will please the eye.
The Mailbird developers have done a great job of removing unnecessary intermediate steps when performing various actions, which ultimately leads to increased productivity. Create quick reply templates, add attachments with drag and drop, and search messages with a simple tap on your profile picture.
Received an email from an unknown contact? In two clicks you can view a person’s profile on the LinkedIn social network. Integration with other applications is also supported: Dropbox, Facebook, Google Docs, Twitter and WhatsApp.
Import mailboxes from email services into Mailbird for easy viewing and management. The free version has limited functionality, while the paid version costs 12 euros per year, or 39 euros for a lifetime license.
eM Client
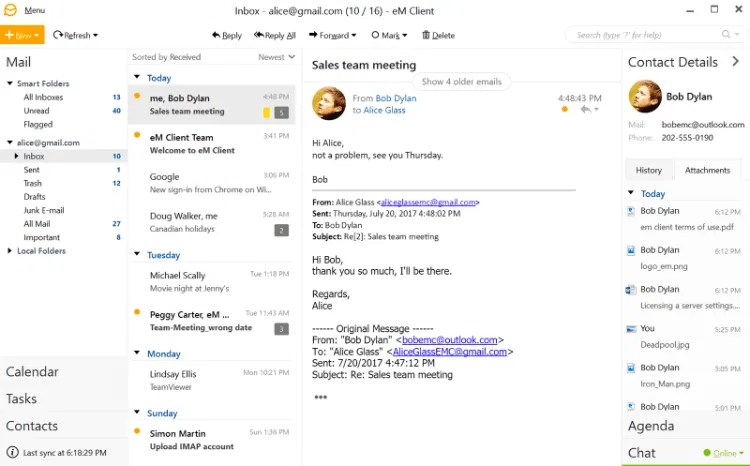
This email client has all the necessary basic functions: calendar, contacts and task manager, as well as live chat between users. The program allows you to import settings and content from many other email clients, so the transition process is easy. Keep in mind that the free version only allows you to import 2 profiles, while the Pro version costs RUB 1,795. has no import restrictions.
As for the built-in tools, eM Client is sure to offer useful features for you: spell checking, translation into other languages using the Bing translator, easy sharing of calendar events and tasks with other users, flexible contact list configuration for better organization when using multiple email profiles. Built-in live chat even allows you to quickly share files.
Claws Mail

Long-time Windows users will likely feel nostalgic when they first see the Claws Mail interface. Admittedly, the application is intended for experienced users who are not afraid to configure everything manually. The application allows you to import an unlimited number of accounts, but you need to do this yourself; there is no automatic import function or even a step-by-step wizard.
Claws Mail has an active issue tracking tool that monitors for app updates and potential issues. This is an ideal application for older computers - it consumes minimal memory and does not load the processor. What you pay for this is the lack of HTML support and advanced app connectivity features. However, Claws Mail does come with several plugins built in, including SpamAssassin, which helps combat spam.
If you don't mind having to manually configure settings and are looking for an undemanding, lightweight solution for an older machine, then the free retro-style client Claws Mail is a good choice.
Zimbra Desktop

Zimbra Desktop is a free and open source email client that has gone through several major changes. Work on the program never stopped and now we have one of the best email applications for Windows 10.
A built-in calendar, contacts, and organizer help you stay productive throughout the day, while a tab-based messaging system keeps your workspace clutter-free.
Want to work offline? No problem! Zimbra allows you to work anywhere, and the results of your work will be saved to your local disk. When connected to the network, you can import Gmail, Yahoo! and Outlook for convenient organization of letters in one place.
Zimbra is a cross-platform solution for Windows, Linux and Mac OS and is distributed free of charge.
TouchMail

TouchMail is a convenient email client for owners of tablets or convertible laptops. Import email accounts other than POP3 accounts and enjoy a touch-optimized interface.
The interface is colorful, which makes TouchMail stand out from other similar applications. The user has a rich set of useful tools at his disposal. The application allows you to organize multiple messages from different accounts into one folder for quick access, and a powerful filtering system can effectively handle large flows of messages.
TouchMail will be especially useful for devices with touch screens. The application is distributed for 1,949 rubles. and also contains several in-app purchases, which looks strange compared to free analogues.
Thunderbird

Mozilla's Thunderbird is unique in that it has a built-in extension system that allows you to extend the client's functionality using numerous tools created by the Thunderbird community. The product offers extensions for almost any task and for any automation scenario.
The client setup wizard will help you import email accounts, and a powerful search engine will allow you to quickly find the necessary information. If you work with huge volumes of emails, then the built-in activity manager that tracks all activity in Thunderbird will be a useful tool. Don't remember which folder you sent the message to? Check the log and find the action you need.
To avoid confusion when writing multiple messages, Thunderbird uses a tab system to display all messages in one window. Naturally, the product contains standard email tools: an address book, an attachment handler, a spam filter and other features that make Thunderbird one of the best email clients for Windows 10.
The Bat!

We think many users will agree with us, The Bat! is also one of the best email clients. It stands out not only for its functionality, but also for its attitude towards the security of data transmitted by email. After all, the main task of the program is to protect correspondence from monitoring by third parties.
Email client The Bat! can protect your information in a variety of ways. In addition to encrypting traffic using SSL/TLS protocols (which most email clients and services can do today), the program allows you to encrypt user data on your hard drive. The price for a license starts from 2,000 rubles.
What email client are you using?Found a typo? Highlight and press Ctrl + Enter


