Unfortunately, Windows 7 does not always work stably, and regularly appear, the system may spontaneously reboot and even force shutdown to prevent damage. In this article we will talk about eliminating system errors on Windows 7.
Description of the problem
As a rule, system errors do not occur without reason. In practice, it looks like a computer or laptop running Windows 7 spontaneously stops working, reboots, or displays a blue screen of death. In any case, it is impossible to work normally in this mode, so the problems must be eliminated. If you recognize your situation from the description, then this article will help you solve the problem. All system problems can be divided into two large categories:
- The OS no longer starts;
- Windows 7 can start after reboot;
Neither the first nor the second situation are good symptoms, but solving the problem, if the OS does start, is a little simpler.
The computer has rebooted but still starts
If a system error manifests itself as a computer reboot, then congratulations, you are in a better position than people who are faced with the situation that Windows 7 does not start. In this case, the problem may lie in the following:
- Outdated drivers;
- Lack of the latest OS update;
- Errors on the hard drive;
- Problems with hardware;
After the next system reboot, run the registry cleaner. It could be, or any other analogue. Fix any registry errors and clear up free space on your hard drive. You can help your HDD and OS performance a little more - defragment it or use special software to check the disk for possible problems.
Go to the update center and check if the latest OS updates are installed. If you have a pirated version of the OS, you still need to take care of OS updates. You may need to worry about activating your system to get the latest updates.
Problems with hardware - video card, processor, etc., can also cause a reboot. These problems are not truly systemic, since the system here acts as a fuse. For example, if your video card overheats, the system reboots to ensure the safety of the card. Here it is necessary to carry out diagnostics, measure the temperature on the main components. And if the system gives you a blue screen, then look at the error code. If you have problems starting the OS, then watch the following video:
Windows 7 keeps crashing
The term “Windows 7 crashes” means that the system constantly reboots itself. The frequency can be anything - from 1-2 times a day, and up to 1 time in 5 minutes. In any case, it is impossible to work and the problem needs to be solved. This behavior of the device clearly indicates that you have a system error or some kind of hardware problem. If you put potential overheating problems aside, you can concentrate on system errors.
In a situation where Windows 7 constantly reboots, try checking the registry for errors first. To do this, use CCleaner. Then defragment the disks, and at the same time check all disks for viruses. If the problem persists, you can restore to a date when the problem did not exist. System Restore helps in most cases. But sometimes drivers or fresh OS updates solve the problem.
Please note that Windows 7 must be kept up to date. If you have not updated the OS for a long time, then the reason why Windows constantly reboots may be due to an outdated version of the system itself.
Windows 7 won't start
The situation when the OS stops starting seems hopeless to some users. How to solve problems if the OS does not start? There are several possible solutions.
After numerous reboots if the OS starts unsuccessfully, the system itself will prompt you to start in safe mode or load the OS with the latest working settings. Try the latest working configuration first.
If the last working configuration did not help you, then try starting in safe mode. If the OS boots in this mode, then all is not lost. Go to the system utility section and restore to the last restore point. Then restart your computer. Alternatively, you can start in safe mode with support for network drivers and perform a remote system scan.
System Restore
You can restore the system without booting it. To do this, when starting the OS, press F8 on the keyboard. A dialog box will open in which you need to select “Repair your computer.”
In the window that opens, select the appropriate recovery options and then follow the onscreen instructions. Depending on the problem, recovery may take up to 1 hour. If you have an installation disk or USB flash drive, you can use them to restore the OS. In any case, follow the system instructions and even a beginner can cope with the recovery.
If the restore does not help, you can return to the “Repair your computer” window and undo all changes. To do this, select the corresponding menu item of the same name.
Reinstalling the OS
The most radical method, but it saves in 100 cases out of 100, if your hardware is not broken, is reinstalling the OS. You can install the OS either from a special installation disk, which you should have made in advance. If there is no such disk, then you can download a clean image of the system and separately drivers from your manufacturer on the Internet. We will discuss the issue with the license, how to transfer and save it, in one of the following articles.
We hope that your Windows 7 computers and laptops will run smoothly and you will never encounter system errors. And if you do, now you know how to fix OS errors.
How to fix Windows 7?


While using Windows 7 OS, sometimes users encounter certain errors. They can appear for various reasons. In this article we will figure out how to fix errors in the Windows 7 operating system.
The most common errors include the following:
- User errors (uninstalled programs, deleted system files, launching games and applications on a PC that do not meet the technical specifications, use of unlicensed software, etc.).
- The influence of viruses. They are capable of modifying or deleting system files, which will cause the OS to not work properly.
- Errors when installing drivers, as well as various updates.
If you decide to figure out how to fix Windows 7, you can use some built-in utilities with which you can effectively restore your computer's functionality.
System Restore
Right-click on the “Computer” shortcut and find “Properties”. In the window that appears, select “System Protection”, “Recovery” and click “Next”. If the available point is suitable, then start the recovery procedure. This method will allow you to “roll back” the system to the moment when there were no failures in its operation.
Recovering system files
If you accidentally deleted an important system file, you can solve the problem and fix Windows 7 errors as follows:
- Open the command line.
- Enter the command “sfc /scannow”.
- Press "Enter".
Once the scan is complete, one of the following messages will appear:
- No problems found (no damaged files).
- Damaged files were detected and restored.
- The operation failed.
In the latter situation, you will have to restore the files manually. To do this, you should contact a service center or use specialized programs.
Cleaning the hard drive
Quite often, errors in the operation of the OS are caused by the fact that a huge number of temporary files are created on the PC, which need to be deleted in a timely manner. They are created by the operating system or software. All this leads to cluttering the hard drive, minimizing free space and slowing down the PC. CCleaner is considered one of the best programs for disk cleaning (you can download it -). It won't be difficult to figure it out. Just run the utility and click the “Cleanup” button.
Using special programs
As a result of installing and uninstalling various programs, as well as performing incorrect operations, the operating system produces errors over time. They are different, so no single utility can become a panacea for all problems. However, the applications described below will help you get rid of common errors.
To solve problems associated with the operation of certain programs, it is recommended to install the Unlocker program. It quite effectively solves the problem with files that cannot be deleted.
To work with the program, just right-click on the file with which you plan to perform certain actions. Then in the explorer window that opens, select “Unlocker”. The program will start, and the user will be able to delete, move and rename files.
If the PC is running too slowly, this indicates that various places where temporary information is stored are full (Windows files, web browser cookies, cache). To solve such problems, the Rising PC Doctor program is suitable. This is a fairly powerful utility that guarantees effective protection against viruses and can eliminate vulnerabilities in the system.
You can learn about registry errors from the article.
The Windows Troubleshooting Wizard is a built-in utility that is responsible for fixing problems with the operating system. Using this program, you can “fix” Windows Update, software errors in USB inputs, Wi-Fi adapter failures, and much more.
Diagnosing problems in Windows 7
The utility, which is responsible for finding and fixing errors in various components of the Windows system, is built into the OS and is launched manually by the user when any bugs are found. There are several ways to access the troubleshooting wizard:
The main window of the Troubleshooting Wizard is a list of categories that, when clicked, launches a debug tool for a specific system element. Collected here:
- tools for diagnosing and configuring programs adapted for another version of Windows OS;
- utilities for setting up and using devices and printers;
- a wizard for troubleshooting sound recording and playback problems;
- Tools for finding and troubleshooting Internet problems;
- design settings;
- utilities for troubleshooting Windows Update problems;
- programs for optimizing energy consumption;
- Tools for troubleshooting performance problems.
The “Computer Troubleshooting” utility is not just some small program for fixing bugs, but a comprehensive system that includes the ability to fix each individual element.
 The main Troubleshooting window includes categories for which you can run debugging
 If you are interested in setting up or debugging a specific element, then especially for such cases, a “View all categories” button has been added to the left side of the main window. It changes the design of the main window of the utility so that its components are not grouped by categories, but are displayed in a list in order. This is more convenient if you know exactly what you want: there is no need to wander through categories, wondering where exactly the required debugger is located.
 The View All Category feature displays all items in the troubleshooting wizard as a list from which you can select the item you want
 Double-clicking an element launches it and opens a program that scans the selected element and notifies the user of any errors found. Before starting diagnostics, in the window that opens, you can check or uncheck the “Automatically apply fixes” checkbox - its presence means that if the program detects problems, it will fix them automatically. If the checkbox is not checked, the utility will ask the user for permission to fix it or will not touch the errors at all.
 Before running diagnostics and treatment, you can allow the program to automatically apply fixes
 After troubleshooting is completed, the utility will provide the user with a report on its work, which will indicate which errors were detected and which were eliminated.
 When the utility analyzes and repairs the element, it will give the user a report on its work
 Examples of using the program
“Troubleshooting Center” is recommended to be used first when problems are detected with a particular system component. The program is not perfect, but it allows you to fix errors in two clicks, which can be difficult to “treat” manually.
Windows Update problems
“Windows Update” is a subsystem that is responsible for downloading, installing and uninstalling updates for the OS.
Failures in Windows Update will cause the system to stop updating, and this will negatively affect its operation. Most update errors can be fixed using the Troubleshooting Wizard.
To open the troubleshooting wizard to fix Windows Update errors, you need to call the “Troubleshooting problems using Windows Update” option from the wizard’s main menu (how to access it is described above). Now you need to click “Next” and monitor the errors that the program detects.
 To troubleshoot Windows Update, select the appropriate utility from the list in the wizard's main menu
 It also happens that the Windows Update problem is resolved, but the unsuccessful update remains. In this case, you need to roll it back, and this is done in Windows 7 like this:

Video: How to remove Windows 7 update
Sound problems
Incorrect sound or complete absence of sound is a problem that can also be solved with the help of a wizard.
It should be remembered that if the problem is in the hardware itself, then the program will not help in any way. The utility is not always able to solve the problems found, but successful diagnostics in any case gives a hint on how to fix the error.
The utility that you need to call from the wizard is called “Troubleshoot Audio Recording” if you have problems recording audio, or “Troubleshoot Audio Playback” if playback does not work.
 Troubleshoot audio problems and Troubleshoot audio problems can help you solve audio problems.
 USB Troubleshooting
There is no standard pre-installed tool for solving USB problems in Windows. Despite this, Microsoft has released a set of utilities called Fix It (aka Easy Fix), which is something like an advanced version of the standard troubleshooting wizard. Its features include a USB troubleshooting utility.
You can download the USB Troubleshooter from the Microsoft website. The utility is downloaded in .msi or .diagcab format: both are executable files and can be launched by double-clicking with the left mouse button.
- After running the file, allow it to install data on your computer. In some cases, an administrator login and password may be required.
 For Easy Fix to run, you need to give it permission as an administrator
 - In the window that opens, click “Next”. If you want to pre-configure the utility so that it applies fixes independently or, on the contrary, asks permission for certain actions, the already familiar “Automatically apply fixes” checkbox is located under the “Advanced” button.
 Here you can set up automatic application of changes and run a utility to find and fix problems
 - Wait a while while the utility looks for and fixes problems.
 Finding and fixing problems will take some time
 - Check out the report that Easy Fix will provide you with after the job. All errors and problems that the program has fixed will be listed there.
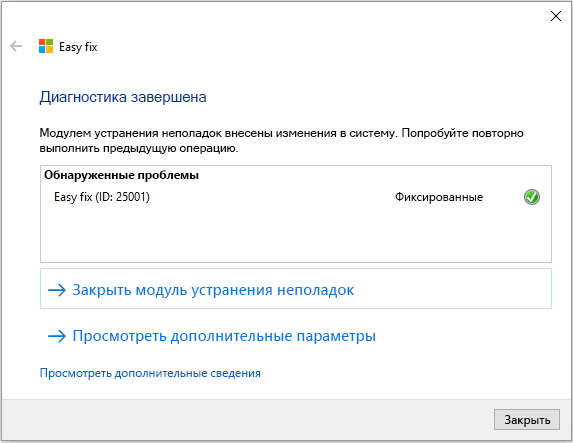 After finishing the work, the utility will provide a report indicating exactly what errors it found and what corrections it made.
Error code 43
Error 43 indicates that Device Manager has stopped the operation of a device due to a problem found in it. Initially, this error indicates a problem with the computer's hardware configuration. In other words, if the mouse gives error 43, it is probably the mouse that is broken, not Windows.
However, in addition to hardware problems, the cause of error 43 can be software failures: most often in drivers. It’s not a fact that Easy Fix will help with them. Most likely, you will have to do it yourself.
- First of all, try restarting your computer. Perhaps this is a single glitch, and after a reboot everything will work.
- If rebooting doesn't help, open Device Manager. To do this, press the Win + X key combination and select “Device Manager” from the menu that appears.
 To enter Device Manager, you need to select the appropriate option in the menu
 - If a device connected via USB generates an error, you should update the USB port drivers. In Device Manager, select the USB Controllers tab and right-click on one of the devices listed there. Select the option "Update hardware configuration" or "Update drivers".
 To update a device driver, right-click on it and select “Update Drivers”
 - When the system asks whether you want to search for drivers on the Internet or specify an existing one, choose based on whether you have a driver file on your system. If there is one, indicate the one you already have and select it, and if not, start a search on the Internet. In some cases, it does not work perfectly, so the best option is, if possible, to find drivers on the Internet yourself.
 To update the driver, you need to either tell the system the path to it, or give it the ability to search for it on its own
 - Repeat the driver update one by one with all USB devices except virtual ones.
- If the above steps do not help, look for a driver for a non-working device on the Internet by its name. The system will not be able to find this driver because it does not recognize the device. The only way out is to search on your own using the information provided on the device or on its packaging.
- When the driver is found, install it (just run it).
- If this does not help, it is recommended to check the system for viruses and also clean the registry using one of the special programs (for example, CCleaner). To do this, go to the “Registry” tab in the main program window and click “Search for problems.”
 CCleaner has a Registry Cleaner tab that allows you to fix erroneous entries in the system registry
If none of the above methods help, most likely the problem is related to the hardware and cannot be fixed using software methods.
Video: how to fix error 43
Troubleshoot startup problems
It is not the wizard that deals with problems when starting the computer, but another utility, but let’s look at that too. If your Windows 7 refuses to boot, this program is an indispensable assistant. However, her help will only work if the problems are software. If the problem is not in Windows, but in the hardware, then the download will not even get to the launch of this utility.

Video: how to fix Windows 7 startup errors
If the troubleshooter doesn't work
The Troubleshooter is a system program, and if it doesn't work, something serious has happened. The failure may be due to update errors, unsuccessful changes to the system (this can be done, for example, by third-party programs), as well as hardware damage to the disk. And if nothing can be done about the latter, except replacing the hard drive, then the rest can be eliminated.
- First, try uninstalling the latest updates. How to do this is described in detail above.
- If uninstalling updates does not help, use Command Prompt. To do this, press Win + R and type cmd in the Run window.
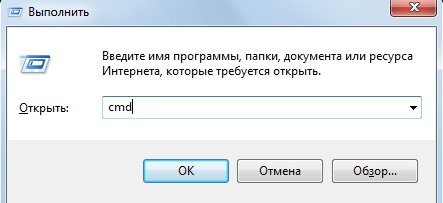 To open Command Prompt, press Win + R and in the Run window type cmd
 - In the Command Prompt, type the following commands:

- Restart your computer.
- If the troubleshooter still doesn't turn on, the problem is more serious. If you have backups (system backups that can be used to roll back the OS), now is the time to use them. To do this, go to “Start” - “Control Panel” - “Recovery” and select the “Run System Restore” option.
 The initial window of the utility prompts the user to select a backup - recommended or another
 - The program itself will offer you the optimal backup copy for recovery. If you do not agree with it, select another backup from the list.
 From this list you can select any backup copy and roll back your Windows to it
 - If you want to see exactly what will change in the system after the backup, click “Search for affected programs.” A window will open where you will see a list of changes.
 The program will show which programs and files will be changed after rolling back to the backup copy
 - In the last window, click “Finish” and wait for the system to be rolled back to the state at the time of the backup. It will take some time.
 To start a system rollback to a backup, click “Finish” and wait a moment
 - If you accidentally select the wrong restore point, the backup can be canceled in the same “Run System Restore” utility. To do this, open it and select the “Cancel system restore” option, and Windows will return to the state it was in before the backup.
 To cancel an unsuccessful system rollback, run the program again and select “Cancel system restore”
Troubleshooting programs
The built-in wizard is, of course, useful, but not ideal. It does not fully cope with cleaning the registry or fixing most bugs. Fortunately for the user, there are many third-party programs that can be used to fix bugs and keep your computer in working order.
FixWin 10
Despite its name, this free program is intended not only for Windows 10, but also for earlier versions of the OS, including Windows 7. The main window of the program has several tabs, and all errors specific to Windows 10 are placed in a separate one. the rest apply to all versions of Windows.
 The main window of FixWin 10 contains information about your system; You can also launch troubleshooting utilities from here
 To start automatic error correction, you need to go to the tab of interest and find the error for which you want to find a fix. Here you can see how to solve this problem manually.
 The FixWin10 tabs look like this: a description of the error and a “Fix” button, as well as help on solving the problem manually
 The main drawback of this program is the lack of Russian localization. So it is suitable for those users who more or less confidently know English.
You can download FixWin 10 from the official website of The Windows Club developers.
Video: how to work with FixWin 10
Anvisoft PC Plus
This program is similar to the previous one: it is free, easy to use and distributed in English. The interface is convenient and pleasing to the eye. The main window presents the most common problems, and clicking on the desired error opens a menu with a “Fix” button. The utility downloads files for repair from the network, so an Internet connection is required for its operation.
 In the main window of the Anvisoft PC Plus program, you can select the error of interest, and a window will open where you can fix it
 You can download the program from the Anvisoft website.
Video: Anvisoft PC Plus program
Kaspersky Cleaner
The utility from the creators of the famous antivirus is aimed at cleaning the computer. But it also has tools to “cure” some problems. The program is in Russian, free and very easy to use: you start searching for errors, and then the utility does everything itself.
 In Kaspersky Cleaner, just run a search for errors, and the utility itself will find and fix everything
 This utility can be downloaded completely free of charge on the Kaspersky website.
Video: review of the Kaspersky Cleaner utility
NetAdapter Repair All in One
Of all the programs presented, this is the most complex, but also the most advanced. It is designed primarily for “fixing” network errors: clearing Hosts, SSL, DNS cache, managing adapters and network cards. There are many functions here, but it is recommended only for experienced users who know what they are doing. The downside of the program is the English-language interface.
 The main menu of NetAdapter Repair All in One lists a significant part of its functions, not including advanced
 The standard Windows 7 troubleshooter isn't perfect, but it can be a big help if you find errors. And if it doesn’t cope, you can always use third-party programs.
Errors in the system are possible of two types: hardware and software.
Hardware failures manifest themselves as follows:
- Computer freezes and slows down,
- unexpected reboots,
- full and video or incorrect playback,
- unstable operation of hardware components,
- overheating of main parts (for example: processor or hard drive).
Software and application failures manifest themselves in the following:
- occurrence and impossibility of normal loading of the operating system (OS) – Screen.1,

- long opening of system and application applications with “freezing” of processes,
- error messages about the system and applications, registry, lack of application libraries - Screenshot 2, 3, 4,
- pop-up dialog boxes about hardware component failures and driver errors,
- inability to read or write information on removable media,
- disappearance of the Start sign, language bar,
- problem with taskbar display,
- inability to load console applications (for example: task manager),
- changing the display of icons and shortcuts,


Causes of Windows problems:
- viruses and malware;
- incorrect system configuration;
- incorrect installation and uninstallation of applications;
- installation of software downloaded from dubious sources;
- incompatibility of additionally installed utilities with the operation of the OS;
- lack of hardware resources to run the OS and several applications simultaneously (for example: if there is not enough RAM);
- registry errors;
- a large number of programs placed in Startup (see);
- incorrectly installed drivers or their absence;
- remnants of uninstalled programs, temporary files, invalid shortcuts clogging up memory.
Microsoft developers have foreseen the occurrence of failures in Windows and included utility utilities in OS packages for diagnosing and eliminating errors.
Check your hard drive and fix problems with chkdsk
Utility utility chkdsk runs from the Windows command line. It is designed to recover damaged hard disk sectors and correct file system errors.
In order to use chkdsk, you must run the command line console with administrator rights.
You can open the command console in one of the following ways:
After loading the command console, type the following in the line:
chkdsk drive_letter: scan_parameters, where:
The drive letter is the drive name followed by a colon (C:).
options:
- /F – check with automatic error correction;
- /V – check with information about the paths and names of files on the disk;
- /R – detection of bad sectors and their restoration;
- /X – with the combined use of the /F parameter, the volume is disconnected before the scan.
On Screen. Figure 5 shows an example of using the console utility chkdsk with the parameters /F and /R on drive C: (detected problems are corrected automatically).
As can be seen in screenshot 5, the command cannot be executed while logical drive C: is in use by the system and the check is offered upon reboot (type Y (Yes) or N (No)).

If you type chkdsk command without arguments(parameters), the utility will run in read mode and show all the information about the verified data, detected errors and bad sectors (Screen 6).

Checking logical drives through Explorer
To check and correct errors on logical drives, you can use the Computer Management snap-in (Disk Management section) and follow the instructions according to screenshots 7 - 10 below.
To launch the snap-in in Windows, version 7, select Computer Management, as shown in screenshot 7.
To launch the snap-in in Windows, versions 8 and 10, press + X and select Disk Management, as shown in Screenshot. 8.
Screenshots 9.10 show the selection of actions to check the logical drive C:/ for errors in the Computer Management console for Windows7.
For Windows 8 and 10, the verification process is similar, with minor differences in the console design and message output.


Troubleshoot Windows using Control Panel
The “Control Panel” (hereinafter referred to as CP) tool, such as “Troubleshooting,” will help you automatically diagnose and eliminate common errors.
Using the built-in utilities of the snap-in, it is possible to increase performance and, as well as correct the following failures:
- network connections and browser operation;
- sound playback;
- connected and internal equipment;
- nutrition;
- in providing protection against malicious applications, etc.


Additional programs for fixing Windows errors
To automatically fix common Windows errors, application developers offer users comprehensive software solutions for cleaning, optimizing and improving the performance of personal computers.
FixWin 10
The application is distributed free of charge, does not require installation on your hard drive and is launched via an executable file (FixWin 10.exe). The interface is English.
FixWin10 was developed for version 10 of the Microsoft OS, but the utility is also suitable for other versions of Windows (7 and 8, and for the 10th fixes are placed in a separate section).
FixWin helps fix the main problems:
- in the Windows Store,
- while opening the Start menu and Office documents,
- with the "Options" panel,
- when downloading updates in Windows Center, etc.
All fixes are grouped into main sections:
- File Explorer (explorer);
- Internet and Connectivity (Internet and connections);
- Windows10 (for new version);
- SystemTools (system utilities);
- Troubleshooters (for individual devices and software);
- AdditionalFixes (additional tools).
- When starting, the user is prompted (Screen 14):
- check system data,
- re-register Windows 10 store applications,
- create a restore point (see),
- repair damaged OS components using DISM (.exe).
Each fix can be run not only automatically, but also manually.
For this:
- click on the question mark next to FIX,
- get a description of actions and commands for manual correction (Screen 15).


Anvisoft PC PLUS
Anvisoft PC-PLUS is a free program with an English interface. You can download it from the official website at this address.
Anvisoft PC-PLUS functionality allows you to fix the following:
- errors in applications and application libraries (*.dll);
- system errors;
- network connection failures;
- problems in popular games;
- Incorrect display of icons and shortcuts on the desktop.
Working with Anvisoft PC-PLUS (Screen 16-18):
- Run the executable file (PCPlus.exe);
- In the main menu, select the section describing the problem (Screen 16), namely:
- erroneous labels,
- Internet connection failure,
- system and software errors,
- checking for problems launching gaming applications;
- Find a specific error on the right side of the interface of the next window (Screen 17);
- Click the Fix now button, keeping in mind that some fixes require an Internet connection;
- Wait until errors are automatically corrected (Screen 18).


NetAdapter Repair All In
This is a free program with an English-language interface that does not require installation on your hard drive.
NetAdapter Repair All InOne is designed to troubleshoot network problems.
The application allows you to view all network settings and scan IP and DNS availability (ping).
Correction and customization options:
- DHCP services;
- HOSTS file;
- TCP/IP protocol;
- Windows network services;
- network adapters;
- DNS addresses;
- routing tables;
- NetBIOS protocol;
- cryptography and online privacy (resetting Internet Security parameters), etc.
The utility is launched with administrator rights – Screen.19.
Errors are not corrected automatically. Experienced users are encouraged to choose what they want to do.
If you click the Advanced Repair button, the settings are:
- WinSock/TCP/IP,
- Proxy,
- Windows Firewall

Antivirus utility AVZ
The most common causes of errors in Windows are viruses. Therefore, to correct failures, first of all, it is necessary to scan storage media to search for and remove malware.
AVZ – antivirus software for detecting and removing:
- Spy Ware and Ad Ware modules;
- Rootkits and masquerading malware;
- Trojan programs (Trojan);
- Back/Door modules and keyloggers (for remote computer control);
- Network and mail worms.
AVZ does not disinfect infected programs.
The utility can be downloaded from the developer's website Z-Oleg.Com.
Interface languages are Russian and English.
AVZ is launched without prior installation on the computer (Screen 20).

In addition to analyzing data to detect malware, the antivirus has a tool that allows you to restore some system settings damaged by malware.
To open the recovery firmware, select the File/System Restore section in the menu (Screen 21) and in the window that appears, check the necessary operations to correct system settings - Screen 22.


Frequently asked questions about Windows problems
What should you do to prevent crashes in Windows?
- Download security updates in a timely manner;
- Clean the registry;
- Update antivirus programs and scan your computer in a timely manner;
- Clean the system from unnecessary files (“garbage”);
- Defragment the HDD after cleaning;
- Check disks using the methods described in the article;
- Perform data backup;
- Turn off the computer, closing all applications (see).
How to resolve STOP errors in Windows?
STOP errors can occur in cases of abnormal shutdown or OS reboot.
If Windows starts after reboot:
- try to return the system to its previous state using System Restore;
- install the latest updates;
- use the Microsoft Support Center;
- find suitable drivers on manufacturers' websites;
- use safe mode to troubleshoot problems;
- Check for hard drive failures and memory errors.
If the system does not start:
- try booting into safe mode;
- use startup repair tools to correct startup files;
- undo recent changes using the Restore component;
- restore data from the image archive;
- as a last resort, .
This program contains a whole set of tools for troubleshooting Windows 10 errors. It is very easy to use and will do everything automatically. The user only has to click a couple of times. Can fix the registry, restart processes, delete temporary and unnecessary files. The application will check system services, as well as the network connection. Eliminate the causes if problems are found.
No installation required, just download from the official website and launch. There is no need to pay for downloading. English version available only. We remember that before working with the registry we always make a restore point.
Kaspersky Cleaner
The application will help clean your computer from malware and the consequences of their operation. You can trust Kaspersky Cleaner to do complete, comprehensive work on your operating system. Start process by pressing one key. Or select a specific task from the list. 
Windows Repair Toolbox
The absence of a Russian version of the program will not make it difficult to work and find the necessary tools. Performs high-quality system diagnostics. Also fixes found problems. A color and digital indicator will notify you of danger if the processor temperature rises above normal. 
Kerish Doctor
If your computer is slow, you can use this program. Even an inexperienced user will be able to maintain system functionality with its help. Frees up space from unnecessary garbage. Updated regularly, this happens independently, with the goal of maximizing and simplifying the work with Kerish Doctor. It can also update other programs installed on the computer. 
Microsoft Fix It
Eliminates all kinds of extraneous resources that affect the optimal operation of the system. So to speak, a pill for errors in Windows. Controls all processes, as well as equipment. Of course, the program's capabilities are not unlimited, but it can handle most problems. There are no difficulties in operation, the utility fully automated. Available for Windows 7/8 operating systems. You can download the Russian version for free. 
File Extension Fixer and Ultra Virus Killer
Both programs were invented and developed by the same person. In the first one, he seemed to attract people with its capabilities, as well as its accessibility. She completely free, but does not fulfill the capabilities of the second utility; of course you will have to pay for it. File Extension Fixer can fix Windows files and the registry, run system recovery, and of course it has the ability to download Ultra Virus Killer. 
It contains more than 30 items with various system error corrections. 
Troubleshooting Windows
To fix problems in the Windows system, it is not necessary to use third-party programs to fix the registry and clean up debris. You can run a standard utility that will perform the same functions. There is such an assistant in control panels, select small icons and look for the item “ Troubleshooting" Next, go to “All categories” and check the boxes, select what needs to be tested. 
Anvisoft PC PLUS
Do you often have problems launching games? After installation, we click on the shortcut, but the result is zero, or an error is displayed indicating that the file is missing? Anvisoft PC PLUS program has the ability checking missingDLL files. And in most cases it will help with launching games. There are also a number of other possibilities. Fixes shortcut errors and registry problems. 
Repair All In One
In the program, the developer concentrated all his attention on working with the Internet. With Repair All In One you can fix host file, which is often modified by malware, disables and connects network cards, and many other useful things. 
Antivirus utility AVZ
The program allows you to protect your computer from Trojans and other viruses. Helps you find and delete infected files. There is a function to correct problems with the Internet connection, it will create the correct file association. Corrects the work of the conductor. Very useful, free tool. 


 Home Google")


