After some time has passed after purchasing a communicator or tablet computer, any owner begins to look for ways to save programs, work data, settings, files, passwords, etc. A natural question arises: “How to make a backup copy (Android)?”
Tablets and smartphones allow you to do this in several ways. We do not undertake to say which one is better, since there are a number of nuances in use, but we will definitely indicate the most popular ones. The choice, as always happens, depends entirely on the preferences of the owner himself.
What people using Android devices save
Each user has their own understanding of the importance of the applications used and the results of their work. One doesn’t want to lose the apk file of his favorite “Tetris”, another is only worried about the list of numbers in the phone book, and the third is looking for options on how to make a complete backup copy of “Android”, saving everything.
Depending on these features, the algorithm of actions also changes. Let's start with the simplest one.
How to save numbers
Any mobile communication device has a software mechanism that allows you to upload a list of phones to a file and, if necessary, restore them. To save, you need to go to “Contacts”, select “Import/Export” and select “Export to storage”. As a result, a file with the vcf extension will be created on the memory card - this is the backup copy. It is advisable to duplicate it on the computer, which will allow you not to lose the numbers if your Android device breaks down.

Save apk files
Often there is a need to figure out how to make not system data, but files downloaded by the user. For example, save programs installed from the Market. Fortunately, they are all stored on the device, so they can be transferred to any folder or other media. To do this, you can use a program in which you should select the “Applications” item and, by checking the boxes, save what you want. The Astro application is also quite functional. There is also nothing complicated about how to make a backup copy of Android using it. After installation and launch, you need to open the “Settings” menu - Tools - Application Backup, check the boxes and click on the button of the same name. The files will be saved on the memory card in the “backups/app” folder. More advanced users who have gained root access can simply copy the apk from the root "data/app" folder.
Access rights

All of the above methods are essentially half measures. They cannot be used to save settings, passwords, etc. Therefore, let's look at how to backup Android using other methods. Again, there are two solutions: using full access to the device’s file system (root) and without it. Having made certain successful manipulations with the mobile device, the owner gets the opportunity to delete, add, edit system files that are otherwise not available.
While learning how to back up your Android, also learn how to get root access to give yourself full control. This will significantly expand the possibilities, including you can easily figure out how to make a backup copy of Android. One of the safest methods is the Framaroot program.
Titanic copying
After obtaining access rights to the file system, you can begin to learn how to make a backup copy (Android). 4pda is a well-known forum from which you can download the Titanium Backup program. Those who want to get everything at once may be interested in the MoDaCo Plus version, however, to simply create a copy, the basic functionality is sufficient. After launch, you need to open the “Backups” tab. A list of all programs will appear, including system ones, which are highlighted in red. Next, you should select the desired application and point to it. A menu will be displayed with a choice of actions: the user can save (make a copy), freeze or delete program data. Here it is also possible to remember in a file a list of calls made/received, which is impossible to do using standard means. Sometimes this turns out to be quite in demand.
No less interesting is the question of how to make a backup copy (Android) on a computer. In fact, this is done quite simply. All data saved via Titanium is located in the TitaniumBackup folder on the memory card. That is, it is enough to connect the device to a personal computer in storage mode, open the SD card through a file manager or explorer, find the above-mentioned directory and make a duplicate of it on the hard drive. In the future, the memory card can be replaced or formatted, but by returning the folder to its place and running Titanium, you can restore everything that was previously saved. This is one of the most popular and easy to use. It is hardly possible to advance in studying the operation of Android devices without paying attention to this wonderful tool.

How to make a backup (Android)
Without root access to system files, you can also create a copy on the device. This opportunity is provided both by the operating system itself and by third-party applications.
In the first case, the user is only required to create a mailbox (account) on the Gmail resource. After this, you can use the mechanism for copying programs, settings, phone books and all related software to the Google server. To do this, you need to activate your account ("Settings" - "Accounts"), specifying your login and password, and also assign synchronization. The latter, by the way, is activated automatically. You can copy everything manually by activating “Copy data” in the “Backup and reset” section. You can return everything saved on any device that has the login parameters for this account. The “Auto-recovery” item is intended for this purpose.

In principle, this method is quite effective, but it is a stretch to consider it ideal. In particular, without access to the Internet, recovery is impossible. And if we take into account the volume required to deploy applications, then access, in addition, must be unlimited and high-speed. And finally, the main disadvantage is storing your data on a remote server.
All phone numbers, SMS texts, passwords to banking systems and, perhaps, photographs of a naked wife become public knowledge. Whether to rely on encryption or not is something everyone must decide for themselves. As an alternative to Google backup, you can use the G Cloud Backup program. This is the same cloud storage, to work with which you need to create an account. You are allowed to store 1.2 GB of data; you can increase the capabilities by participating in “promotion”.

Copy of everything
Once you have root access, you can install CWM - custom recovery. It is different for each model of smartphones and tablets, so we cannot indicate the installation and selection method here. If everything went well, then when you turn on the device, you should launch FastBoot (press and hold the volume rocker up and the power button) and select “Backup to SD” in the list of operations.
There are situations when resetting the data stored on your device and rolling back to the manufacturer's settings is simply necessary for Android to work. The reasons may be anything, but the result is always the same - the irretrievable loss of all existing data that has been lovingly accumulated for a long time. Therefore, the need for backup (backup of Android firmware) of photographs, contacts, installed applications and other things is absolutely obvious. So that you can avoid long and exhausting searches for the necessary information, we want to offer you detailed material on how to make a system backup and its further restoration.
Surprisingly, not many people know about the ability of the system itself to do backup android, and, if necessary, save all your existing content. It is absolutely clear that a failure in the operation of any system is possible, which can occur due to clutter, for example, and as a result - the inevitable deletion of data. Or after purchasing a new phone, you will need to transfer information to a new smartphone. Now you can cope using standard tools without resorting to installing special applications.
How to Backup and Restore Using a Google Account
It is well known that Android and Google are one and the same. This integration makes it possible to save backup copies in the cloud and easy access to them when system recovery is required. What we must do for this:
1st step. To synchronize with a Google account, find “personal” in the settings, then “accounts”, and then Google.
2nd step. Select your account and check all the boxes.
3rd step. Go to settings, then “personal”, then “backup”, and finally “reset settings”. Check the “data archiving” and “auto-recovery” fields. We first check the account with which we worked (see step 1). It is important that it is registered in the backup account field. In the synchronization section, click the “Synchronize” button. To restore saved data, log into your Google account from your phone (by “data” we mean all passwords, wireless network settings, as well as previously installed applications).
Immediately after the settings have been reset to factory settings, or when connecting an old account on a new device, the system should load all the data from your account; make sure that an Internet connection is provided in advance.
It's worth noting that this kind of storage refers to something related to Google services. That is, if, at the cost of enormous effort, you have reached the last level of a game, then you may not be able to return to it. During recovery, from a list of applications that is too long, we remove those that you no longer need.
If you have applications that are not connected to the Google server, then backup and restoration are performed in other ways.
Using standard ADB tools
Step by step:
- Enable USB debugging on Adnroid;
- Download the proprietary program from the ADB RUN website (version 3.21.35 and higher);
- Install the driver on the PC (if it has not been installed previously);
- USB cable
Let's create a backup:
- Launch Adb Run, select the Backup menu;
- Select the first item “Adb Backup”;
- Take your Android smartphone (tablet) and click the “create a backup copy” button (password not required).
Restoring from a backup:
- Select the item “Adb Restore”;
- On your Android device, click “recover data.”
Using custom Recovery (root)
To use this method, you need to understand that Recovery must already be installed, because the creation of a backup itself cannot be called a backup copy, it is rather the creation of a solid image of the current state of the firmware.
- After installing Recovery, log into it;
- Select “Backup and Restore” from the menu
- Next comes the “Backup” menu item (to create a backup)
- To restore, select “Restore”.
Online Nandroid Backup (root required)

Despite the name, unfortunately, nothing is saved in the cloud. The program does not have a graphical interface, so we will operate from the terminal. This type of backup was created specifically for those who are already tired of rebooting into Recovery to perform Backup, as well as to create a snapshot of the current state of the entire system and what is already installed in it.
Using DataSync (root)

This program will be useful for backing up existing applications and quickly transferring them to another device. However, if your goal is to create backup copies of the applications themselves, and not just existing data and settings, then this application is not worth using.
OBackup (root) features

Backups are created similarly to ONB (third method), only in this case we see a graphical and intuitive interface, and a means of sending the backup to a cloud drive.
Titanum Backup (root)

Perhaps the most convenient and flexible option for high-quality backup. And although in this case a snapshot of the current state of the system is not performed, all user and system applications, as well as their data, are backed up. If your plans are to switch to another firmware and then restore everything you need, then we highly recommend this method.
Helium (root/root)

An effective means to perform android backup. The operating principle is based on ADB, but with the ability to select the application for which a copy is created
(The application does not work on Motorola). In this case, it is possible to work without root rights; in this case, you need to connect the android to the PC. So, step by step:
Download free Helium from the official Google Play app store
If you do not have Root rights, download and install the add-on on your PC. It is possible to install drivers on your computer (for non-Root devices) available on the download page.
Creating a backup in Helium on rooted devices
- Launch the application;
- We refuse the offer to log into Google Disk, because this function does not work correctly (copies, but restores only in the paid version);
- We save backups using internal or external memory. To create them, select the necessary applications in the “backup” section, press the button to start the process, select where we will save the data.
The recovery process is also extremely simple.
Creating a backup in Helium on non-rooted devices
- Everything basically looks the same as in the previous case, only with some reservations: After downloading and installing the add-on on your computer, launch it;
- Enable USB debugging on Android;
- Let's launch
- We perform the remaining actions in the same way as for root.
We hope that our material will be useful to you, good luck!
The data recovery process depends on the phone and Android version. For example, you can't restore data from a device running a later version of Android to a device running an earlier version.
Note. Some of these steps can only be performed on devices running Android 9.0 and later.
Content Backup
Backing up data and settings
Note. If more than one person uses the tablet, only the owner can create backups or reset settings.
How to manually back up your data and settings
If you are using Android version 8.1 and below, you can perform a manual backup at any time, for example if you want to transfer information to a new phone.
How to delete data after backup
How to restore data and settings
When you add a Google account to your phone, all previously saved data for that account is downloaded there.
Important! It is not possible to recover data from a device running a later version of Android from a device running an earlier version. .
How to restore applications
When you restore your Google Account from a backup, the apps that were previously saved in that account are installed on your phone.
Note. Not all old applications can be restored this way. If some applications are not added automatically, download them again from Google Play.
After you reinstall the app, you can restore its settings from your Google Account backup.
Many users of Android devices know that experiments with firmware, installation of various add-ons and fixes quite often lead to the device not working, which can only be corrected by installing the system completely, and this process involves completely clearing the memory of all information. If the user has taken care in advance to create a backup copy of important data, or, even better, a full system backup, restoring the device to the “as it was before...” state will take a matter of minutes.
There are many ways to make a backup copy of certain user information or a complete system backup. What is the difference between these concepts and for which devices it is advisable to use one or another method will be discussed below.
A backup copy of personal information means saving data and content generated by the user during the operation of the Android device. Such information includes a list of installed applications, photographs taken by the device’s camera or received from other users, contacts, notes, music and video files, browser bookmarks, etc.
One of the most reliable, and most importantly simplest ways to save personal data contained in an Android device is to synchronize data from the device’s memory with cloud storage.

Full system backup
The above methods and similar actions allow you to save the most valuable information. But when flashing devices, not only contacts, photos, etc. are often lost, because manipulation of device memory sections involves clearing them of absolutely all data. To reserve the opportunity to return to the previous state of software and data, you only need a full backup of the system, i.e., a copy of all or certain sections of the device’s memory. In other words, a complete clone or cast of the software is created in special files with the ability to restore the device to its previous state later. This will require the user to have certain tools and knowledge, but can guarantee complete safety of absolutely all information.
Where to store the backup? When it comes to long-term storage, the best way is to use cloud storage. When saving information using the methods described below, it is advisable to use a memory card installed in the device. If it is not available, you can save backup files to the internal memory of the device, but in this case it is recommended to immediately copy the backup files to a more reliable location, such as a PC drive, immediately after creation.
Method 1: TWRP Recovery
From the user's point of view, the simplest method of creating a backup is to use a modified recovery environment for this purpose - custom recovery. The most functional among such solutions is TWRP Recovery.


Method 2: CWM Recovery + Android ROM Manager App
As in the previous method, when creating a backup of the Android firmware, a modified recovery environment will be used, only from a different developer - the ClockworkMod - CWM Recovery team. In general, the method is similar to using TWRP and provides no less functional results - i.e. firmware backup files. At the same time, CWM Recovery does not have the capabilities that many users need to manage the process of creating a backup; for example, it is impossible to select individual partitions for creating a backup. But the developers offer their users a good Android application, ROM Manager, using the functions of which you can start creating a backup directly from the operating system.


Method 3: Titanium Backup Android App
Titanium Backup is a very powerful, yet quite easy-to-use tool for creating system backups. Using the tool, you can save all installed applications and their data, as well as user information, including contacts, call logs, sms, mms, WI-FI hotspots and more.

The advantages include the ability to widely customize parameters. For example, you can select applications whose data will be saved. To create a full-fledged Titanium Backup, you must provide root rights, that is, for those devices on which Superuser rights have not been obtained, the method is not applicable.

It is highly advisable to take care in advance of a safe place to store the backups you create. The internal memory of a smartphone cannot be considered as such; it is recommended to use a PC disk, cloud storage, or, as a last resort, a MicroSD card of the device to store backups.
- Install and launch Titanium Backup.
- At the top of the program there is a tab "Backups", let's move on to it.
- After opening the tab "Backups", you need to call the menu "Batch Actions" by clicking on the button with the image of a document with a checkmark located in the upper corner of the application screen. Or press the touch button "Menu" under the device screen and select the appropriate item.
- Next, press the button "START" located next to the option “Make r.k. all user software and system data".A screen opens with a list of applications that will be backed up. Since a full backup of the system is being created, nothing needs to be changed here; you need to confirm your readiness to start the process by clicking on the green checkmark located in the upper right corner of the screen.
- The process of copying applications and data will begin, accompanied by the display of information about the current progress and the name of the software component that is currently being saved. By the way, you can minimize the application and continue using the device as usual, but in order to avoid failures, it is better not to do this and wait until the copy is created; the process happens quite quickly.
- When the process is complete, a tab opens "Backups". You may notice that the icons to the right of the application names have changed. Now these are peculiar emoticons of different colors, and under each name of the software component there is an inscription indicating that a backup copy was created with the date.
- Backup files are stored in the path specified in the program settings.

To avoid loss of information, for example, when formatting memory before installing system software, you should copy the backup folder to at least a memory card. This action can be done using any file manager for Android. A good solution for performing operations with files stored in the memory of Android devices is ES Explorer.


Additionally
In addition to the usual copying of the backup folder created with Titanium Backup to a safe place, in order to be safe from data loss, you can configure the tool so that copies are created immediately on a MicroSD card.


Method 4: SP FlashTool+MTK DroidTools
Using the SP FlashTool and MTK DroidTools applications is one of the most functional ways that allows you to create a truly complete backup of all memory sections of your Android device. Another advantage of this method is that it is not necessary to have root rights on the device. The method is applicable only for devices built on the Mediatek hardware platform, with the exception of 64-bit processors.
- To create a full copy of the firmware using SP FlashTools and MTK DroidTools, in addition to the applications themselves, you will need installed ADB drivers, drivers for MediaTek boot mode, as well as the Notepad++ application (you can also use MS Word, but regular Notepad will not work). Download everything you need and unpack the archives into a separate folder on the C: drive.
- Turn on the mode on the device "USB Debugging" and connect it to the PC. To enable debugging,
first the mode is activated "For developers". For this we follow the path "Settings" — "About the device"- and tap five times on the item "Build number".
Then in the menu that opens "For developers" activate the item using the switch or checkbox "Allow USB Debugging", and when connecting the device to the PC, we confirm permission to carry out operations using ADB.

- Next, you need to launch MTK DroidTools, wait for the device to be detected in the program and press the button "Block Map".
- Previous manipulations are the steps preceding the creation of the scatter file. To do this, in the window that opens, click the button “Create scatter file”.
- The next step is to determine the address that will be needed to indicate to the SP FlashTools program when determining the range of blocks in the memory of the device for reading. Open the scatter file obtained in the previous step in Notepad++ and find the line partition_name: CACHE:, under which there is a line with the parameter linear_start_addr just below. The value of this parameter (highlighted in yellow in the screenshot) must be written down or copied to the clipboard.
- Direct reading of data from the device memory and saving it to a file is carried out using the SP FlashTools program. Launch the application and go to the tab "Readback". The smartphone or tablet must be disconnected from the PC. Press the button "Add".
- In the window that opens, there is only one line. Double-click on it to set the reading range. Select the path where the future memory dump file will be saved. It is better to leave the file name unchanged.
- After determining the save path, a small window will open in the field "Length:" where you need to enter the value of the linear_start_addr parameter obtained in step 5 of this instruction. After entering the address, press the button "OK".

Press the button "Read Back" tab of the same name in SP FlashTools and connect the switched off (!) device to the USB port.
- If the user has taken care of installing the drivers in advance, SP FlashTools will automatically detect the device and begin the reading process, as evidenced by the filling of the blue progress bar.
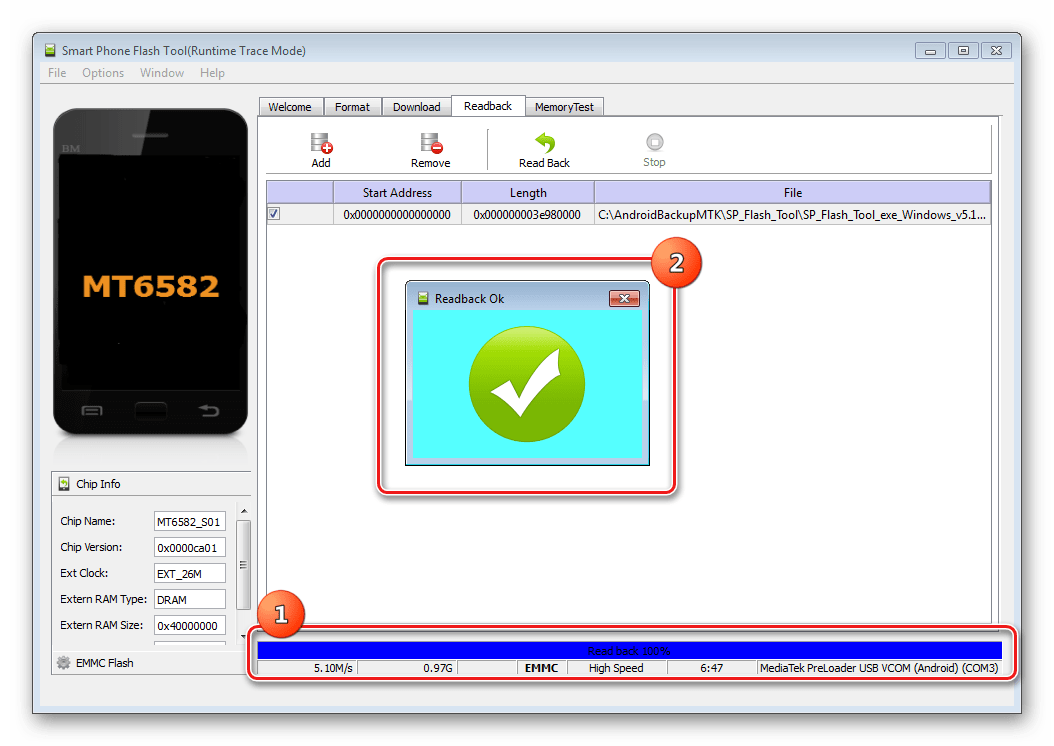
Upon completion of the procedure, a window appears "Readback OK" with a green circle with a confirmation checkmark inside.
- The result of the previous steps is the file ROM_0, which is a complete dump of the internal flash memory. In order to make it possible to carry out further manipulations with such data, in particular, upload firmware to the device, several more operations are required using MTK DroidTools.
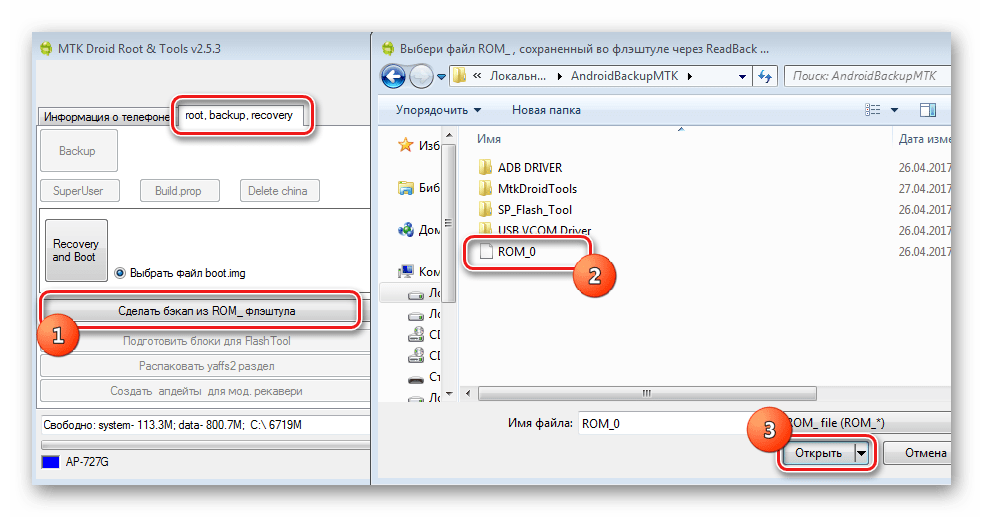
Turn on the device, boot into Android, check that "Debugging via USB" turned on and connect the device to USB. Launch MTK DroidTools and go to the tab "root, backup, recovery". Here you need a button “Make a backup from ROM_ flash drive”, press it. Open the file obtained in step 9 ROM_0. - Immediately after pressing the button "Open" The process of dividing the dump file into separate images of partitions and other data necessary for recovery will begin. Process progress data is displayed in the log area.
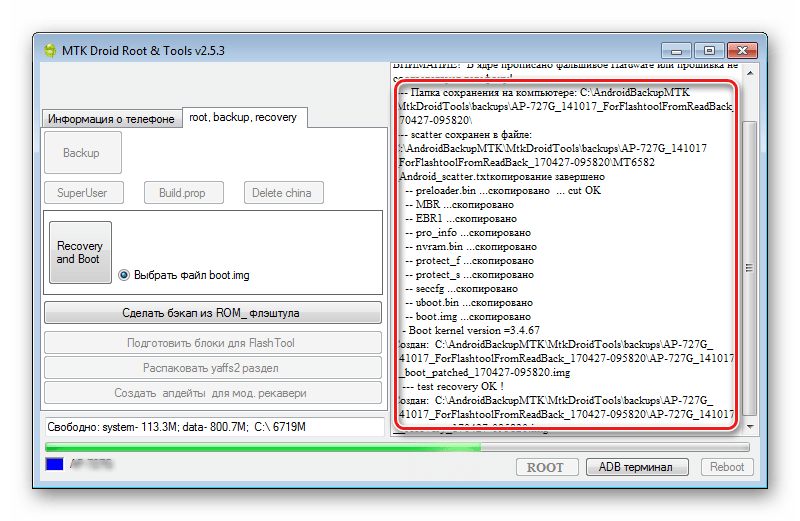
When the procedure for splitting the dump into separate files is completed, the following message will be displayed in the log field: "task completed". This completes the work and you can close the application window.
- The result of the program is a folder with image files of the device’s memory partitions - this is our system backup.


And choose the path to save the scatter.


Method 5: System backup using ADB
If it is impossible to use other methods or for other reasons, to create a complete copy of the memory partitions of almost any Android device, you can use the OS developer tools - the Android SDK component - Android Debug Bridge (ADB). In general, ADB provides all the possibilities for carrying out the procedure; only root rights on the device are required.
It should be noted that the method in question is quite labor-intensive and also requires the user to have a fairly high level of knowledge of ADB console commands. To facilitate the process and automate the entry of commands, you can turn to the wonderful shell application ADB Run, this automates the process of entering commands and saves a lot of time.
- The preparatory procedures consist of obtaining root rights on the device, enabling USB debugging, connecting the device to the USB port, and installing ADB drivers. Next, download, install and launch the ADB Run application. After the above is completed, you can proceed to the procedure for creating backup copies of partitions.
- We launch ADB Run and check that the device is detected by the system in the desired mode. Main menu item 1 - "Device attached?", in the drop-down list we perform similar actions, select item 1 again.

A positive answer to the question whether the device is connected in ADB mode is the ADB Run response to the previous commands in the form of a serial number.
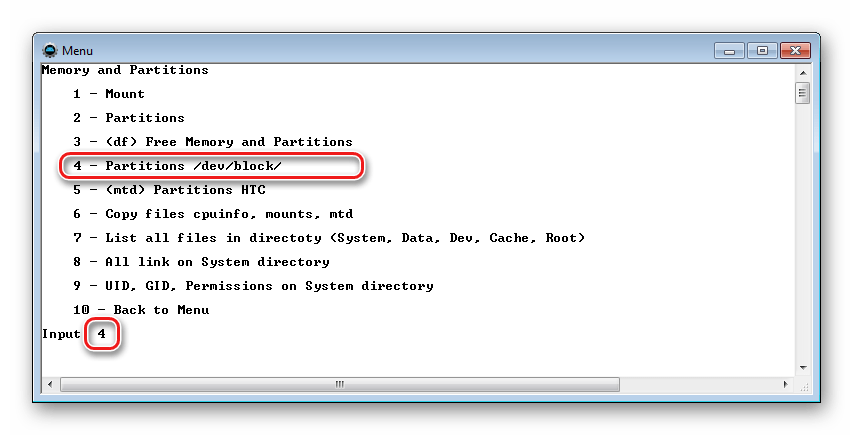
- For further manipulations, you need to have a list of memory partitions, as well as information about which “disks” - /dev/block/ the partitions were mounted. Using ADB Run, getting such a list is quite easy. Go to the section "Memory and Partitions"(item 10 in the main menu of the application).
- In the menu that opens, select item 4 – "Partitions /dev/block/".
- A list opens listing the methods by which attempts will be made to read the necessary data. Let's try each item in order.

If the method does not work, the following message is displayed:

Execution will have to continue until the full list of partitions and /dev/block/ appears:

The received data must be saved in any available way; there is no automatic saving function in ADB Run. The most convenient way to capture the displayed information is to create a screenshot of a window with a list of sections.


When it comes to creating a data backup or restoration quickly and reliably, many Android users wonder what and how, in this article you will find many ways how and how to backup and later restore!
Why backup?
1. Your personal Android may store a lot of information that is very valuable, which you cannot afford to lose, or for example, you are planning to move from one Android device to another! Of course, when it comes to Google services, for example, everything is very simple here: you entered your username and password, waited 2 minutes until synchronization with the Google server was completed and the data was all there, but with other applications you will have to suffer to quickly make a backup copy and restore.
Method No. 1 - backup on Android and restore using standard ADB tools
Thanks to Google, which took care of creating a backup copy, the method is not ideal but still better than none!
So what do you need for this?
2. Download the program from the ADB RUN website (from version 3.21.35 and later)
Method No. 4 - DataSync (root)
The DataSync program is suitable for those who need to back up application data, as well as instantly move them to another device. If you need to create backup copies of applications themselves, and not just their data and settings, then this application is not for you. Learn more about how this DataSync application works.
Method No. 5 - OBackup (root)
OBackup - Creates backups just like Online Nandroid Backup, only this time the application has an intuitive graphical interface, and you can also send the backup to a cloud drive. OBackup details.
Method No. 6 - Titanum Backup (root)
Method No. 7 - Helium (root/ root)
A very interesting tool for creating backups. The principle of operation of this application is similar to the operation of the ADB debugging tools; more precisely, it is based on this method, only with the ability to choose which application to create a backup for. This application does not work on Motorola
The Helium application can work without Root rights, but if you have them it’s even better (if you don’t have root rights, you need Android to your computer).
How to create a backup using Helium?
1. To get started, download the Helium app
If you do not have Root rights, then you will also have to download and install the add-on on your PC
You may also need to install drivers on your PC (for non-Root devices), which are presented on the PC add-on download page

Creating a r.k. in Helium on Root devices
Launch the application refuse from the offer to log into Google Disk, so this function does not work entirely honestly (backup, but restoration only works in the paid version of the application)

You can save backups to internal or external memory


