You may need to take a screenshot in a variety of situations, so you need to be prepared for this by having a special, convenient free program at hand.
It's better to see once than to hear a hundred times! And it is true. The average person perceives more than 70% of information about the world around them visually. For example, with a computer: you can spend a long time talking about what and where you need to press to get this or that result. Or you can simply show it all with one single image with a screenshot.
Such pictures are usually called screenshots. They allow you to quickly and clearly demonstrate any sequence of actions with a computer or certain programs. Their advantage, for example, over video is their small size and the ability to print on paper without losing information content.
The function of creating screenshots is so popular that it is built into most operating systems. However, to create a truly good screenshot, it needs to be processed, providing various explanations. That’s why there are so many special programs for creating screenshots, which we will get acquainted with today.
The principle of taking screenshots
In Windows, an entire key on the keyboard is allocated for taking screenshots - Print Screen(PRT SCR). Pressing it automatically saves the current screen state to the clipboard. To save it as an image file, just open any graphics editor (for example, regular Paint) and paste the image stored in the buffer into its work area.
If you need to capture not the entire screen, but active window only, then this can be achieved by first holding down before pressing Print Screen, key ALT. In Windows 8 and older, another combination for taking screenshots was also added - WIN+PrtScr. With its help, you can automatically save a screenshot of the entire screen to a file, which will be placed in the “Screenshots” folder in the “Images” directory.
In addition, starting with Windows Vista, a tool appeared in the arsenal of the operating system "Scissors". In fact, this is already a more or less self-sufficient utility for creating screenshots. It allows you to save snapshots not only of the entire screen or active window, but also of a randomly selected area, and also makes it possible to add explanatory notes and make notes:
However, all this is suitable only for personal use, where no special aesthetics are required. If you need to share a screenshot with the general public, then crookedly drawn arrows and less-than-ideal hand-drawn strokes will not look entirely appropriate. Therefore, a good program for creating screenshots should first of all have in its arsenal tools for drawing neat explanatory elements.
The minimum set of such elements can be called:
- text signatures;
- arrows;
- cropping tool;
- basic geometric shapes (with and without fill);
- a brush or pencil for freehand marks and an eraser for removing them.
Advanced screenshots also usually have several additional screen capture modes. Among them, the most useful, in my opinion, are window element capture And capturing a scrolling window.
Some programs, in addition to taking screenshots, also allow you to record screen video and even with sound! However, these are additional functions, of which there can be quite a lot and which vary significantly between different software manufacturers.
Actually, we have found out what a good screenshot should be able to do and now we will look at some of them and compare their capabilities in order to choose the one that is most suitable for you!
PicPick
I confess :) At the beginning of my soft-testing career, I used a hacked version of the popular SnagIt screenshot to take screenshots. However, as I gained experience working with free software, I decided to find a free analogue of this program with the most similar functionality. And the result of the search was a free program that I have been using for many years:

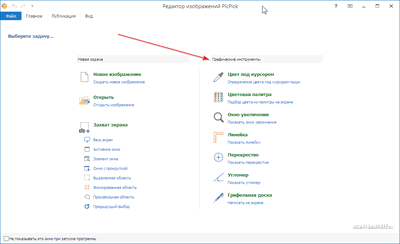
The PicPick program has an initially Russian-language interface, a built-in graphic editor with the necessary set of tools, as well as a large number of screen capture modes (with customizable hot keys) and a number of additional tools. In addition, a portable version is available on the official website, which does not require installation!
The program allows you to capture the entire screen (including the contents of a scrolling window), as well as selected parts or even fragments of working windows. The only thing PicPick can't do is capture video. But there are other programs for this, if anything...
As for the built-in editor tools, there is almost everything you need: several types of beautiful arrows, various selection styles, callouts, adding text areas, shading, blurring and pixelation effects. The only thing that I personally lack is the function of inserting a translucent watermark in the place I need with the ability to correct its position by simply dragging it.
You can save the finished screenshot in any popular format on your local computer or online (FTP servers, Imgur clouds (without registration), Dropbox, Box, Google Drive, OneDrive (all with registration), social networks Facebook and Twitter are supported). Also, if you have an email client configured, the resulting image can be directly sent by mail to the recipient you need.
In addition to the screenshot function, PicPick has a number of additional tools that will be useful to a designer or web developer. These tools include: color selection under the cursor, a color palette for calculating the RGB code of any shade, a 10x screen magnifier, a pixel ruler, a point and angle coordinate calculator on the screen, as well as a full-fledged slate for drawing on the screen “by hand” .
In general, PicPick, in my opinion, is one of the best screenshots. And it would be the best if it weren’t for minor flaws in functionality that the developers can’t correct, and the licensing principle. The latter implies that the program can only be used for personal non-commercial activities. So, if you want to use the program in an organization, you will have to pay about $25 for it.
Greenshot
If you are a fan of OpenSource software and want to use your favorite tool in any conditions, then you may like the completely free Greenshot screenshot program:

Despite the fact that the official website of the program is in English, the program interface itself is almost completely Russified. There is an official portable build that does not require installation, as well as access to the Greenshot source code.
The program itself has a relatively small “weight” (just a little more than a megabyte), but contains a very impressive arsenal of capabilities:
- full-page browser window capture;
- support for uploading screenshots to the Internet;
- optical text recognition on a screenshot (including Russian language!!!);
- connecting modules and external command scripts.
According to the principle of operation, the program is in many ways similar to PicPick discussed above. Here we can also configure any keys for one or another capture option, as well as redirect our capture to the built-in graphic editor. The latter, unfortunately, is not so convenient. Its main problem is the lack of image scaling. In addition, there is no support for hotkeys (you will have to manually switch tools using buttons on the toolbars).
The range of supported services for uploading a screenshot online is approximately the same as that of PicPick (the focus on popular Western “clouds” is visible). However, there are some peculiarities. Greenshot is a modular program. This means that, theoretically, you can add a module for it that will upload the image where you need it (however, for this you need to be able to program :)).
By the way, about modules. Greenshot has an almost full-fledged OCR module that even works! Moreover, even with Russian text!!! If you click the "OCR" button on the toolbar, the program will honestly "pull" the text from your screenshot into the clipboard and you will only have to put it into a text editor. The only thing is that you must first specify the recognition language in the “Settings” of the program.
Greenshot is a very interesting and promising project, but, alas, it is still a little crude and its everyday use can cause a number of difficulties. However, if you just need a free screenshot with the possibility of commercial use, then you can take a closer look at it.
ShareX
In my search for good and completely free programs for creating screenshots, I came across another interesting OpenSource project called ShareX:
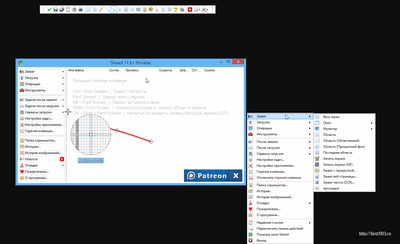
Like Greenshot discussed above, ShareX is a completely free program. But at the same time, its functionality is much closer to PicPick, and in some aspects even surpasses it (sorry, but not in all)! The main “trump cards” of ShareX are:
- the presence of all existing capture modes with the ability to reassign hot keys (including scheduled capture!);
- the ability to capture video and create GIF animation (requires resuming the ffmpeg component);
- a huge number of “clouds” available for instantly uploading screenshots (Imgur by default);
- generation of short links, previews and QR codes for distributing screenshots on the Internet;
- built-in graphic editor;
- built-in OCR system with support for Russian language recognition;
- the presence of additional tools (Palette, Eyedropper, Screen ruler, Image combiner, etc.).
As you can see, the set of tools is more than solid. However, alas, not everything here is as smooth as we would like. There are no questions about the capture function. In ShareX it is implemented very conveniently and has a large number of options for any need. The bottleneck of the program (like many similar ones) is the built-in graphic editor. It has a basic set of necessary elements for highlighting and emphasizing the necessary details, but does not, for example, have functions for filling and resizing the image. And in general it is not very convenient...
There is support for hot keys here, but they do not always work. In addition, some changes (for example, cropping) for some reason cannot be undone. True, in fairness, it is worth noting that the ShareX editor supports translucency and can correctly insert any pictures on top of the edited image (for example, the same watermarks). In general, you can use the built-in editor, but if you decide to do so, you will have to get used to all its features and quirks...
More successfully than in Greenshot, the text recognition function on screenshots is implemented here. Everything happens in a special window where you can directly select the recognition language and have the opportunity to copy the received text. Some functions are implemented very dubiously. For example, the preview generator cannot reduce images by percentage or by a given side - you need to clearly indicate the width and height...
The good news is that the program is being developed very actively and many shortcomings are consistently corrected a couple of times a month. This gives us hope that developers will be able to improve ShareX to the level of the best screenshot in the near future. In the meantime, he is also one of the good ones :)
Monosnap
If you are not a particular fan of decorations and you like to do everything quickly, then the Monosnap screenshot may suit you:
In terms of capture, alas, there are no special conveniences. You can capture either the entire screen or a manually selected area. But it is possible to record screen video and even images from a webcam (which other competitors do not have).
The built-in graphic editor also does not have much functionality. Here you can draw basic shapes, create inscriptions, make freehand notes, and add a blur effect. However, there is no zoom, no fill, no normal highlighting of areas of the edited image.
Joxi
At the end of our review, I would like to mention another free domestic tool for express exchange of screenshots online Joxi:

For full use, it is advisable to register a free account on the website of the program developers (you can do it through the program itself). This will give you the opportunity to instantly upload the screenshots you create online. 1 GB of space is available for free for your images, which are stored on the server for up to 90 days. For 400 rubles per year, you can switch to Joxi Plus mode to expand the storage up to 3 GB and remove some restrictions (the maximum upload file size is more than 20 MB, generating a direct link and connecting your own Dropbox or FTP server).
In terms of functionality, here, like Monosnap, only capturing the entire screen or a manually selected area is available. But there is no support for capturing video and directly uploading files to online storage. But Joxi has a plugin for the Google Chrome browser that allows you to take screenshots of web pages with scrolling or fragmented and does not require installing the program itself:

The screenshot editor for both the desktop and browser versions of Joxi is identical. Here, again like Monosnap, there are basic highlighting and accentuating tools, but some of the usual functions of traditional image editors (for example, eraser, normal selection and overlaying image fragments) are missing.
The advantage of Joxi over Monosnap is its focus on Russian-speaking users. The finished screenshot can be uploaded not only to online storage, but also to our popular social networks: VKontakte, Odnoklassniki, Facebook and Twitter. Moreover, you can do this in one click by setting a special key combination for the service you need!
To summarize, I can say that installing Joxi as the main screenshot is not suitable for everyone due to its “lumpy” functionality. But as an extension for Chrome, it is a quite convenient tool for quickly sharing a snapshot of the browser state.
Comparison
We briefly reviewed the capabilities of the best free screenshot software and now summarize the information about them in the form of a summary table:
| Program | Disk size | Graphics editor | Publishing a screenshot on the Internet | Video Capture | Commercial use | Peculiarities |
|---|---|---|---|---|---|---|
| PicPick | 30+ MB | multi-tab, no alpha channel support, no drag-and-drop watermark positioning feature | + (Imgur or "clouds") | - | - | a large number of capture modes, a very convenient graphic editor, a set of additional tools for designers, an official portable version |
| Greenshot | 1+ MB | non-standard, hot keys do not work well, there are no tools (eraser, fill, selection), undo does not always work, no zoom | + (Imgur or "clouds") | - | + | modularity, OpenSource project, inconvenient graphic editor, presence of OCR function, presence of official portable version |
| ShareX | 10+ MB | non-standard, there is support for alpha channels and overlays, there are no tools (eraser, fill, selection), no zoom (but there is a virtual magnifying glass near the cursor) | + (Imgur, Pastebin (for text), bit.ly (for shortening links) or "clouds") | + (as well as GIF animations if the ffmpeg module is available) | + | modularity, OpenSource project, the presence of an official portable version, a not very convenient graphic editor, but with alpha channel support, a large set of additional designer tools and mini-utilities (OCR, preview generator, QR code generator, etc.) |
| Monosnap | 21+ MB | single-window, has only a set of simple tools, no zoom, has a blur effect | + (own server, FTP or WebDAV) | + | + | the ability to capture video (including in games and from a webcam), the function of uploading any files to online storage |
| Joxi | 40+ MB | non-standard (editing using a special panel right on top of the screen), quite easy to use and has most of the popular selection and emphasis tools, no zoom | + (own server or social networks (VKontakte, Odnoklassniki, Facebook, Twitter)) | - | - | minimum required set of functions, quick uploading of screenshots to online storage, availability of a standalone extension for Google Chrome |
conclusions
In my experienced opinion, there are no ideal free programs for professional screenshot creation. Each of them is missing something. Either there are few capture options, or a very modest editor, or even a complete lack of any important tools! Although, for your personal everyday needs, you can easily take any of the screenshots we reviewed - they all have the required minimum functions!
Many of the programs from our review have official portable versions, however, if you don’t want to download and install anything at all, then you may need special services for creating screenshots online (yes, there is such a thing!). Good luck with your shots and may your screenshots always look professional!
P.S. Permission is granted to freely copy and quote this article, provided that an open active link to the source is indicated and the authorship of Ruslan Tertyshny is preserved.
Well, proven folk wisdom does not age as quickly as our smartphones and laptops go out of fashion. “It’s better to see once than to hear 100 times”.
Have you tried to explain to someone through correspondence how to set up a WI-FI router? Then you probably understand that it would be better, indeed, for a person to see 1 time than to hear 100 times or read 100 messages! That's why many people ask how to take a screenshot on a computer.
A few words of theory
The word screenshot was exactly transferred into the Russian language from international English. It means an exact image of the user's screen, a screenshot. A shortened version of this concept, “screen,” is in common use.
How to take a screenshot on Windows
Actually, here are the main groups of solutions:
- standard Windows tools;
- online services that allow you to take a screenshot on a computer;
- special programs.
Method 1. Screenshot on Windows using system tools.
If you look at the top left of your keyboard, you can find a button there PrtScr. The name of this button comes from English Print Screen- screen printing. Previously, by pressing this button, the printer would print the active screen. Now, when we click this button, the screen image goes to the clipboard. All that remains is to insert the image into some program from which it can be saved.
Honestly, on a laptop, this button can be anywhere on the right side of the keyboard. Sometimes, as in the example below, for this button to work you need to start a button with it Fn(Functions - this is usually located on the lower left side next to the button Ctrl) and without releasing it, press the button labeled PrtScr.

To action: press PrtScr, go to the Paint program, it is available in any Windows operating system and click “Insert”.
You can access Paint through the Start menu → All Programs → Accessories → Paint.
The Start menu differs depending on the version of Windows; the screenshot below shows how to open Paint in, because I use this particular operating system.

In the Paint program you need to click "Insert" and our screenshot ends up here. If necessary, it can be edited using the program or simply saved using the button "File" and than "Save" or t.

IMPORTANT. When you press just the PrtScr key, a screenshot of the entire computer screen is copied to the clipboard. When you press the Alt+ PrtScr combination, the active (selected) window is copied. If you use the Win + PrtScr combination, the image of the entire screen is saved in the c:\Users\Username\Pictures\Screenshots\ folder. It can be easily found from the Computer menu. In the left column, click the “Images” menu item and then select the “Screenshots” folder.
So, to take a screenshot on Windows using the system, you need to press the PrtScr key, go to any image editing program, for example Paint, and click the “Insert” button.
Method 2. How to take a screenshot on a computer using an online service
It happens that a screenshot needs to be edited and it is often more convenient to do this using some kind of website than an installed program. For example, let's take 2 such services. They are united by the general principle of how to take a screenshot. Press the button PrtScr(if you don’t know where it is, see the first method just above). We go to the site and click Ctrl+V.

And, as we are advised, we press Ctrl+V.

We see that the screenshot has been inserted into the site window. If you need to save it, then click on it, it opens in a new browser tab.

Congratulations! The image is saved on the computer.
So, to take a screenshot on your computer using an online service, you need to press the PrtScr, or Alt+ PrScr key, go to the service that we have chosen, press Ctrl+V to paste the image and save it to your computer.
Method 3. How to take a screenshot on a computer using special programs
It is worth saying that there are actually a huge variety of programs that allow you to take a screenshot of your computer screen. If you look at the Softportal service, the request “screenshot” returns 181 applications.

Of course, each of them has its pros and cons, but often people use such programs out of habit. Once installed, figured it out and that’s it. There are especially powerful applications, even paid ones, that allow you to quickly not only create a screenshot, but also edit it. For example, you can add arrows, frames, and other effects.
One of the decent and free options is the Joxi program.
You can download it from the official website joxi.ru.
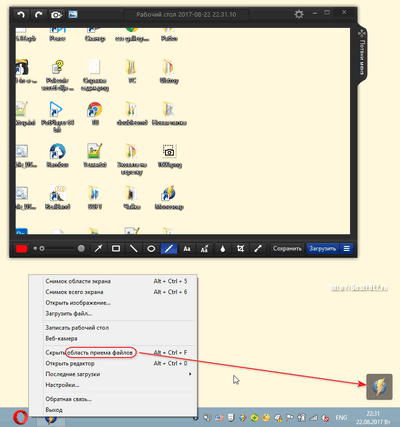
After installation, an icon for this program appears in the taskbar. The first time you launch it, in the bottom right corner you'll be given the option to choose whether you want to capture the entire screen, a snippet, or other options. Subsequently, after clicking on the icon, you can select the area of the screen that you want to save and after selection, the program looks like this:

Notice the blue icon in the top right corner. By clicking on the small arrow on the right, you can select:

Conclusions from our “screenshot production”
If you make a resume, there are 3 main solutions that allow you to take a screenshot on a computer
- Use Windows tools;
- Online services;
- Special programs.
Here, as they say, who likes what and for what purposes. Try it, experiment.
Snipping Tool in Windows 7
The Snipping Tool allows you to take a screenshot of any element on your desktop or the entire screen. The program is launched from the menu Start → All Programs → Accessories.
More details
Mac OS
To take a screenshot in Mac OS, press the keyboard shortcut ⌘ Cmd + Shift + 3. A file with a snapshot of the entire screen will appear on your desktop.
If you want to take a screenshot of a specific part of the screen, press the keyboard shortcut ⌘ Cmd + Shift + 4 and highlight the desired area of the screen with the cursor.
To take a screenshot of just the active window, press the keyboard shortcut ⌘ Cmd + Shift + 4 and then press Spacebar.
iOS
The iOS platform allows you to take a screenshot using standard tools starting from version 2.x. To take a screenshot, press and hold the button for a couple of seconds Sleep/Wake Mode and Home. The resulting images are saved in the standard Photo application.
Android
You can take a screenshot on a mobile device running Android in different ways, depending on the device manufacturer and platform version. The resulting images are saved in the standard Gallery application.
- Android 4.x–9.0
- Android 3.2 and higher
- Android 1.x and 2.x
- Samsung
Press and hold the button for a couple of seconds Decrease volume and Nutrition.
Press and hold the button for a while Recent Programs.
The Android platform version 2.x and below does not support taking screenshots using standard means. You must use third-party applications installed from Google Play.
Press and hold the Home and Power or Back and Home buttons for a couple of seconds (depending on your device).
Press and hold the Power and Home buttons for a couple of seconds.
PicPick is a free program that combines a traditional screenshot and a simple but functional graphic editor. It is easy to use and also takes up very little space.
Using the PicPick program, you can take a screenshot of the screen, immediately correct it, add the necessary elements or eliminate flaws, save the image in the desired format, send it to a social network, by mail, add it to the cloud or open it in Word, and so on.
Installing the program on your computer is very easy. First you need to download PicPick from the official website, for this, follow the link below. Now we look for the installation file on the computer and run it.

Launch the PicPick program installed on your computer. This can be done by clicking on the program icon that appears in the tray.
![]()
After clicking on the icon, the main menu of the program appears, in which you can perform a lot of different actions. "Image Editor"– will open the main program window, “Screen Capture” – will allow you to select a method for creating a screenshot. Let's consider "Program settings".

On the Main tab, you can select a language so that PicPick starts when Windows boots and automatically checks for updates.

The “File Name” tab specifies what name will be given to files when saving, and in what format they will be saved.

On the “Keys” tab, you can see what methods of creating pictures there are, and what hotkeys are used for this.

For example, you are working and need to take a picture of a window or area. I'll take a photo "Arbitrary area", to do this, press the key combination Shift+Ctrl+Alt+PrintScreen. A cross-shaped cursor appears, and I select the desired area with it. The captured photo immediately opens in the PicPick program. To choose what to do with a photo after it is taken, go to the “Capture” tab, then open the list and select the desired item. It can be opened in PicPick, Word, sent by mail or on a social network, immediately saved as a file or .

Try taking screenshots in different ways.
Now from "Main menu" let's look at the programs "Image Editor".
On the "Home" tab, you can perform various actions with the image: crop, apply effects, use stamps, add shapes and text.

On the “Publish” tab, you can publish the file on a social network or open it in another program.
Don't forget to also look at the range of additional features included in the program. Perhaps something will be useful to you.

Now we have figured out that screenshot program PicPick will allow you to easily and quickly save images of the desired areas of the screen, edit them, save them in the desired format on your computer and post them on social networks or send them by email.
I was convinced from personal experience that this is indeed the case. All screenshots for the article were taken using the PicPick program.
Rate this article:The built-in screenshot feature in Windows is not always suitable for use. Therefore, many screenshot programs have been created, the functionality of which is many times better than the built-in version. But first things first.
Screenshot is a screenshot. One at the touch of a button PrntScr can save a “photo” of the image on the monitor to the clipboard. This has its downside. Screenshots taken in this way must be saved manually, since each subsequent press of the PrntScr key deletes the old image from the clipboard.
We will now list the best screenshot apps and discuss their capabilities. It is worth noting that almost all programs work under all versions of Windows 7, 8, 10.
FastStone Capture
Although FastStone does not “weigh” that much, this does not reduce its effectiveness. You can download it from the FastStone Capture website in three forms - exe, zip, or portable version. The latter is different in that does not require installation, and can even be launched from a USB drive.
You can use the utility for free for 30 days, after which it will ask you to purchase a license.
Installation does not require any special actions - a standard license agreement and selection of the installation folder. And this is what the application window looks like:
As you can see, it is small and does not take up much space. For work it is offered Several variants screen capture - photo of the active window, selected object/window, rectangular selection of a specified or arbitrary area, full-screen screen of a scrolling window, as well as screen recording.
After performing one of these functions editor opens, in which you can zoom in/out of the picture, crop it, make a note, highlight important details, and so on. 
Small and fast, the program is ideal for using basic screenshot functions and editing them.
Snagit
This program differs in that it has a website where you can upload your pictures and share them, search for similar ones, store them in the cloud.
The downloaded application is running on the taskbar in hidden icons. To use him It’s very simple - press the hotkey or the application icon itself. After this, you are asked to select an area for screen capture and immediately edit the image. And then it is saved in the cloud/on PC. It's simple.
Jshot
Another simple program for taking screenshots is Jshot. Since the official website no longer works, you can download it from third-party resources.
All that can be said about her is simple and functional. The same hotkeys, the same editor, nothing new, just in a slightly different form and with a different interface.
Screenshot Creator
Clip2Net
Clip2Net allows you to take screenshots, edit them immediately and save to the cloud. A convenient utility for sharing your photos.
There are free and paid versions. Free the clip2net version limits the storage space for files in the cloud, their storage time, the number of downloads per day and the maximum file size. IN paid In versions of cliptonet, restrictions are partially removed and capabilities are expanded.
Ashampoo Snap
Ashampoo Snap is a more professional utility. There are both standard functions and more advanced ones. For example, you can take a screenshot of entire sites at once, or several windows in one.
Advanced Editor allows you to work out every detail of the image. There is also a good video editor.
True, you will have to pay for all this, since the free version limits user actions.
Monosnap
 Another easy to use application. Monosnap offers different screen capture and photo editing options.
Allows save your files in the cloud without restrictions.
Movavi screen capture
Many of those who have ever edited video are familiar with Movavi screen capture. A very simple and at the same time functional interface is the specialty of this company. Allows you to take screenshots and edit them, although the main task is working with video.
Carambis ScreenShooter
A lightweight and free program that allows you to take a screenshot and edit it. One of the features Carambis ScreenShooter is something that places virtually no load on the system.
ShareX
Another lightweight application that practically does not load the system. ShareX is mainly used to quickly share your photos. Traditionally, there is also an image editor.
Joxi
Joxi shareware screenshot utility. Provides a large amount of cloud storage and unlimited file storage time.
In just a couple of clicks you can create and send an image, editing it along the way.
ScreenShot Captor
ScreenShot Captor application, which is suitable for working with multiple monitors. Allows you to take several types of screenshots and configure a hot button for each type.
Peculiarity is that it allows you to create your own watermarks.
DuckCapture
A simple version of a screenshot that allows you to take screenshots of different types and formats. DuckCapture allows add annotations to pictures and upload them to the cloud.
Suitable for Windows XP, Vista, 7.
SnapDraw
The difference between this application is that, in addition to regular screenshots, it allows you to create them in 3D. In the SnapDraw editor can add several images to combine them into one, and there are also many special effects.
Lightscreen
Lightscreen allows you to work with multiple monitors and at the same time very easy to use. Up to six hotkeys can be configured, and the created screenshots are saved in the cloud on imgur.com. 
Jing
Screen Grab Pro
Screen Grab Pro allows you to use hotkeys to capture the screen in different formats and views. There is a timer for slow capture.
Cropper
Allows trim and edit Pictures. Cropper is a good image editor, but the interface takes some getting used to.
Screenshot
A bit similar to Light Shot, but still an original screenshot program. The screenshot allows you to immediately make annotations, put arrows and so on in the picture.
QIP Shot
An intuitive program that allows you not only to take screenshots and edit them, but also to online broadcast your screen. The QIP Shot editor allows you to work with images of all types. Cloud file storage is also available.
As you can see, most programs are similar, and at the same time differ in functionality. But all of them greatly improve the built-in screen capture function, which makes working with pictures much easier.


