The Elder Scrolls V: Skyrim is a fantasy game with a rich game world. Colorful caves and gloomy dungeons, spacious forests, majestic mountain ranges covered with snow and ice, impressive medieval fortified cities capable of holding an entire army - all this is the hallmark of the Elder Scrolls universe. Exploring the world can take many hours. The developers tried to make it not only exciting, but also pleasing to the eye. The settings for the graphic component are very flexible. Let's take a closer look at the settings that affect picture quality and performance.
Basic graphic settings of Skyrim
- Aspect ratio - aspect ratio.
- Resolution – screen resolution.
- Antianalising - smoothing.
- Anisotropic Filtering - anisotropic filtering.
After launching the launcher, go to the settings window. Next, the “Skyrim options” options window will open. At the first launch, the optimal settings will be entered by the launcher itself. It is not recommended to change them, but if you are sure that your system is capable of more, then the following tips will come in handy.
- The ratio of the height and width of the monitor is “Aspect ratio”. Change the “Aspect ration” parameter if black bars appear on the sides of the screen. “Resolution” is responsible for the resolution and clarity of the image. Depending on the selected aspect ratio, the acceptable screen resolutions also change. High screen resolution settings can have a significant impact on performance.
- “Antianalising” is a parameter responsible for smoothing surfaces. If you disable this parameter, the “ladder” will noticeably worsen the picture. The outlines of buildings, terrain, and equipment become smoother at higher values. The impact on performance depends on the power of the video card. To achieve balance, it is recommended to set the parameter to position “6”. The noticeable difference between “6” and “8” is noticeable only at high resolution and on a large screen.
- Anisotropic Filtering is responsible for the clarity of textures located at an angle to the main character. Overall, it improves the picture. Especially noticeable when looking into the distance. Doesn't affect performance much. The difference between the filtering state being turned off and the parameter being turned on to “2” is noticeable to the eye, and does not affect FPS. To achieve the best result, set the parameter to “16”.
- The “Detail” line will allow you to select graphic settings presets. There are only four detail presets – from low to ultra. Accordingly, the selected parameter will have a corresponding impact on performance.
Fine-tuning graphics and effects in Skyrim
- Texture quality – texture quality.
- Radial blur quality – radial blur quality.
- Shadow Detail – quality of shadows.
- Decal Quantity – number of decals.
Clicking on the “Advanced” option will open a window with fine graphics settings. This window is divided into 2 parts. The settings in the first window are responsible for graphics. The second window is responsible for the drawing distance of characters, effects and various objects.
- The “Texture quality” parameter or texture quality affects the resolution of textures. The higher it is, the sharper objects become. The impact on performance is only noticeable at high screen resolutions. If your video card has a small amount of memory, it is not recommended to set the parameter to maximum values. “Radial Blur” is responsible for simulating the main character receiving damage. The radial shake effect appears during battles. Performance impact is minimal.
- “Shadow detail” – a parameter responsible for the quality of shadows. As you know, shadow processing in games has a significant impact on performance. High values of this parameter will please the eye with the play of shadows. “Decal quantity” – is responsible for the quality of small objects. The quality of decals affects bits of dirt, ice spell marks, and charred surfaces. The impact on performance is negligible.
- FXAA is a time-tested filter that is responsible for smoothing objects. This option significantly improves graphics and practically does not load the system. Paired with Antianalising turned on, the image becomes juicy and pleasing to the eye. If you are looking for a way to take the load off your system but still maintain acceptable graphics, then enable only FXAA.


Adjusting draw distance and water quality in Skyrim
The water quality will noticeably improve if you check all the proposed options under the “Water” parameter. Reflections of the landscape, trees and weather effects will appear. It is worth noting that by unchecking all the boxes, you can gain about 3-5 fps, but the visual losses will also be noticeable. It is better to leave the draw distance settings at the recommended values.

Despite the fact that Skyrim's graphics engine is outdated, it produces a nice picture. If you have a powerful enough video card and a high-performance processor, the game will be able to please your eyes with pleasant views. Tips for setting up graphics are designed to help achieve the optimal balance for a comfortable journey through the expanses of Skyrim.
This article describes the configuration file settings Oblivion.ini For The Elder Scrolls IV: Oblivion. With its help, you can slightly improve the game's graphics and change some useful settings to your taste. First of all, this will be useful for those who do not like third-party mods, preferring the original game. What is described in the article is designed for modern computers with at least 1 GB of RAM and 512 MB of video card memory.
Below you will see tables with the names of the parameters and their descriptions. For convenience, the tables are sorted by category - you will find the same categories in Oblivion.ini, where each of them is enclosed in square brackets. The first column of the tables is the names of the parameters, the second is the standard value at maximum graphics settings, the third is the descriptions of the parameters.
To get started, open the file Oblivion.ini any text editor. This file is located in the following path: C:\Users\\Documents\my games\oblivion. Be sure to back up the file in case any errors occur due to changes.
General
| bRunMiddleLowLevelProcess | 1 | If you put “0” instead of one, the game will be provided with more computer resources than other programs. Productivity increases. |
| bFixFaceNormals | 0 | A value of "1" improves the shadows on characters' faces. |
| uGridDistantTreeRange uGridDistantCount |
15 25 |
High values of both parameters increase the visibility of distant trees. Both parameters need to be changed, otherwise there will be no effect. |
| uGridsToLoad | 5 | Responsible for the display radius of highly detailed models and textures. Values can only be odd. If you increase the value, errors may appear. Values for RAM: 1 GB - “7”, 2 GB - “9”, etc. |
| uInterior Cell Buffer uExterior Cell Buffer |
3 36 |
The number of game world cells stored in RAM. The first parameter is responsible for interiors, and the second for exteriors. The values for 1 GB of RAM are “6” and “72”. For 2 GB - “16” and “102”, respectively. Increasing these parameters from the original is necessary when changing the “uGridsToLoad” parameter. |
| SMainMenuMovieIntro SIntroSequence |
If you don’t want to watch the cutscenes before opening the game menu, then delete everything after the “=” sign. | |
| bUseThreadedBlood bUseThreadedMorpher |
0 0 |
|
| bBorderRegionsEnabled | 1 | If you set the value to "0", all boundaries of the world will disappear. |
| uGridDistantTreeRangeCity uGridDistantCountCity |
4 4 |
Parameters that determine the visibility of distant trees from cities. |
| iPreloadSizeLimit | 26214400 | The maximum amount of RAM used by the game to preload data. The maximum value is 262144000. For 1 GB of RAM - 52428800, for 2 GB - 104857600. We do not recommend increasing the initial number of this parameter. |
| bUseThreadedTempEffects bUseThreadedParticleSystem |
0 0 |
When set to "1", these parameters improve performance on multi-core processors. |
Display
| fDecalLifetime | 10.0000 | The higher the parameter value, the longer the blood remains. |
| bEquippedTorchesCastShadows | 0 | If you set the value to “1”, shadows of torches will appear in the interiors. |
| bHighQuality20Lighting | 0 | If you set the value to “1”, the quality of lighting will improve. |
| bAllowScreenShot | 0 | The value “1” allows you to take screenshots in .bmp format using the “PrintScreen” key. |
| iShadowFilter | 2 | Responsible for smoothing shadows. Smoothing increases at high values. |
| fSpecualrStartMax | 1000.0000 | The distance at which glare from objects disappears. The increase affects performance. |
| iActorShadowIntMax iActorShadowExtMax |
10 10 |
Maximum shadows in interiors and outdoor areas. The increase affects performance. |
| iMaxDecalsPerFrame | 10 | Number of blood stains displayed simultaneously. High settings may degrade performance. |
| fShadowFadeTime | 1.0000 | The time of disappearance and appearance of shadows. To avoid waiting for your shadow to appear after switching from first-person to third-person view, set the value to “0.0000”. |
| bAllowPartialPrecision | 1 | A value of "0" will improve the graphics quality. |
| iShadowMapResolution | 256 | Responsible for resolving shadows. The value must be a power of two (256, 512, 1024, etc.). |
| bAllow30Shaders | 0 | If you set the value to "1", then the game will use shaders version 3.0. On modern computers the number of frames per second will increase slightly. |
Controls
Water
| bUseWaterReflectionsMisc bUseWaterReflectionsStatics bUseWaterReflectionsTrees bUseWaterReflectionsActors |
0 0 0 0 |
A value of "1" in each of these parameters will enable the reflection of various objects on the water. |
| uDepthRange | 125 | A parameter that determines the transparency of water visible from land. Increasing the parameter value may result in performance degradation and errors. |
| fSurfaceTileSize | 2048.0000 | A parameter responsible for the size of the water texture mesh. |
| uNumDepthGrids | 3 | A parameter responsible for the visibility range under water. Large values cause errors. A value of "1" for this parameter removes possible errors from increasing the uGridsToLoad variable. |
Audio
Combat
HAVOK (physics)
Interface
GamePlay
SpeedTree
LOD (Long Object Display)
| fLODMultTrees fLODMultActors fLODMultItems fLODMultObjects |
2.0000 10.0000 10.0000 10.0000 |
The distances at which trees, characters, objects and objects begin to be drawn. |
Grass
OPENMP
If you think that some important parameters were not mentioned, write them in the comments to this article.
Quite an interesting mod for all connoisseurs of beautiful graphics and owners of extremely powerful computers.
uGridsToLoad— this is a parameter that specifies the radius of “full” drawing of objects. As a result, everything that falls outside this radius looks less quality and attractive. As you might guess, increasing this parameter will make the picture in the game more beautiful and of higher quality, but at the same time will increase the requirements for computer performance.
By default, this line is not in Skyrim.ini and the game uses the value uGridsToLoad=5, but if you want to increase this indicator, then you need to add the line uGridsToLoad=N in your Skyrim.ini, at the bottom of the section.
This parameter can take only odd numbers values, i.e. 5,7,9,11,13…
By default, using a value of 9 or higher may cause the game to behave incorrectly, even if your computer is powerful enough. This mod will correct this misunderstanding and allow you to use almost any value for this parameter. The maximum value that the author tested is uGridsToLoad=15.
Attention! If you are not sure that your computer has sufficient performance, do not change this value! because if, for example, you set the value to 9 and go into the game and save, and then find that the game has become unstable, you will have to “dance with a tambourine” to return the values to the original data, because you can return it back only in the Skyrim.ini file not enough. The “inflated” figure will be saved in the save file.


The Elder Scrolls V: Skyrim is the fifth installment in the epic role-playing saga The Elder Scrolls. The new game features a vast, detailed fantasy world for you to explore to your heart's content. Like other games in the series, Skyrim allows you to choose how you play through the game. You can be a warrior, a mage, a thief, or all three at the same time; you can be good, evil or neither; ignore the main quests and just do random treasure collecting. All these features (as well as many others) became available due to the fact that Skyrim contains such unlimited possibilities that only a computer game can have.
When a game developer (Bethesda Game Studios) states that game content takes literally hundreds of hours to complete, this is not an exaggeration at all. The duration of the gameplay directly depends on how curious and ready for adventure you feel. From a graphical standpoint, the world around you and its inhabitants look more realistic and alive than ever before. The completeness of the picture is complemented by excellent musical accompaniment, written by the same composer who wrote the music for Morrowind and Oblivion. This makes an already outstanding game even richer.
The purpose of this guide is to allow you to better understand and practice all the configuration options available in Skyrim, as well as special advanced settings to enhance your gaming experience.
- Processor: 2 GHz dual core CPU (Quad Core CPU)
- RAM: 2GB (4GB) RAM
- Hard drive: at least 6GB of free space
- Video card: DirectX 9 compatible (GeForce GTX 550 Ti or GeForce GTX 260 or higher)
- Sound card: DirectX compatible
- Internet connection: required to access Steam
- Operating system: Windows XP, Vista or Windows 7
In this guide you will find complete descriptions for all the settings found in the game's various options menus. To compare the impact of a certain setting on the quality of the game image, we provided this material with in-game screenshots that clearly illustrate the action “before” applying a certain effect and “after” it. For each setting, detailed information is provided about the effects and capabilities that are achieved with it. Also keep in mind that the extent to which any option will affect your system specifically depends on your system configuration, as well as other game settings and general system settings. We've tried to provide as much information as possible here so you can make informed choices (which settings to enable and which ones not to enable) that provide the optimal balance of image quality and performance.
General system optimization
Before moving on to the settings inside the game, make sure that Windows itself and the drivers are installed correctly. Because due to incorrect settings of the operating system and drivers, a large number of performance problems arise. In particular, slowdowns, freezing, or a complete “throwout” from the game can be caused precisely by internal Windows settings and some old or incorrectly configured drivers. Use a dedicated guide to setting up your PC specifically for gaming, or at least make sure your graphics drivers are updated to the latest available version.
performance measurement
To evaluate the success of any innovation, you will need something that can objectively measure gaming performance in FPS (Frames Per Second). The easiest way to make such measurements is to use the FRAPS utility. Download, install and run this program before you even launch the game itself. You will see a yellow FPS counter in the corner of the screen. Keep an eye on its readings throughout the game, especially during graphics-intensive scenes: massive battles over large areas, especially around cities. If at the same time your FPS level drops more than twice or to the level of single digits (0-9), then this is a sure sign that you need to adjust some settings so that the minimum FPS level does not fall below 25. Then you will be guaranteed Constant support for optimal frame rate levels.
Please note that in Skyrim, vertical synchronization (VSync) is enabled by default and cannot be disabled through in-game settings. This means that your framerate will be limited to the screen refresh rate level, which is usually 60 FPS. Mouse lags are also possible. Some solutions to the default Vsync issue will be discussed in the Advanced Settings section of this guide.
General Settings
Before we look in detail at the various graphics settings that have the most significant impact on performance and image quality, let's take a look at the other settings. To get into the game settings, you need to launch Skyrim, load a saved game, or start a new game. After that, press the ESC key and select the “Settings” menu item.
Graphics-related options will be covered later, but for now let's take a closer look at the gameplay, display, and audio settings.
Gameplay
Invert Y: If there is a cross next to this option, then when you move the mouse forward, your character will look down, and moving the mouse back will make him raise his head and look up. If this option is not checked, then the character reacts to mouse movements in the direct order: forward - up and back - down.
Look Sensitivity: This slider determines the sensitivity level of the mouse: the higher the slider level, the more sensitive the mouse becomes to your movements. But remember: if the mouse lags even after you have set this indicator to the maximum, you need to check the frame rate. If its value is constantly at the level of 20-25 FPS, then you need to adjust the settings so as to improve the FPS level. Only after this the mouse’s response will return to normal. In the Advanced Settings section of this guide, we'll look at some advanced settings that can help mitigate mouse lag.
Vibration: If you have a gamepad that can transmit vibration and use it in Skyrim, then check this option to enable vibration transmission during gameplay. Otherwise, leave the window blank.
360 Controller: This option should be enabled if you play Skyrim using an Xbox 360 controller. If the aforementioned controller is connected to your computer, but you do not want to use it to play Skyrim, make sure this option is disabled and/or disconnect controller, as otherwise it may cause hardware conflicts.
Difficulty: The game has five difficulty levels. In order from easiest to most difficult, they are called Novice, Apprentice, Adept, Expert, and Master. The higher the difficulty level, the more difficult it is to complete the battles: in order to kill the enemy, he will need to inflict more damage. However, unlike Oblivion, enemies in Skyrim will not automatically level up to match your current level. Often, battles will take place with both frankly weak and very strong enemy units. Moreover, the difficulty level can be changed at any time, and the changes will take effect immediately.
Show Floating Markers: In your Journal, you can use the Enter key or left-click on the corresponding quest titles to determine which ones to make active. A small mark will appear above each active quest in the journal. In turn, such a quest will be highlighted with an arrow on the compass at the top of the screen. If this option is active, then a smaller version of such an arrow will also float over the corresponding character (object, area) from the quest when he is nearby. Disabling this option removes the floating markers, but has no effect on the display of other quest markers.
Save on Rest: If selected, then whenever you fall asleep (Sleep), an autosave will be created (the state at the time before falling asleep).
Save on Wait: similar to the previous one. An autosave will be created every time before selecting the “Wait” option.
Save on Travel: similar to the previous one. The game will automatically save the entire time you use the Fast Travel option. Save moment: before starting a journey to a new place.
Save on Character Menu: If this option is active, you can use it to determine the amount of time (in minutes) that must pass before an autosave is created after you enter the Character Menu (default - TAB key).
Created using one of the four options above, Auto Save files are different from, and do not overwrite, Quick Save files and other manually created “saves.” However, the total number of simultaneously existing Auto Save files is limited to three, so more recent “autosaves” will replace previously created ones. Four different autosave options are designed to make it easier to create autosaves on a regular basis. So that if you forget to save manually or using a quick save, you have at least one more or less fresh and good point to resume the game. If you often use Quick Save or manual saving, then activating these four options is not necessary.
Display
Brightness: This slider adjusts the overall brightness of the game. Set it according to your preferences. The slider position in the middle corresponds to the default brightness level.
HUD Opacity: allows you to set transparency for the main elements of the Heads Up Display (HUD): compass scale, crosshair, health, magic and stamina levels. The further to the left you move the slider, the more transparent these elements become, until they become completely invisible at the far left point of the slider. If the constant presence of a HUD seems intrusive or distracting to you, then you can reduce the level of transparency of its elements, leaving them visible, but less expressive.
Actor Fade, Item Fade, Object Fade, Grass Fade, Light Fade, Specularity Fade: These all have an impact on performance and image quality and will be covered in their respective sections of this guide.
Crosshair: if you check this box, a round crosshair will appear in the center of the game screen. If you remove the check mark, the sight will disappear. However, even if you turn off the crosshair display, an eye symbol will still be displayed in the middle of the screen while sneaking, indicating the level of exposure.
Dialogue Subtitles: When this option is selected, subtitles are displayed for the spoken responses of characters with whom you engage in dialogue. However, anything they say outside of their direct conversation with you will not be displayed using subtitles.
General Subtitles: This option determines whether words spoken by game characters outside of dialogue with you will be shown as subtitles.
The difference between the last two settings can be illustrated by this example: if you pass by characters in the game and they mutter something inaudibly, or when you engage in combat with them, then their words will be shown as subtitles with the 'General Subtitles' option enabled . If you are talking with a specific character and the dialogue interface is open, then all the interlocutor’s answers will be duplicated with subtitles only when ‘Dialogue Subtitles’ is selected. If both options are active, then all spoken words will be repeated in text.
Audio
Master: This is the master control regarding the overall volume level of all game sounds.
Effects, Footsteps, Voice & Music: These sliders adjust the volume level of the corresponding game elements.
Many aspects of gameplay, interface and audio can be customized later (during the gameplay). This will be discussed in more detail in the “Advanced Settings” section of this manual. Now it's time to look at the various graphics-related settings.
Video Settings
A full range of graphics settings are available in the Options menu, which can be called up whenever you launch the game from the Steam game server. In this section, we'll take a closer look at each of the graphics settings and see how they affect performance and picture quality.

We start the performance graph for each of the settings at the “base level”, where all options are set to High detail preset and vertical synchronization (VSync) is disabled (how to disable it is in the “Advanced settings” ). From this baseline, we varied specific settings to measure their effect on performance and image quality.
Parameters of the system on which we tested the game:
- GeForce GTX 560 1GB
- Intel Core i7 940
- 3GB RAM
- Win7 64-bit
- NVIDIA 285.79 Beta Drivers
- Resolution & Antialiasing
This section covers the general video settings found in the main Options window, accessible after launching Skyrim Launcher.
Graphics Adapter: Your graphics card (GPU) is shown here. Check that it is defined correctly. If this is not the case, see the General System Optimization section of this manual. You can also read the beginning of the Advanced Settings section to learn how to reset all settings to their default settings.
Aspect Ratio: This option determines the ratio of your monitor's height to width and affects which options are available to you in the Resolution setting. To avoid picture deformation, choose the ratio option that matches your monitor. In most modern displays it is 16:9 or 16:10, in older models it is 4:3. The correct aspect ratio should be set automatically, but if you are not sure, then do a simple test: make sure that round objects in the game (for example, shields) look really round. If such objects are flattened or stretched (have the shape of an ellipse), then the proportions are set incorrectly.
Resolution: This defines the resolution of the game image, expressed in the number of horizontal and vertical pixels (for example, 1920x1080 pixels). The number of resolution options is limited by the following parameters: the capabilities of your video card and monitor; is there a checkmark next to ‘Show all resolutions’? ‘Aspect Ratio’ settings discussed above. The higher the resolution level you select, the more detailed the image on your monitor screen will be. Do not also forget that too high a resolution can provoke and increase the load on the system (in particular on the video card), as a result of which the overall level of gaming performance will decrease. For a clearer image on LCD monitors, you need to select the highest possible resolution level (the so-called “native” monitor resolution). In the same case, when you choose a resolution below the possible maximum, also check the box next to the ‘Windowed Mode’ box, the meaning of which will be discussed later in the text.
The graph shows changes in FPS values depending on changes in resolution settings:

The graph shows that the FPS value is inversely proportional to the resolution level: the better the image, the lower the performance. But in our game, FPS does not decrease on such a large scale as in others. The thing is that in Skyrim the load level of the central processing unit (CPU) is forcibly limited. This means that if your processor is a little weak, but you have a powerful video card, then changing the resolution will not have any noticeable impact on the overall system performance.
Windowed Mode: if you want to run Skyrim in a separate window on the Desktop (so that the game does not take up the entire screen, hiding other applications and Windows elements), then check this box. Running the game in this mode is the best solution if you need to reduce the resolution of the game screen to improve performance while maintaining image clarity. However, this can cause problems with memory allocation in the system, so if you experience any instability, then it is better to switch back to full screen mode.
Antialiasing: a method that reduces the “jaggedness” of lines - Antialiasing (AA) - in Skyrim is available for use in four options: “off” (Off), “2 Samples”, “4 Samples” and “8 Samples”. This corresponds to 0, 2, 4, and 8 times Multi-Sample Anti-Aliasing (MSAA). The higher the anti-aliasing level, the less jagged the contours of various objects in the game world will be. But the higher the potential level of FPS loss.


In the pictures above, notice the roof of the building and the wooden fence immediately behind the player character. When anti-aliasing is not applied, the contours of these objects have a pronounced “jagged” effect. When the AA level is set to "2 Samples", the jaggies are already smoothed out to a large extent. At the “4 Samples” level, the lines are already almost perfectly straight. All the beauty of choosing the “8 Samples” level is quite difficult to appreciate with the naked eye, at least in these static screenshots.
Regardless of the level of anti-aliasing we choose, some aspects of the game will still appear somewhat uneven, especially foliage. This can be corrected by using the FXAA filter (more on this later in the text), or by forcing Transparency Antialiasing, which is discussed in detail in the “Video Driver Settings” section of this manual.
The performance impact of changing this setting is shown below:

Anti-aliasing can have a significant impact on FPS, but a lot also depends on the resolution you choose. As you can see in the graph, using 8x MSAA overall has a significant impact on performance, resulting in only a marginal improvement in image quality. By and large, if you want to use anti-aliasing, then the best options are 2x or 4x MSAA. But if you need to increase the FPS level, then MSAA is the thing that needs to be disabled first. FXAA can also be considered as an alternative way to smooth images, but we will talk about that later. Please also note that 8x MSAA caused artifacts at a resolution of 2560x1600, so we did not perform performance measurements on this combination of parameters.
Anisotropic Filtering
Anisotropic Filtering: Anisotropic filtering (AF) is a texture enhancement technique designed to improve image clarity on surfaces that are angled towards the viewer. Similar textures are noticeable in the pictures below when looking at the road that opens up in front of us. Here, anisotropic filtering is first turned off, and then its multiplicity is increased from two to sixteen times. The higher the AF factor used, the clearer and more visible the road surface becomes, receding into perspective.


In these game screenshots you can see how the picture quality changes when a certain AF level is applied. This effect is most noticeable on the main path made of wooden blocks and on the stone road running parallel to it: with increasing AF, they become increasingly clearer. Even with an anisotropic filtering factor of 2, the overall improvement in detail appears significant, and with 4x AF applied, texture clarity at medium distances is noticeably higher than before applying the filter. At a factor of 8, even the most distant surfaces become clearer, while 12 and 16 make only subtle improvements over the previous level.
If you want to improve the quality of textures even more using anisotropic filtering, then this indicator can be forcibly activated through the control panel of the video card. In this case, the image quality will be much clearer compared to using AF directly through the game's graphics settings interface. This issue will be discussed in more detail in the “Video Driver Settings” section of this manual.
The dependence of performance on changes in AF indicators is shown below:

Anisotropic filtering has a very small impact on the performance of modern video cards. In essence, AF level 8 is the best option, while AF level 16 is worth choosing for those who want maximum image clarity with little loss of performance. If you have an outdated video card or you have to literally “rip out” every unit in the FPS indicator, then 2 AF is quite enough to experience a noticeable improvement in texture quality compared to the complete absence of such a filter.
Detail Presets
Detail: in the game you have four main auto settings for the graphics quality level: Low, Medium, High and Ultra. Each preset affects a wide range of settings, as well as the effects of the Antialiasing and Anisotropic filters. In general, this composition has a significant effect on improving performance and image quality. However, do not forget that all installations have been done for you and come as a ready-made kit. Therefore, using presets is not an option when you need to customize the graphics in Skyrim specifically for yourself with pinpoint precision.


The figures above show the differences between the capabilities of each preset:
- at a low level (Low), the image looks generally acceptable, but the detail of the game world is frankly poor. Textures are very blurry despite the fact that Texture Quality is set to “Medium”, which is not the lowest possible setting. Grass and foliage are almost invisible, objects seem unusual for the game world, shadows are very short: therefore, everything that is already behind the character does not cast shadows at all. Nothing else is reflected in the water except the sky. Antialiasing and Texture Filtering filters are also not applied, which results in jagged edges and blurred distant images.
- at the medium level (Medium), the “Texture Quality” parameter is set to the highest value. However, this does not greatly affect the level of clarity of the overall picture due to the simultaneously activated FXAA and four-fold Multisample Antialiasing. The latest filters are used to reduce jagged textures. Increasing shadows, the appearance of trees and other details in the distance add more depth to the overall picture. The water already reflects not only the sky, but also the main elements of the area, which looks more realistic.
- At the “High” level, objects look much sharper because FXAA, 8x Multisample Antialiasing, and 8x Anisotropic Filtering are active simultaneously. Together, these filters improve picture quality by keeping blur to a minimum. Grass and leaves look much more realistic, as do nearby objects. Barns, tree stumps, rocks and a bridge stand out in their realism to the right, while the surface of the ground (both nearby and in the distance) takes on sharper contours. The character's shadow is much clearer (since its resolution has been increased), and the rest of the shadows have increased to their normal length. Water already reflects everything, not just the sky.
- At the Ultra level, noticeable differences are visible at distant objects. Most of the objects on the right began to cast shadows, the number of trees on the top of the mountain increased, and the mountains themselves became more detailed. The surface of the water has undergone minor changes, becoming more similar to the color tones of the sky. By increasing the Anisotropic filtering level to 16, distant textures also became noticeably clearer.
The dependence of the performance level on changes in detail settings is shown below:

The graph shows how noticeably performance can change depending on different detail settings. The transition from Medium to High turns out to be very significant at low resolutions, reducing the frame rate by almost half. But in any case, the set of settings for each of the presets is far from ideal. We recommend that you start with the detail settings that suit your system best (without overloading it), and then adjust each filter individually to achieve the optimal balance between performance and game image quality.
In the next section, we begin a detailed examination of all the graphical settings that are available when you click on the “Advanced” button in the Skyrim Options window.
Texture & Radial Blur Quality
Texture Quality: Textures (in general) are images that cover the surfaces of all objects in the game world, giving their appearance an effect of depth and detail. This setting adjusts the level of detail for textures and has Low, Medium and High options. As they change from low to high, the visual depth and detail of structures increases, improving the overall perception of the picture.


In the screenshots above you can see how using one or another degree of this effect affects the image quality. At Low level, surfaces and objects are very poorly detailed. This is done primarily to ensure that the game runs even on the weakest system configurations. On Medium, the overall picture already looks much more detailed: the leaves become more visible, the bark on the trees becomes more realistic, and the road becomes structured and deep. The rocky hill visible in the distance to the right also acquires pronounced detail. When using High, the difference with the previous level is also quite noticeable: the bark and leaves become even clearer, the road becomes clearer, and the rocks (regardless of the distance) are “overgrown” with new details.
Try to use anisotropic filtering (AF, discussed earlier in the tutorial) in order to improve the clarity of textures. Also remember that FXAA settings (discussed later) tend to blur the overall image slightly and can therefore reduce the clarity and definition of textures. Therefore, if you care about very clear textures, FXAA should not be used.
The impact of this indicator on the level of performance is shown below:

As you can see from the graph, this setting has a very moderate effect on the FPS level. However, the graph cannot show that if your video card has a small amount of RAM (Video RAM; VRAM), then you may experience slight “slowdown” or periodic “lags” when using the High level. The minimum level we recommend is Medium, as on Low the details are still too blurry to enjoy the game.
Radial Blur Quality: This setting adjusts the amount of visibility of the radial blur effect, which is most often used to simulate disorientation and pain when you miss hits in battle. It's called "Radial" because the judder and blur appear to radiate out in circles from the center of the screen. There are three options (levels) available for this effect: Low, Medium and High. As practice shows, there is no significant difference between these three levels.


The comparison frames of the screenshots were intended to demonstrate the difference in the use of each level of this setting, but seeing it is quite problematic due to the fact that this itself is a dynamic effect. And despite the fact that in the screenshots the Medium and High levels look more “shaky” than Low, during dynamic gameplay the overall degree of “jitter” for each level looks about the same. With this setting, you won't be able to turn off the effect completely (unless you like it). For more information on how to do this, see the “Advanced Settings” section of this guide.
The performance impact of changing this setting is shown below:

The graph confirms that changing the Radial Blur Quality parameter does not have a noticeable effect on gaming performance (mainly due to the fact that changing the levels of the parameter itself does not significantly affect the visual image).
Number of decals and shadow detail (Shadow Detail & Decal Quantity)
Shadow Detail: This setting controls the overall resolution of most shadows cast by players, objects, and buildings in Skyrim, as well as the length of those shadows. There are four levels available: Low, Medium, High and Ultra.


In the pictures above, you can see that at Low level the hero and the tree next to him cast unclear shadows due to the choice of their low resolution to preserve gaming performance. At the Medium level, the contours of the shadows become more visible. Using High they become even more detailed, although some blurriness still remains. Additional shading becomes noticeable at medium distances. At Ultra there is a subtle improvement in the appearance of shadows, also appearing on rocks and overhangs in the distance.
Due to the nature of game shadows, their quality will vary noticeably depending on distance and lighting source. For example, a shadow cast by an object indoors from a nearby fire will have smooth edges and appear more detailed. And shadows from objects located further from the fire will remain “square”. By the way, we noticed a small game “glitch” (not only in this game moment) and it can be seen in the pictures above: after the shadow detail level changes from High to Ultra, additional leaves appear on distant trees.
There are several ways to add and customize shadows using a set of commands described in the Advanced Settings section. You can also add beauty to the gaming atmosphere by displaying shadows even more deeply using the pre-installed Ambient Occlusion. To learn more about this, see the “Video driver settings” section.
How gaming performance changes depending on changes in the shadow detail parameter can be seen in this figure:

The graph shows the significant impact of shadow detail level on FPS. This is not surprising since shadows are widely used throughout the gaming world. In practice, the impact of this parameter on FPS can be even more significant in some game episodes, so use it sparingly so as not to harm performance and get rid of lag in some specific episodes. For example, simply switching from Ultra to High can significantly increase FPS without any loss in image quality.
Decal Quantity: This setting determines the number of decals that can be visible at once. As a rule, decals are small images that are additionally applied to characters, objects and the surrounding area. These could be pieces of dirt, blood or char marks. The available options are None, Medium, High and Ultra. However, it seems that in Skyrim this option has no effect on blood spatter, since even with the option turned off, your weapons, enemies and the screen (from the back) still remain quite bloody during battle.


The main differences when varying different levels of this attunement were visible in the appearance of a large number of black charred spots on the ground after using destructive spells. They are not present when the Decal Quantity parameter is not enabled at all; at the Medium level there are already quite a lot of them; switching to the High and Ultra levels no longer noticeably increases the number of decals appearing on the screen simultaneously. Although in practice it is quite difficult to count the number of decals that appear in most scenes, the theoretical values for the maximum number of these additional images are as follows: None - 0, Medium - 100, High - 250 and Ultra - 1000.
The dependence of performance on changing this parameter is presented below:

The graph shows that this setting has a very small effect on game performance, although it can slightly “overload” the system in massive battles when spells are used and a lot of decals are generated (like blood, soot, etc.). Since in most cases high settings do not make a drastic change in appearance, we recommend setting it to Medium for the optimal balance of performance and image quality.
FXAA and reflections in water (FXAA & Water)
FXAA: NVIDIA's FXAA filter (short for Fast Approximate Anti-Aliasing) is a jagged edge smoothing technique that has proven to be quite effective and moderately effective. There are four options available for selection: Off, Low, Medium and High. FXAA can be used instead of or in conjunction with the standard gaming Antialiasing filter that we covered earlier in this guide.


The screenshots above show the main combinations of the various anti-aliasing filters available in Skyrim. In the first pair of images, standard Antialiasing was not used at all, only the effect of FXAA is visible there. When this filter is turned on, the total number of jagged lines becomes much smaller, such as the outline of the top of a bridge in the distance, bushes and trees, and the outline of a horse and its rider. However, this filter also blurs the overall picture slightly, making it a little hazy and reducing the clarity of textures, as seen in the example of the wooden planks of the bridge in the foreground. In the third image, FXAA is already turned off, and instead eight times standard anti-aliasing (8xAA) is turned on. When comparing the third image to the first and second (where only FXAA was used), it can be seen that the 8x AA level eliminates the "jaggies" on most objects without blurring them like FXAA. The overall picture itself looks much clearer, but it is worth noting that 8x AA does not smooth out foliage. Well, the last one is an image where FXAA and eightfold AA are turned on together. It looks extremely smooth. Be that as it may, the overall picture is still not as blurry as with only FXAA, and the fog is more noticeable.
The performance impact of changing this filter is shown below:

FXAA stays true to its reputation as a moderately efficient filter, having minimal impact on FPS at various resolutions. This makes it an indispensable assistant for those players who are looking for a resource-saving and fairly effective line smoothing tool instead of the more intensive and resource-consuming Antialiasing filter option available in the game menu. On the other hand, if FXAA blur is a concern for you, but you still want to achieve foliage antialiasing, you can enable Transparency Antialiasing, which we'll go into more detail in the Video Driver Settings section.
Water: There are four options for reflections that appear on the surface of water: Reflect Land, Reflect Trees, Reflect Objects and Reflect Sky. If desired, you can disable all reflections by unchecking the corresponding boxes (Reflect None), or vice versa, enable them all together (Reflect All). Depending on the selected reflection option, the color and realism of the water in the game will change.


The screenshots above compare the main options for reflections in water. Pay attention to the water around the nearby ruins and the water that is quite far away. When all reflections are turned off, the water looks a fairly flat, pale blue color. When Reflect Land is turned on, the general contours of the landscape are visible in the water. When you activate Reflect Trees, you can clearly see the reflections of trees in the water. The screenshot with Reflect Objects turned on shows that rocks and more detailed elements of the earth's surface are already visible in the water. Reflect Sky affects the appearance of the water surface, giving it realistic highlights and changing color. When all these options are selected together, compared to the Reflect None screenshot, the Reflect All image clearly shows the depth and realism of the picture achieved thanks to the various reflected elements.
The performance dependency on changing the reflection options parameters is demonstrated below:

This graph shows that when reflection options are enabled individually, they do not have any noticeable impact on gaming performance. However, when they are all enabled together, there will be a slight jump in framerate. Given how significantly these options can improve the realism and depth of bodies reflected in water, it is generally advisable to leave them turned on. At least if you are not fighting for every FPS unit while there are large water surfaces in the game scenes.
Objects and characters in the field of view (Object & Actor Fade)
There are a number of settings available on the View Distance tab of the Advanced Options window. They determine the distance between you and an object (character, object) necessary for this object (character, object) to appear in your field of vision (or disappear from it). The important point is that the effect of entering/disappearing from the field of view, obtained with various combinations of the options described below, directly depends on whether you are approaching a specific object (character, object) or moving away from it. For example, if you approach a rock with the Object Fade set to the lowest level, then this rock will instantly appear in front of your eyes, just a few steps away. But when you move away from it, you will need to cover twice the distance for it to disappear from view again.
Object Fade: This slider determines the distance at which secondary game objects, such as fences, rocks, paths, and others, become visible. When this setting is at its minimum level, some objects in the distance will not be visible and will only come into view when you begin to approach them. The distance at which they begin to appear is determined by the position of the slider: the further to the left it is, the closer you will need to be to the object for it to appear before your eyes.


The images above show the effects when the slider is positioned at Minimum, 1, Medium, 8, and Maximum, 15. When moving from Minimum to Medium, a number of additional objects become visible, including some new rocks in the middle of the screen, a path to the left in the distance, as well as many dead branches, rocks and small boulders throughout the landscape. At the Maximum level, the main changes concern increasing the detail of small bushes and stone ledges, respectively, in the far left and far right of the center of the screen.
The impact of this setting on game performance is shown below:

The graph shows that as the Object Fade level increases, FPS begins to decrease, but this is not the main thing. The main reason why this setting should not be too low (preferably leaving it at the Medium level - 7 or 8) is so that during your wanderings around the game world you do not miss interesting objects and items standing nearby.
Actor Fade: This slider adjusts the distance at which characters and creatures can be seen. Similar to Object Fade: the lower the slider goes, the closer you need to be for these creatures to become visible to you.


The screenshots show the slider positions corresponding to the levels “minimum” (Minimum, 2), “average” (Medium, 8) and “maximum” (Maximum, 15). The situation involves four different people and a chicken. With Actor Fade set to the minimum level, none of this is visible. On the middle one, an elderly woman and a chicken are already visible in the middle of the screen, but the other three people are still not visible. When switching to maximum, two adults and a small boy are now visible at the end of the path, although they are quite difficult to distinguish.
The dependence of productivity on changes in this indicator is visible below:
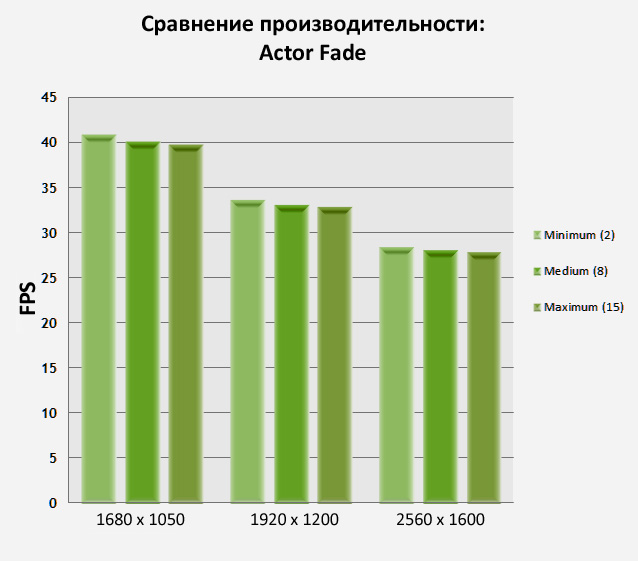
The graph shows a slight drop in FPS as Actor Fade increases. Battles and interaction of the main character with other characters are one of the key ideas of Skyrim, so we strongly recommend not underestimating this indicator unless there is an urgent need to “pull out” FPS. Alternatively, using the Minimum level will result in you literally bumping heads with other characters or creatures that suddenly appear right in front of your nose.
Grass & Specularity Fade
Grass Fade: this slider adjusts the amount of grass and small bushes that appear in the corresponding game locations (forest, meadow, etc.). The lower the level of this parameter is set, the less vegetation on the ground surface is visible.


The images clearly show the difference between the three slider positions: “minimum” (Minimum, 0), “medium” (Medium, 3) and “maximum” (Maximum, 7). At the Minimum level, the ground in front of us is completely devoid of grass. Rare patches of grass are visible only in the immediate foreground, and a few lonely bushes of fern are visible in the distance. When using the middle level, the amount of small vegetation increases noticeably: grass and small grass bushes cover almost the entire road, approximately to the middle of the field of view. At the Maximum level, the entire field (even at a fairly large distance) is already densely covered with grass. But still, in the farthest corners, small “bald” pieces are visible.
The dependence of performance on the settings of this parameter is discussed below:

The graph shows that the Grass Fade parameter has an impact on gaming performance, but in many cases it is not significant. And since grass is not the most important thing in the game (and sometimes it can even obscure some objects and areas), it is appropriate to reduce this setting within reasonable limits if you need additional performance in outdoor scenes.
Specularity Fade: This slider is designed to adjust the brightness level (shine) of many objects in the game world. However, in practice its influence is almost not manifested in any way.


The available levels for this setting vary from minimum (Minimum, 2) to maximum (Maximum, 15). In the additional settings, you can also select the “ultra” level, then the Maximum value will become 20. Be that as it may, the screenshots above make it clear that there is absolutely no difference between the minimum (2) and maximum (20) influence of this setting. And this despite the fact that the room is full of shiny and shimmering surfaces. Barely visible changes are visible only in the thickness of the smoke rising from the torches.
The effect this setting has on game performance is shown below:

The graph confirms that “from nothing comes nothing”: since this setting does not produce visible visual effects, it has almost no effect on performance. This is an excellent reason to set it to minimum in order to win an extra couple of FPS units without feeling it in the quality of the game image.
Appearance of heat from fire and small objects in the field of vision (Light & Item Fade)
Light Fade: Using this slider, you adjust the distance from which fire from various sources (bonfires, torches, etc.) becomes more clearly visible. In practice, this effect establishes the realism of the heat emanating from the fire and the rarefied air in its immediate vicinity. The effect is best seen indoors.


The images show different levels of this effect: “minimum” (Minimum, 2), “medium” (Medium, 18) and “maximum” (Maximum, 35). Upon closer inspection, subtle changes are difficult to discern, and during gameplay they are not visible at all. If you look more closely at these pictures, you will see that on the torch on the right the fire has become more distinct, and in the brazier, in addition, the rarefied air rising upward from the flame is also clearly visible. The overall picture in the room becomes a little brighter.
The impact of this effect on game performance is depicted below:
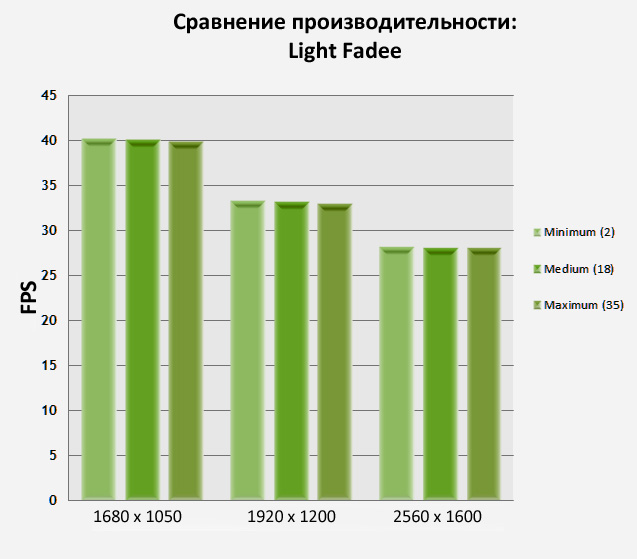
The graph shows that applying the Light Fade effect has a negligible impact on performance levels. Since this effect affects the game image in much the same way, it can be safely minimized if it is necessary to increase the FPS level. As much as possible, it would be wise to turn it on when the action takes place in dark dungeons, in order to make them a little lighter.
Item Fade: This visual parameter sets the distance from which small objects (weapons, armor, potion vials, scrolls, etc.) enter your field of view. The lower the slider level, the closer you need to be to the object for it to become visible to you.


In the game episode captured in the pictures above, we see a large number of different objects densely scattered along the entire length of the road, on the bridge and near a small shack standing in the distance. When the minimum level is set (Minimum, 1), then only nearby objects are visible: several mushrooms, a book, a scroll and a couple of bottles with a potion. At an average level (Medium, 8), absolutely all objects become visible, including barely visible weapons, scrolls and shields in front of the barn. At the Maximum level, no fundamental changes occur with the previous image: all /pobjects are just as clearly visible and just as poorly distinguishable. But the vagueness of the outlines is most likely explained by their microscopic sizes at such a decent distance.
The performance dependency on the Item Fade parameter can be illustrated below:
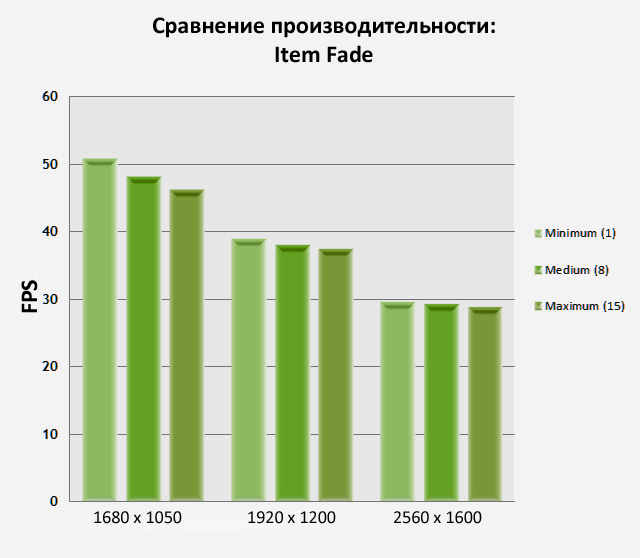
The graph shows that this parameter leads to a noticeable, albeit insignificant, jump in the FPS level, especially at its higher levels. For gaming purposes, we strongly recommend not to lower this parameter below the average level. If you set it to the minimum, then you will simply lose sight of very important and useful items while exploring the game world just because you will not notice them.
Object Detail
Distant Object Detail: This setting adjusts the level of detail of distant game objects. As a rule, these are hills and mountains: they surround almost any game landscape. Available levels: Low, Medium, High and Ultra. The lower the level you choose, the less detail will be visible in the distance. Although it is worth noting that this setting affects realism and game atmosphere to a greater extent than gameplay.


The screenshots above capture the changes each change in detail level brings to the distant landscape. Pay special attention to the mountains in the distance. At Low they are mostly bare, angular and devoid of any vegetation. At the average level, they already begin to gradually fill with content, acquiring shadows, shape and a detailed surface. At the High level, the main innovation is the trees at the foot of the mountains. When selecting Ultra, trees fill the entire mountain surface, making it more realistic. The important thing is that this setting does not affect human buildings in any way (as can be seen by the structure standing on the far right).
How this setting affects gaming performance is shown below:

The obvious implication of a quick look at the graph is that as the level of this effect increases, performance decreases. This is especially noticeable when using the Ultra detail level. Since this setting has no effect on gameplay, you can easily lower it to High or Medium to gain extra performance in large open areas.
Object Detail Fade: The purpose of this effect is to provide additional options for adjusting subtle details of objects in the game world. When enabled, non-essential details will be hidden to provide improved gaming performance. But if you like higher image detail, then you should uncheck this option.


At first it is difficult to find any differences in these two images. If you look more closely, you will notice that on the mountain slope in the distance to the left and center the ivy disappears when the effect is turned on. A small patch of moss and a rock in the distance to the right also disappear. In other words, the effect does not bring any tangible changes, changing only very minor details.
How this effect changes gaming performance can be seen below:

The graph illustrates the slight increase in FPS when this effect is enabled. It makes sense to use it if you need to win some FPS points. Especially considering that it has almost no effect on the game picture, removing items whose loss is not immediately easy to notice.
Afterword
For those players who are used to spending their time immersed in exploring numerous quests and secrets, Skyrim provides a world of almost endless gaming possibilities. Try to avoid the temptation to rush through the game, and enjoy the sharp and detailed gameplay.
As for overall gaming performance, it is advisable to play Skyrim with a good graphics card and processor in order to achieve a consistently high frame rate when using maximum settings. Sometimes a game may be limited by the level of load it places on the central processor, so sometimes stuttering will be inevitable, especially on weak system configurations. On the other hand, this forced limitation on the use of CPU resources gives advantages to owners of powerful video cards: they can significantly increase the level of visual effects without any loss of FPS. However, certain new graphics settings that are available in Skyrim (most notably the Shadow Detail settings) are very resource intensive. Shadows, along with anti-aliasing, are the first two settings that should be limited to avoid overloading weaker systems. Everything else is mostly a matter of taste for each player.Of course, if you like to experiment, then the possibilities of advanced settings allow you to more accurately establish the compromise line on which performance and quality of the game image are always balanced.
If after reading this guide you still have questions and difficulties with the game settings, need some gameplay tips, or just want to know more about the upcoming patches and new downloadable content (DLC) for Skyrim, you are welcome to visit the official Skyrim forum .
Including Skyrim, Bethesda created a separate game engine, the Creation Engine. This new development introduces realistic shadow technology and many other advances. Luckily, the game files and configuration options are readily available, allowing us to tweak the Creation Engine ourselves in a few different ways:
1. By adding or changing variables in configuration files (.ini).
2. Using the command line.
3. Using user-created game modifications (Mods)
4. Changing video driver settings.
Below we will analyze all these methods in detail. But before you start making any changes, we strongly recommend that you protect yourself from possible loss of original settings and saved games. The easiest way is to make a backup copy of the entire \My Documents\My Games\Skyrim directory and place it in a safe place.
Changes to .ini files
The Skyrim game engine uses .ini files to store various settings, which are then read and applied as original. The contents of these simple .ini files can be changed in any text editor, for example, in the usual Notepad (Windows Notepad). Many of these files are located in the main game directory \Program Files (x86)\Steam\steamapps\common\skyrim, but these are only templates and cannot be changed.
Those configuration files that you can (and should) change are located in the \My Documents\My Games\Skyrim directory: these are Skyrim.ini and SkyrimPrefs.ini. When we make changes to any of these files, the specific name will always be indicated. Important: if you mess up something in them and you don’t have a backup copy, or if you suspect that changes in their text will cause some problems, then you can safely delete them. The fact is that the next time you start Skyrim, they will be created again with the default settings.
When you change in-game settings using Skyrim Launcher, a number of variables in the .ini files will also change or be reset. Therefore, it will be better to first adjust all the settings within the game to the level you need before moving on to the “jewelry” settings in the configuration files. You can also write down any changes to these files somewhere (since future official patches may also reset or change some settings in them), but you should never copy the entire .ini file (or a large chunk of it) from an older version to a newer one. new.
The settings listed in this guide are not the only correct ones. In general, this kind of change requires experimentation. We will provide some general recommendations, but it depends on your personal tastes and system capabilities which of the proposed options you choose and what it will cost you. Also, don't just mindlessly copy the contents of someone else's .ini file. In most cases, there will be content that will not suit your personal tastes or even cause problems. Each of our advice implies that you understand the essence and consequences of the changes being made and will test them yourself before finally deciding whether to listen to it and apply the changes to your system.
Important: variables that can be completely changed using general game settings, and those that do not have a significant impact on performance or game image, were not considered.
General Performance
uGridsToLoad=5. This variable does not exist, and in order for the changes it makes to take effect, you must add it to the end of the section of the Skyrim.ini file. It controls the radius around the hero in which the game engine loads the greatest detail of objects, characters and landscapes. This variable also has a significant impact on both the quality of the game image and performance. Any value of this variable must be specified as an odd integer (3, 5, 7, 9, 11). Below are screenshots of the game showing how much more detailed the world around the character becomes at a distance when changing the values of this parameter.


Since changes to this variable provide tempting changes to the quality of the game's image, you should experiment with its values in different game locations. Especially where you usually have the lowest FPS. The default value of "5" provides a fairly optimal balance of image quality and performance. But if you need additional FPS units, then you can reduce this parameter to the value “3”. Although Bethesda strongly recommends against doing this, since changing the lower limit can lead to game instability.
Important: Also remember that too high values of this variable can significantly increase the level of resources consumed by the game, and as a result, be a potential source of game instability and decreased performance. Also, if you save your game after changing this setting, the new value will be applied to the saved game. This fact deserves special attention, since in Skyrim you can only load a game “save” in which the uGridsToLoad level is less than or equal to your current parameter. And you will no longer be able to load a saved game with the highest uGridsToLoad level. Simply put, if you change the values of the variable down again, you will not be able to load games that used large values. Therefore, you should study in detail any change created by the uGridsToLoad parameter before proceeding to save the game. If you need to “roll back” uGridsToload changes in an existing game save, then follow this sequence of actions:
1. Launch Skyrim and load your saved game.
2. Press ALT+TAB to switch to the Desktop.
3. As usual, edit the Skyrim.ini file, lowering the value of the uGridsToLoad variable to the desired level and close it.
4. Use ALT+TAB to switch back to Skyrim.
5. Open a command prompt using the tilde (~) key and type refreshini.
6. Save the game to a new slot. The saved game is now set to the required uGridsToLoad value.
uExterior Cell Buffer=36. This variable controls the number of world cells (depending on the uGridsToLoad settings) that are processed in the random access memory (RAM) buffer to ensure smooth transitions and improve image stability. The general rule for calculating the optimal value for this variable is to add one to the value of the uGridsToLoad parameter and square the resulting number. For example, if uGridsToLoad is at level 7, then uExterior Cell Buffer needs to be changed to 64 =(7+1)2.
iPresentInterval=0. In Skyrim, vertical synchronization VSync is enabled by default and cannot be disabled using the game settings. If you add this variable to the end of the section of the Skyrim.ini file and assign it the value “0”, VSync will be forcibly disabled. Disabling VSync reduces/eliminates mouse lag, removes the cap on FPS, and can also improve overall performance. However, disabling Vsync can also have some potentially negative effects: a "crying screen" effect may occur. In itself, it is harmless, but quite annoying, and the timing and physics of the game world can speed up or “glitch” (especially in those locations where the FPS level is high).
The two main methods for using VSync in Skyrim are:
VSync is enabled (default). Instead of using the D3DOverrider utility (which comes with the free RivaTuner software), enable Triple Buffering. This will improve overall performance and reduce mouse lag without causing any additional negative effects. Just remember that Triple Buffering uses more Video RAM (which can cause problems on some system configurations), and may not reduce mouse lag as much as it would with VSync completely disabled. To achieve the same level, look at the other variables (mouse related) in this section.
VSync is disabled. Use FPS Limiter Mod to maintain any FPS you want (regardless of the recommended one). This should prevent issues with game physics and remove mouse lag. But some “drips” will still remain on the screen.
Note that iPresentInterval can also be set to "2" to allow VSync to run at a reduced FPS cap (typically 60 instead of 30). But this will increase the amount of mouse lag, will not improve performance, and will also result in very long loading times. Therefore, it is better not to use this value at all.
You may have noticed that some notable caching and memory settings were not included in this guide. For example, from the Memory Limit Increase mod. When experimenting with them in Skyrim, we didn't find any practical impact on ongoing performance, resource usage, or overall system smoothness. At the same time, we cannot definitively refute their effectiveness on all systems. As a result, we agreed that there was no need to change them.
Only changing the Large Address Aware (LAA) flag on the main game file TESV.exe can have a real impact on optimizing the game's resource usage. This LAA change allows Skyrim to potentially use more than the two-gigabyte limit inherent in 32-bit executables. But this change is recommended to be made only when the amount of system RAM you have is equal to or exceeds 4 GB. Steam prohibits the use of any patches that directly change game .exe files, so you will need something like this mod: 4GB Skyrim LAA mod. This should not be taken as a panacea for all instabilities, but it can work if you use a number of resource-intensive mods or make changes to .ini files in Skyrim.
Audio
fAudioMasterVolume=1.0000. This variable in the SkyrimPrefs.ini file is equivalent to the Master volume control in the in-game settings. However, here you can assign it a value greater than the limit of 1.0000, which is present in the game regulator. Thus, if the sound in Skyrim seems too quiet for you, you can make it louder: try, for example, setting the level to 1.5000 or 2.0000. Subsequently, you can adjust other sliders that are responsible for the sound in the game, but remember that further manipulations with the Master volume “from under the game” will again reset the maximum value of this variable to 1.0000.
bEnableAudio=1.0. If you add this variable to the Skyrim.ini section of the file and set it to "0", it will disable all sounds in the game. Very useful during troubleshooting so that you can determine whether the audio is actually the source of game problems such as slowdowns and lags.
Interface and control
- fDefaultWorldFOV=90
- fDefault1stPersonFOV=90
To change your field of view (FOV) in Skyrim, you must first add both of these variables to the end of a section of the Skyrim.ini file. Changing their values will correspond to changing the FOV level you want to use. You should also add the variable fDefaultFOV=90 to the end of the section of the SkyrimPrefs.ini file, again setting the value you need. After this, load the last saved game and enter the text FOV 90 in the command line (more details about the command line will be described later in the text) so that the FOV level takes on the values of the above variables. Save the game for the changes to take effect permanently.
- fSafeZoneX=15
- fSafeZoneY=15
- fSafeZoneXWide=15
- fSafeZoneYWide=15
The above section and its variables are added to the end of the Skyrim.ini file. These parameters adjust the distance from the edge of the screen on which Heads-Up Display (HUD) elements are displayed (compass scale, health levels, magic and stamina). The lower the assigned value, the closer to the edge of the screen HUD elements (including status messages or locations) will be located. This will help make them less noticeable and intrusive.
- uLockedObjectMapLOD=8
- uLockedTerrainLOD=8
- fMapWorldMaxHeight=150000.0000
- fMapWorldMinHeight=1500.0000
- fMapWorldZoomSpeed=0.0800
Also, the entire section and all the variables included in it should be added to the end of the Skyrim.ini file (if you need the changes they bring). The first two parameters affect the level of detail of the game world, which is visible in Map view, and the above values make the map more detailed. The third and fourth variables allow you to zoom in and out further in the “zoom” mode than is possible with the normal game capabilities. The last option reduces the zoom speed, so you can see the map better when zooming in or out. If you want to completely remove clouds from the game, you can also add sMapCloudNIF=0 to the above section, and then they will disappear.
bDoDepthOfField=1. If this variable is set to "0" in the SkyrimPrefs.ini file, the Depth of Field effect, most often visible in the backgrounds of the Items, Magic, Skills, Maps screens in the Character Menu, will be disabled. Disabling this effect increases the FPS level, but it also makes it more difficult to distinguish objects in the background of the character menu.
bShowQuestMarkers=1. If this variable is set to "0" in the SkyrimPrefs.ini file, all quest arrows will be disabled (including on the map and compass scale), but landmarks will still be shown. When these markers are disabled, it becomes more difficult to complete quests, since now you will have to listen and read their descriptions more carefully.
bShowCompass=1. If this variable is set to "0" in the SkyrimPrefs.ini file, the compass scale will disappear from the top of the screen. This will provide a cleaner game image, but you will need to refer to the map more often, or study the pathfinding spell (Clairvoyance) more carefully.
bAlwaysRunByDefault=1. If you set this variable to zero in the SkyrimPrefs.ini file, then by default your character will move on foot instead of running. To change this behavior at any time, you simply press the CAPS LOCK key. If the parameter is assigned a certain value manually, then this is the manner of movement the hero will start the game with.
bMouseAcceleration=1. When this variable is set to "0" in the SkyrimPrefs.ini file, mouse acceleration will be disabled. This will make your mouse movements more consistent, responsive, and predictable, so you won't have to move it faster for big movements and slower for small ones. Also, with this change you can reduce the feeling of “lag” inherent in Vsync enabled by default.
fMouseHeadingSensitivity=0.0440. This variable in the SkyrimPrefs.ini file is associated with the in-game Look Sensitivity setting and should primarily be adjusted through the in-game menu. However, if you need to assign it a higher value than is available in the game, then you can make changes here.
- fMouseHeadingYScale=0.0200
- fMouseHeadingXScale=0.0200
The section and its variables must all be added to the end of the Skyrim.ini file to change the sensitivity of the Y (up/down) and X (left/right) axes of mouse movement accordingly. Larger values increase the effective sensitivity of a particular axis.
Shadows
iShadowMapResolution=4096. This variable from the SkyrimPrefs.ini file directly adjusts the resolution of shadows and is therefore the main determining factor in the quality of shadows in the game. It is included in the in-game “Shadow Detail” settings. When the Shadow Detail parameter is set to Low, iShadowMapResolution = 512; average (Medium) – 1024; high – 2048; ultra (Ultra) – 4096. For shadow resolution, a higher value of 8192 is also available, which will slightly improve the quality of shadows, but will significantly reduce the FPS level. The images below show the difference between using this variable value of 4096 (corresponding to the Ultra level) and 8192. The selected scene is indoors, where the difference in shadow quality will be most noticeable. You can see that the character's shadow and the large shadow to the right of it have significantly smoother edges at 8192.


iBlurDeferredShadowMask=3. This variable in the SkyrimPrefs.ini file controls the blur effect applied to shadows. Low values will give sharp edges to the shadows, while a value of 0 will turn the effect off completely, giving the most definition. As the variable values increase, the shadows will gradually blur until they become completely shapeless. In the screenshots below you can see the difference between the values 0, 3 and 7: it is most noticeable in the shadow of the tree. This effect has a small impact on performance. You can lower the variable's value to see more detail in high-resolution shadows, or increase its value to blur and completely hide jaggedness and flicker in low-resolution shadows.


iShadowMaskQuarter=4. This variable in the SkyrimPrefs.ini file also affects the transparency and purity of shadows. When it is set to high values (like 10), it increases the clarity of the shadows, but at too high values it will simply "drown" the game. Low values will make the shadows less detailed, but remember that a value of 0 completely disables indoor shadows. The performance impact is quite noticeable, so you should first use the iBlurDeferredShadowMask settings to change the clarity of the shadows.
fShadowDistance=8000. This variable from the SkyrimPrefs.ini file has a significant impact on the quality of shadows in outdoor locations. It adjusts the distance from which shadows become visible. However, due to the way the game engine works, it also determines the overall level of shadow detail in the game world. By decreasing the values of this variable, the resolution of shadows will increase, and on distant objects they will not be visible at all. This has a significant impact on increasing productivity. With a value of "0", shadows on the street will be completely disabled. The comparison images below show the effect that the values of 400, 2000 and 8000 have. They confirm that at low values the shadows will be shorter, but the level of detail in them will be higher.


fInteriorShadowDistance=3000.0000. This parameter in the SkyrimPrefs.ini file is responsible for indoor shadows. However, a decrease in its values simply results in more areas being shaded, but not in any noticeable improvement in shadow resolution. Increasing the values of this variable also does not have a noticeable practical effect. Indoors, shadows are usually sharper the closer they are to the light source, regardless of the value of this parameter. Only increasing the values of the iShadowMapResolution variable can really have a positive effect on both indoor and outdoor shadows.
fShadowBiasScale=0.15. This variable from the SkyrimPrefs.ini file determines how much a surface will be shaded by changing the angle at which light hits the object. In practice, larger values reduce shadowing and smaller values increase it on various surfaces.
bTreesReceiveShadows=0. If this variable is set to "1" in the SkyrimPrefs.ini file, then leaves on trees will cast shadows not only on the ground, but also on themselves. The visual changes are quite noticeable, as shown in the images below. This effect does not have a noticeable impact on performance, so it can be enabled on most systems to give more natural foliage.


bDrawLandShadows=0. When this variable is set to 1 in the SkyrimPrefs.ini file, the terrain will become slightly shadowed. This effect is not easy to see, but if you look at the screenshots below, you will notice that when the effect is turned on, the entire base of the hill in the center of the image and in the distance to the left becomes darker. It has minimal impact on performance.


- fSunShadowUpdateTime=1.000
- fSunUpdateThreshold=0.500
If the above variables are added at the end of a section of the Skyrim.ini file, then you can control the position of the shadows depending on where the sun is. By default, when the sun moves, shadows change their position only occasionally, visually perceived as sharp jumps in their jagged outlines as they move from the old position to the new one. As the value of the fSunUpdateThreshold variable changes, the frequency at which the shadow positions change changes: the higher the value, the longer the intervals will last before the shadow moves to its new location. Changing the value of fSunShadowUpdateTime determines how long the transition itself will be: high values will make the movement extended over time, and low values will result in a pronounced jump between the old and new positions of the shadows. For example, try this combination: fSunShadowUpdateTime=0.000 and fSunUpdateThreshold=0.100. It will provide frequent and, as a result, stable updates of shadow positions with shorter and clearer transitions.
Skyrim is the first Elder Scrolls game to make extensive use of dynamic shading. The quality of shadows may vary noticeably in the game, as well as their flickering and movement speed. Since shadows have a fairly intense impact on game performance, very often you have to make compromises with quality when setting them up and balance between the rich texture of shadows and a sufficient level of framerate. However, setting the optimal level of detail for all shadow parameters is not so easy. This guide has covered many combinations for different shadow display settings, but a lot of the final choice comes down to personal preference and the capabilities of your particular system.
Grass and trees
fGrassStartFadeDistance=7000.0000. This SkyrimPrefs.ini file setting has the most significant impact on how grass is displayed. It determines the distance at which it appears in the game world and corresponds to the in-game Grass Fade setting. The lower its value, the less grass will be visible in the distance; the higher the value, the more grass. The game setting does not allow you to exceed the level of 7000.00, but you can increase this value yourself if you want more small vegetation to be visible on the horizon. For example, a value of 14000.00 will double the distance at which the grass will be visible. The performance impact will vary by system, but should generally be small.
iMinGrassSize=20. This variable must be added to the end of the section of the Skyrim.ini file. It is responsible for the density of grass bushes. As its value increases, “bald patches” appear on the surface of the earth caused by the lack of grass; as it decreases, the grass cover becomes much thicker. We noticed that there is no point in going below 20: the grass doesn’t get any thicker anyway. The images below show two opposing values (80 and 20) and the changes in grass bush density are very noticeable. Reducing the density of grass can be seen as an additional way to increase productivity levels without reducing the distance from which it is visible or eliminating it entirely.
Figure 7 - Click here for an interactive comparison of this effect between iMinGrassSize values of 20 and 80
bAllowCreateGrass=1. If this variable is set to "0" in the Skyrim.ini file, all grass will be disabled. This can have a positive effect on the performance of not the strongest GPUs in outdoor scenes, however, with the loss of grass, a sufficient amount of the realism of the game is lost. How to temporarily disable grass in specific locations to prevent the game from slowing down will be described in detail in the “Command Line” section of this guide.
fTreeLoadDistance=75000.0000. This parameter in the SkyrimPrefs.ini file determines the distance from which trees become visible. Increasing the value of this parameter will increase the number of visible trees at a distance, and decreasing it will reduce their number. But note that even with a value of “0”, nearby trees will still be visible. Changing this setting can have a noticeable impact on performance depending on your location. In the screenshots below, the variable was assigned values of 5,000, 75,000 and 150,000. There is a noticeable change from 5,000 to 75,000. At higher values, no visible changes occur in the landscape.


fTreesMidLODSwitchDist=10000000.0000. This variable in the SkyrimPrefs.ini file controls the level of detail of trees at close distances. When it is set to a low value, fewer leaves and branches are visible on nearby trees. If you increase the values, then there are more leaves and branches. The performance impact will vary depending on the system.
bRenderSkinnedTrees=1. This variable in the SkyrimPrefs.ini file determines the amount of foliage on nearby trees. If it is assigned a value of "0", then the trees will lose a certain number of branches and leaves, although they will remain quite detailed. Changing its values increases performance, but reduces the realism of the game. Note that the uiMaxSkinnedTreesToRender variable in the SkyrimPrefs.ini file also adjusts the maximum possible tree detail, but increasing its value does not make any visible difference and does not increase the number of trees in most game scenes.
Level of detail
fLODFadeOutMultObjects=15.0000. This variable in the SkyrimPrefs.ini file regulates the distance at which game world objects appear in the field of view and corresponds to the game's Object Fade setting. In-game it can be set to a value of no more than 15, but manually you can increase it even more by increasing the spawn distance of objects.
fLODFadeOutMultItems=15.0000. This variable in the SkyrimPrefs.ini file is responsible for the distance at which objects fall into the field of view and corresponds to the game's Fade setting. The in-game maximum for this setting is 15, but you can increase it further yourself to increase the spawn distance of items.
fLODFadeOutMultActors=15.0000. This variable in the SkyrimPrefs.ini file controls the distance at which creatures and characters appear in the field of view and corresponds to the game's Actor Fade setting. Using the available means of the game, you will not be able to set her level above 15, but you can independently increase her values in order to increase the distance at which other characters will be visible.
- FblockMaximumDistance=250000.0000
- fBlockLevel1Distance=70000.0000
- fBlockLevel0Distance=35000.0000
- fSplitDistanceMult=1.5000
The above SkyrimPrefs.ini file variables control the level of detail of distant terrain features and partially correspond to the game's Distant Object Detail setting. The maximum values that they can take when changing game settings are indicated above. However, you can increase their values if desired. When these three variables are increased, it will result in subtle improvements in detail in very distant areas, such as mountain tops. The fSplitDistanceMult variable is responsible for the coefficient at which the overall LOD changes occur. When its value increases, the landscape within a small radius from the character will look much more detailed. Do not forget that any change in the values of these variables only affects distant lands. Therefore, in many scenes the visual effect will be minimal or completely unnoticeable.
fSkyCellRefFadeDistance=150000.0000. This variable in the SkyrimPrefs.ini file actually controls the distance at which clouds appear in view, especially around mountain peaks. As its values increase, more and more distant mountain peaks are hidden in the clouds. When decreasing, there will be fewer clouds until they disappear completely at the value “0”. Changing this variable has a moderate effect on performance.
General graphic settings
bDisableAllGore=1. If you add this variable to the end of a section of the Skyrim.ini file and set it to "1", it will disable all blood-related effects in the game (such as pulsating fountains from wounds)
- bBloodSplatterEnabled=0
The above section and variable must be added together to the end of the Skyrim.ini file with a value of "0" (for the variable) if you want to disable bloodstains on the screen. This will not turn off the blood spray when you hit an enemy (or they hit you); Only red spots on the screen will be disabled, simulating blood splashes getting into the character’s eyes.
- bDoRadialBlur=0
The above section and variable must be added to the end of the Skyrim.ini file and the variable set to 0 if you want to completely disable the radial blur effect discussed earlier in this guide in the game settings section. In theory, disabling the effect should improve performance during battles, but the main reason to disable it is if you simply don't like the radial shake effect itself.
- bPrecipitation=0
The above section and variable must be added to the end of the Skyrim.ini file, and the variable must be set to "0" if you want to disable precipitation in the game (mainly snow and rain). And although the game will lose some of its realism, disabling this effect will have a positive effect on performance.
iMaxDesired=750. This SkyrimPrefs.ini variable controls the intensity of the "particle effects" associated with smog, fog, and especially fire and spells. Experimentally, we found that for smog and fog the effect is almost invisible, but is clearly visible with fire (in particular, from torches) and spells. For example, when the variable's value increases, the Flames spell spews significantly more fire from your hand. But with a value of “0”, the flame from this spell is not visible at all. The images below show the difference between the values of this variable "0" and "950". Notice both the flash near the hand and the torch: the effect affects both. Changing this variable can have a noticeable impact on gaming performance depending on your system.


- iWaterReflectHeight=512
- iWaterReflectWidth=512
The SkyrimPrefs.ini file variables listed above determine the resolution of reflections that are visible in the water. Increasing their values (for example, to 1024 each) will slightly increase the detail of all objects reflected in the water; while decreasing (for example, to 256 each) will lower its level. In the images below you can see the difference between 512 and 1024 resolution, with the higher value making the reflections a little clearer. This is especially noticeable in the distance on the right side of the picture. The effect of this parameter on performance and picture quality depends on the system configuration; on how high you set the level of reflection in the water in the game settings; from Anisotropic Filtering installations and, of course, from the proximity and size of water areas.


bAllowScreenShot=1. If this variable from the Skyrim.ini file is set to "1" (which is the default), then you can take a screenshot of the game at any time by simply pressing the PrtScn key. Screenshots are saved in BMP format in the \Program Files (x86)\Steam\steamapps\common\skyrim directory.
In this section, we've covered most of the most useful changes you can make to your game by adjusting .ini files. Many important settings were tested, and many minor and non-impact settings were ignored. All of the above changes will work correctly if you make them exactly as shown in this guide. It is equally important to install each one separately and observe the effect it has on your system. Do not directly copy-paste information into your .ini files from the examples in this guide or from other sources.
In the next section, we'll talk about other ways to vary your gameplay and graphics settings.
Command line
Unlike .ini files, which are read and executed at the start of a game by the game's engine, the command line is where you can quickly change certain aspects of the engine while you're playing and see the immediate results of those changes. The main mission of the commands that are written in it is to regulate gameplay or interface parameters rather than to change the quality of the game image or performance. Remember that using these commands does not prevent you from using new products from Steam. Although some of these new products are just cheats, and they can spoil the experience of the game. Moreover, Bethesda warns that commands executed from the command line may break the logic of quests, lead to incorrect visual display of the game world and dungeons, and some saved games may become incompatible with subsequent patches.
To enter command line mode, you need to start the game and then press the tilde (~) key. On most keyboards it is located above the TAB key, to the left of the number 1, below the ESC key and it shows the letter Yo on the Russian layout. Clicking it will open a command line dialog box at the bottom of the screen. When it is open, the game pauses. You can also close or reopen the command prompt by pressing the ~ key.

To run a command, simply type it, specifying the appropriate value (if required) and press Enter. After this, you will receive confirmation of its successful completion. In general, commands can be in short or long form: it is normal practice to use both forms. For example, both the ToggleCollision command and its short version, TCL, will have the same effect (this command turns on/off the parameters for objects hitting each other). If there is a need to assign a value to a command, this is done like this: first, the command itself is printed, followed by a space - the required value. For example, to change your character's field of view by 90 degrees, you need to type FOV 90 and press Enter: the changes will take effect immediately. If you type FOV again without any value, the default value will be returned.
Some commands require you to specify the object to which they will be applied. To do this, first call the command line, then left-click on the desired character or object, and the code will appear in the center of the screen. There is no need to write it down or remember it, as in most cases this code is simply used as confirmation that you have made a certain choice. Now you can execute the appropriate command and it will be applied specifically to the selected object or character.
There are many command line commands in Skyrim, but most of them are designed to satisfy the needs of developers for debugging and testing. A short list of the most useful of these commands, with a little explanation, is presented below:
FOV- This command allows you to change your character's field of view (FOV). This term refers to how widely you can see the game world on the screen. Assign the required numerical value to this command, and the changes will take effect immediately. Type FOV (without a number) to return the standard field of view. Once you have decided on an appropriate FOV level, you can change the appropriate variables in the .ini files (discussed in detail in the Advanced Settings section) to make this value permanent in the game.
Showracemenu– this command opens the character creation menu that you encountered at the beginning of the game, when you first created your avatar. With its help, you can vary the race of your hero, his gender and appearance. But if changes in appearance are perceived positively by the system, then changing the race may cause glitches, so just in case, save the game before using this command.
Set Timescale to- such a team will change the speed at which playing time passes. The default value is 16, but by increasing it you can speed up the passage of time, and by decreasing it you can slow down the passage of time. Try, for example, setting Set Timescale to 5000 to observe the frame-by-frame effect of the game flow.
Disable— if you want to remove any object from the game world, then select it, enter the Disable command, and it will disappear. To make the last object you deleted appear again, use the Enable command.
Kill- select a character (or creature) with the mouse, and then type this command, and he will be killed immediately. To kill several characters (creatures) near you at once, use the Killall command. To bring a dead person back to life, select him with the mouse and enter the Resurrect command. This is also useful if your NPC partner accidentally gets caught in the crossfire.
Stopcombat- If you use this command against the specified character you are fighting, he will immediately stop and put down his weapon. This can come in handy when you unintentionally hit a friendly character and they don't respond to the normal fight-stop gestures.
TAI– using this command you can enable/disable Artificial Intelligence (AI) in the game. When AI is turned off, characters and creatures will simply repeat their last actions or do nothing at all. If a character or creature is acting aggressive towards you, then it will continue to attack, in which case you need to use the TCAI command to turn the AI on or off accordingly during battle. The combination of the TAI and TCAI commands completely disables AI for most characters and creatures, but note that using TAI may result in unclear controls, glitchy gameplay, and is not always completely effective at disabling AI. If you simply want to avoid being seen by other creatures or characters, you can use the Tdetect command for this purpose.
TCL– regulates the collision system. When it is turned off, your character can fly over the game world and pass through any solid objects. This command comes in very handy when you get stuck in a certain area of the territory and want to quickly change the location.
TFC– turns on the “flight” of the camera. Similar in action to TCL, but with TFC the flight speed is much higher, and the character remains in place. Very useful when you need to quickly explore the surrounding lands.
TG– regulates grass coverage. Using this command, you can temporarily disable grass in those locations where the game is slowing down. This option is much better than removing all grass from the game forever.
T.G.M.– allows you to enable/disable God Mode. When it's on, you can't be hurt or killed (and your health, magicka, and stamina levels don't decrease). Alternatively, you can use the TIM command to enable Immortality Mode. In this mode, you will be able to play as usual: your health, magicka and stamina levels will deplete, but you will remain immortal since your health bar will remain just above the minimum at all times.
FW— sets the weather according to the code you choose. List of codes here - Weather ID Numbers. For example, the command FW 10a241 will trigger a storm.
Unlock- first select a specific door (or box, chest) and using this command you can automatically open it. To close the selected item again, select it and use the Lock command.
Movetoqt- this command will take you to the corresponding goal in the selected quest, allowing you to complete it faster. Look at the list of quest IDs and enter the required code for this command.
P.S.B.– Immediately adds all spells, shouts, and words to your spellbook.
Player.AddItem— this command adds the specified item to your inventory in the selected quantity. Before use, you must look at the list of codes or the list of codes by category. For gold, the code is "F", and for lockpicks, the code is "A". For example, to add 10,000 gold to your treasury, type Player.AddItem F 10000; to add five steel clubs, type Player.AddItem 00013988 5 and so on. Text messages will appear to confirm that new items have been added.
Player.Placeatme- Summons any character from Skyrim a couple of meters away from you. Check out the list of NPC IDs to choose which code to use. Remember that the summoned character will only appear after you close the command line.
COC— teleports you to the specified location. You can equally use both the code and the location name, which you will find in this list. For example, the COC Riverwood command will take you to the Riverwood village where you started the game.
QQQ– a command to quickly exit the game directly to the Windows Desktop, bypassing the questions (prompts) that appear during the standard exit procedure.
Changes made using the command line will not take effect when you exit and restart the game. Some of them will still remain if you save the game or autosave. Based on this, we recommend that you manually create a "game save point" before attempting to use commands from the command line. If, after experimenting with the commands, you want to use some of them every time you play, you can do this automatically using batch files.
To do this, create a new text document and give it any convenient name, for example commands.txt. Edit it and enter each command on a separate line. Below is an example of the contents of such a batch file:
- Set Timescale to 1
- Fov 90
Save this file to the \Program Files (x86)\Steam\steamapps\common\skyrim directory. Launch Skyrim, load the saved game, open the command line and write Bat in it so that its contents begin to be executed. In our example, we need to write Bat commands and the three commands above will start to take effect.
Video driver mods and settings
Bethesda Game Studios games are updated everywhere to be modded. And Skyrim was no exception. Existing mods replace and improve textures, but in January Bethesda will release The Creation Kit, free software that allows players to change almost any aspect of the game. New quests, radically different gameplay elements, and much more are expected that will maintain interest in the game even years after release. In addition, Bethesda is integrating Skyrim with the Steam Workshop, giving players the ability to securely, easily and efficiently download and install user-created mods directly onto their own computers.
The purpose of this section is to draw your attention to mods, but not in the form of a list of recommended or necessary modifications. In fact, not a single mod inherently provides for mandatory use. The game can be great without them. Therefore, if you do not enjoy using these modifications, then you should not attach much importance to them. After all, in reality, mods are not only unofficial developments made by users themselves, but they can also carry the risk of unexpected bugs or performance problems. On the other hand, judicious use of some of them will help make Skyrim the way you like it.
The best mods are located on Skyrim Nexus, which has the widest selection of free mods available for download. As you explore this growing list, be sure to read the details and user reviews of the mods you're interested in before installing anything. Here are some popular mods you can try:
Another modification that works in a similar way to the FXAA Post-Process Injector is the SMAA Injector. This mod adds a form of post-processing line smoothing known as Subpixel Morphological Antialiasing (SMAA). This type of anti-aliasing can reduce the jaggedness of an entire landscape without the blur that accompanies FXAA and without the performance hit of MSAA.
If the existing Skyrim mods don't excite you enough, then be prepared to encounter hundreds of new mods literally every day. Just in case, let us remind you once again that modifications in Skyrim are an option, but not a necessity. Therefore, if you start having any problems with the game, you should start troubleshooting by first disabling all mods.
Video driver settings
There is another method that allows us to have more control over the graphics fidelity in Skyrim: graphics card driver settings, which can be changed using the graphics card control panel. This section will cover many effects and settings that are not supported by default in Skyrim, but can be forced to be enabled using the aforementioned control panel. First, make sure you have updated to the latest available video drivers, as described at the beginning of this guide.
Improved Anisotropic Filtering
Anisotropic filtering (AF) has already been discussed in the corresponding section of this guide. The maximum level of its multiplicity can be set to 16. However, if you want to get the best quality of anisotropic filtering, then there is this alternative: disable AF in the game settings, and instead configure it using the video card control panel. NVIDIA owners should follow the following sequence of actions:
2. Set the “Texture Filtering - Quality” parameter to “High Quality”.
3. To set Anisotropic Filtering, select the AF level. The recommended value is 16.
4. Click the "Apply" button
5. Launch Skyrim, click “Options”, disable anisotropic filtering (“Anisotropic Filtering” -> “Off”) and click “OK”.
After this, launch Skyrim as normal and you'll notice much clearer textures, especially from a distance.


In the images above you can compare the in-game AF settings of 16x and the same 16x AF, but already selected through the NVIDIA control panel. When setting AF through the control panel, the surface of the water appears much more detailed, and distant objects (the mountains and the stone building on the left) appear clearer and more defined. The difference in performance levels when using both of these methods is minimal.
Transparency Antialiasing
Just like with anisotropic filtering, in Skyrim it is possible to independently select different types and levels of anti-aliasing settings using the video card control panel. Let's look at transparent anti-aliasing (TRAA), which cannot be adjusted using purely game-based methods. This form of anti-aliasing smoothes out jagged lines on transparent textures, typically affecting foliage, objects with bright edges or transparent parts. For NVIDIA owners, the following sequence of actions is recommended:
1. Open the control panel (NVIDIA Control Panel) and in the “Program Settings” tab, select “Elder Scrolls 5: Skyrim” in the first checkbox. If you do not see the name of the game in the list, then uncheck the “Show only programs found...” box and try again.
2. set “Antialiasing - Transparency” to the multiplicity level (Supersample) 2x, 4x or 8x; Multisampling TRAA can cause failures, as discussed earlier.
3. Click the "Apply" button
4. Launch Skyrim and select "Options", then make sure that the anti-aliasing option is set to something other than "Off" and click "OK".
Multiple TRAA should not be used in Skyrim as it may cause instabilities in the game, causing some parts of opaque objects to become transparent. Major visual changes can be easily achieved through the use of different levels of Supersampe TRAA.


The screenshots above compare regular gaming 8x anti-aliasing, followed by Multisampe TRAA, and then 2x, 4x and 8x Supersample TRAA (installed using the NVIDIA Control Panel). As you can see, increasing the TRAA levels evens out the jagged edges of the bushes on the left and the trees on the right, and the subtle shimmer of the foliage is achieved more clearly through the means of the game itself than through TRAA. The impact of Multisample TRAA on performance is almost unnoticeable on most mid-range systems, and 2x TRAA is already acceptable on advanced configurations. However, 4x and 8x Supersample TRAA levels will be a significant drag on performance, especially when the game's MSAA settings are set to high at the same time, and at Ultra settings.
Ambient Occlusion
Ambient Occlusion (AO) is a technique that creates more realistic shadows from daylight. There is no in-game option to enable AO in Skyrim, but it can be easily enabled by NVIDIA owners using video driver settings. However, remember that if you see flickering, artifacts or other graphical oddities when AO is enabled, it is better to disable it or use the Quality mode, which can reduce these effects. Players with NVIDIA graphics cards and R290 drivers can enable Ambient Occlusion through the NVIDIA Control Panel:
1. Open the control panel (NVIDIA Control Panel) and in the “Program Settings” tab, select “Elder Scrolls 5: Skyrim” in the first checkbox. If you do not see the name of the game in the list, then uncheck the “Show only programs found...” box and try again.
2. Set the “Ambient Occlusion” parameter to Performance or Quality – see the screenshots below to compare them.
3. Click the "Apply" button
4. launch Skyrim.
For better control of the AO level, you can use the free NVIDIA Inspector utility, which allows you to adjust the NVIDIA driver profile for Skyrim. If you have NVIDIA, then do the following:
1. Launch NVIDIA Inspector and click on the small “Profile Settings” button at the end of the “Driver Version” line.
2. Click on the “Profiles” button and select “Elder Scrolls 5: Skyrim” from the drop-down list.
3. Edit the “Ambient Occlusion compatibility” setting and select the “0x00000003 (Fallout 3)” profile.
4. In the “Common” section, select “Enabled” for “Ambient Occlusion usage”.
5. Assign the “Ambient Occlusion setting” to the mode that suits you. We recommend "Performance".
6. Click the “Apply changes” button at the top right.
7. Launch Skyrim normally to see the changes.


With this method, AO can be played in Performance, Quality and High Quality modes. Visual differences are demonstrated in the screenshots above. There you can see that the changes between the absence of AO and the Performance AO mode are significant: grass, trees, stones and the character itself acquire rich shading, and the impact on performance is moderate. Selecting Quality and High Quality improves shadows slightly, but at the cost of a fair amount of performance, which is why we recommend using the Performance mode.
If you need to undo changes that have been made to the video driver profile using NVIDIA Inspector, then simply click on the green NVIDIA logo at the top of this utility and it will restore the default values. Same with the NVIDIA Control Panel: Click the "Restore" button at the top right of your Elder Scrolls 5: Skyrim profile to have the same thing happen.


