This article talks about how to create, change or delete hard disk partitions using Windows 7.
To work with hard drive partitions in Windows 7, there is a tool called “Disk Management”: Control Panel → System and Security → Administrative Tools → Computer Management → Disk Management OR “Start” → in the search bar enter: diskmgmt.msc and press Enter.
1. Creating a section
Right-click on a free space not occupied by other partitions on the desired hard drive → Create a simple volume... The “Simple Volume Creation Wizard” window will open, click the “Next” button. Then specify the size of the partition to be created, assign a drive letter, select the required file system and formatting options, once again make sure that you did everything correctly and click “Finish”
2. Compressing a Partition
Right-click on the desired section → Shrink Volume... A message window will appear asking for space for compression, wait until the end of the survey. Then in the window that appears, in the line “size of compressed space”, indicate the amount of free space and click “Compress”
3. Section expansion
Extend volume... The “Volume Expansion Wizard” window will appear, click the “Next” button. Then select the required free space from the list, click “Add”, then specify the amount of free space allocated to the partition, click the “Next” button, check the information and click “Finish”
4. Deleting a partition
Right-click on the desired section → Delete volume... Before continuing the operation, copy all the necessary files and folders to another drive, because... Once a volume is deleted, all data on it will be lost.
5. Changing the drive letter
Right-click on the desired section → Change drive letter or drive path... Click on the Change button, select the desired drive letter and click OK. Next, we will look in detail at ways to expand disks without harming the information stored on them.
In order to divide the hard drive into partitions, you need to go to the "Start" menu → right-click on "Computer" and click on "Manage".

In the window that appears, go to the "Disk Management" section.

Select the hard drive and partition that needs to be divided and right-click on it.

In the drop-down menu, you need to select "Shrink Volume" and then select the size to which you want to shrink the existing partition. The space freed up after compression will be the new hard drive partition.

To create a new partition, you need to right-click on the free space and select “create volume”. Then specify the size of the new partition and wait for the operation to complete. Sooner or later, any computer user faces such a problem as lack of free space on the system partition of the hard drive. This is where the question arises: How to expand drive C?
First we need to go to the "Computer Management" tab (see above).
When this tab opens, you will see in the window all the media that are currently connected to the computer. Each hard drive can be divided into several logical ones. The very first one will be "Disk 0". On the right you will see the space reserved by the system and the logical partitions (C, D, E, F, etc.). If you have only one drive C and it is full, then you can try “Shrink Volume” (see above). If you have several logical partitions, then move on.
The principle of disk division.
The principle of action is this: we must expand drive C at the expense of the adjacent logical partition. This could be drive D, E, and so on. In the same way, you can increase not only section C, but also others, if you have such a need. So, delete the adjacent disk, for example, D. Right-click on it and select the “Delete Volume” option. Click OK. Immediately after this, this volume should appear in black. The message “Volume is not allocated” should appear on it. Now we can add the space we need to drive C. To do this, right-click on partition C and select “Extend volume”. Click "Next" and select the size you want to add.You can use the maximum size as suggested by default, or select one of your own. Click "Next" and then "Finish". If no additional windows pop up, then the operation was successful. You have learned how to expand a disk using Windows 7. The main thing to remember is that the system partition can only be expanded if there is free space to the right of it. Otherwise, nothing will work.
Possible difficulties.
What other difficulties could there be? Let's say we have five volumes. We want to configure them in such a way that part of the space is added to drive C, and the other to drive D. When deleting one of the partitions, the “Delete Volume” function may not be active, and the “Extend Volume” function may not be available on volume C.The whole point is that the section style can be used MBR*. This is an outdated style. In this case, two adjacent volumes can be connected by a green frame. This means that you cannot create more than four volumes with the MBR partition style.
Windows 8 provides the same tools for increasing space. Therefore, this method is also applicable on this operating system.
Partitioning a hard drive in the Windows 7 operating system is a very simple thing. You can see this for yourself if you partition and create a new partition according to the described algorithm.
*MBR (Master Boot Record) master boot record in a PC - a table in the first sector of the boot disk that stores data about the physical and logical organization of the disk. If this record is corrupted, loading the OS becomes impossible.
That's all. Thank you for reading the article. I hope it was useful to you.
The reasons why you need to divide your hard drive into several partitions are different for everyone. For some, this is an opportunity to systematize the necessary information and store it correctly; someone using several partitions uses several operating systems on their computer or laptop. Finally, if the hard drive is divided into several parts, then separately.
Standard PC equipment: the simpler the better

This program is rightfully considered one of the best or even the best hard drive partitioning program.
This is the simplest program that will help you effectively manage multiple systems and different programs.
Its main advantages are eliminating partition errors, converting file systems and protecting data. Another advantage is that this utility is very popular, because there is a lot of reference information on it on the Internet.
2. Disk management in Windows
Any version of Windows has the Disk Management function: this is the simplest, most accessible and quite effective tool that allows you to change partitions.
Each version of Windows OS has its own differences, but in the most popular ones (Windows Vista, Windows 7 and 8) there are no fundamental differences. Let's take a closer look at how to partition a Windows hard drive using this utility.
The program opens through the Start menu, and in the “Disk Management” item, even a novice user with the help of three main points (Expand, Shrink and Delete volume) performs all the necessary actions in real time. No special knowledge is required for this - just give affirmative or negative answers and click the desired menu items.
There is only one drawback of the standard program - there are risks of failures that lead to the loss of certain sections. A risk exists if there is a mass of unnecessary programs on the disk, or when trying to partition the partition of the hard drive in which Windows is running: the processor does not always react unambiguously to an attempt to “experiment” with the system partition.
Free software for everyone
Two programs that can be downloaded absolutely free from the Internet - EaseUS Partition Master Home Edition and Paragon Partition Manager 11 Free - are also easy to learn and use, but require certain knowledge.
1. EaseUS Partition Master Home Edition

The program helps not only to partition a hard drive, but also to create, copy, resize or completely delete partitions; and also restore deleted partitions.
The disadvantage that affects the popularity of the program is that it is only available in English. But if you know English, you can appreciate the excellent functionality and predictability of the program, stability of operation and the ability to carry out all procedures in virtual mode - at any time you can correct a settings error, cancel the disk partition procedure and restore the original data.
2. Paragon Partition Manager 11 Free
The program again has an English-language interface, but for a beginner it is more interesting than the previous one - the main windows are quite clear and make it easier to navigate the functions. The disadvantages of the program include low speed and unpredictability.
If funds allow, you can purchase a Russian-language version of this program for money, but it also retains the main disadvantages of the English-language product.
Programs for advanced users
These programs have advanced functionality - support for various disks and flash drives, the ability to convert file systems, create bootable media and much more. The fundamental differences lie in speed, functionality and special features.
5. Active@ Partition Manager

This program is a free manager that simplifies working with logical drives: a system reboot is not required when creating, formatting or deleting disk partitions.
Even if you accidentally delete important partition data, the program will help you restore it!
But the inability to change disk sizes (the partition must first be deleted and then another created in the same place) leaves no chance of recovering lost information.
6. MiniTool Partition Wizard Home Edition
Experienced users can use the equally simple and accessible MiniTool Partition Wizard Home Edition manager. The most important advantage of the program is the ability to work with both a separate hard drive and RAID arrays created on the basis of two or more disks.
To work with hard disk partitions (dividing into partitions or combining them into one), the Windows 10 operating system has a built-in utility “ Disk management" Its use, in my opinion, is preferable to installing any third-party tools. You can read how to split a hard drive using Ten’s own means or, conversely, combine its partitions in separate articles on this site: divide And combine. But sometimes situations arise when it is quite difficult to do without third-party tools.
This article was written in response to questions from site readers who had problems dividing a hard drive or merging its volumes. The Disk Management utility built into Windows 10, despite all its advantages, has its drawbacks: sometimes it does not allow you to create a partition of the required size, sometimes it does not allow you to split your hard drive at all, sometimes it is not possible to combine the necessary volumes into one. In these problematic situations (and only in them!) I recommend using a third-party one, even if free program for managing hard disk partitions in the "top ten". It is worth remembering that using any third-party tool to manage the operating system can be potentially dangerous. I am not inclined to dramatize the situation, but I believe that I am obliged to warn about it, even if the probability of possible problems is one chance in ten thousand. Therefore, whenever possible, it is better to still use the Disk Management utility built into Windows 10, developed by Microsoft.
When I was preparing this article, I spent several hours of time to find a truly completely free, reliable and reputable program for dividing a hard drive into partitions(or their combinations). There are a lot of outright lies and dubious programs of unknown origin in this area. A separate point in my search was the question that the software found should not only free, but also had a Russian-language interface and it also turned out completely compatible with Windows 10. The last question is far from idle - the fact is that on the Internet you can find information about how some disk partitioning programs created for Windows 7 or 8 ruined the hard drives of Windows 10 users.
So, as a result of a long and thorough search, I finally found and tried the program myself AOMEI Partition Assistant. In general, its full version, the Professional Edition, costs from $59 and much more. But don’t let this scare you, because the functionality of its free Standard Edition branch is quite enough to:
- Divide the hard drive into partitions
- Merge hard drive volumes into one partition
In general, the presence of a paid version speaks only in favor of this software. After all, this indicates the seriousness of the intentions of its authors. Those who create programs for money probably make decent solutions for free, albeit with somewhat limited functionality (especially since it’s quite enough for us). Another proof of the authority of AOMEI Partition Assistant, in my opinion, is the presence of an article about it in Wikipedia. By the way, if you doubt the reliability and safety of a particular program, always check through a search engine whether Wikipedia writes about it. This, of course, is not a 100% guarantee, but still, since this electronic encyclopedia strives for maximum objectivity, in articles about software there you can find information about the possible “pitfalls” of a particular program. It is there, on Wikipedia, that it is better to take a link to the official website of the program. The fact is that the first places in search engines are often not the official websites of certain programs.
On the official site AOMEI Tech I found it right away section dedicated to the Partition Assistant program. Let's go down a little on this page to the second screen. There, to download the free version of the program we need to manage the hard drive, we find the item Partition Assistant Standard Edition and (of course) click “Download”. Don’t be alarmed that the site is in English; the program itself has an official Russian localization. Please note that there are several options for downloading this program for different needs on the page - for free home use, choose the version Standard Edition.

The installation process of the program is not at all complicated. First, you are asked to select a language, then traditionally accept the usage agreement, and, if necessary, select the folder where the program will be stored - that’s basically all. After installation, the program will automatically launch if you leave the “Run this program” checkbox at the last stage.
I will not consider all options for using AOMEI Partition Assistant to manage a hard drive. I will only examine in detail the question of how this can free program to split your hard drive into several partitions in Windows 10. Everything else (including merging volumes) is done by analogy.
Dividing a hard drive into partitions using the free AOMEI Partition Assistant program in Windows 10
When the program starts, all the physical hard drives installed on your computer or laptop, as well as the partitions that exist on them, will be displayed at the bottom. In order to divide a disk into several volumes, you first need to “pinch off” a piece of space from an existing partition. To do this, stand on the donor volume and, right-clicking on it, select “ Resize partition».

A new window will appear in which you need to specify what size you want to leave the existing volume. All remaining space will be freed up for the new partition. I left the C drive with 150 GB. Click OK.

Now we see that we have free space labeled " Unoccupied" We need to create a new partition (volume) on it. To do this, right-click on it again and select the item “ Creating a section».

The pop-up window appears again. We leave everything in it as default and click OK.

After this, a new section will appear on the program screen. It would seem that you can rejoice. But it was not there. Turns out, no changes have been made to the hard drive itself yet! For the operation to be completed, you need to click the button at the top. Apply».

Typically, you will need to restart your computer to complete the operation. This is exactly what the new window in the AOMEI Partition Assistant program tells us. Click “Go” on it. It is better to leave the checkbox next to the “Check partitions before execution” item. This will allow the program to check the partitions for errors before dividing.
After this, a new window will appear again warning you to restart your computer. We agree and click “Yes”.

After the reboot, the actual physical division of the hard drive into two partitions begins. It occurs before the Windows 10 operating system boots in PreOS mode.

Personally, this process took me only a couple of minutes. Most likely, the fact is that on the shared hard drive I had nothing except the clean installed Windows 10 and several programs. Therefore, it did not take much time to move files. If the computer is weak and there is a lot of information on the disk, then the division process may take much longer. My computer rebooted twice and then started up normally. After this, a new section appeared in Explorer, and the existing one became smaller.
Let me remind you that, by analogy with this instruction in Windows 10, using the free AOMEI Partition Assistant program, you can combine hard drive partitions.
I foresee a question from some meticulous readers of my site about why I reviewed only one free program for managing hard drive partitions on the “ten”. Will explain. The fact is that the rest of the programs I studied did not suit me for various reasons: some of them did not have the Russian language (and for many this is important), others had too much functionality in the free version, others raised doubts about the plan security for the operating system and compatibility with Windows 10. In addition, I absolutely see no point in looking for something else to solve fairly rare problems. I believe that the software reviewed copes with the assigned tasks with a bang and has undoubted advantages over all other free programs that I have studied. So why then bother yourself and others with unnecessary information?)
In contact with
Classmates
There are many free hard drive testing tools that can help you determine what's going on with your hard drive when you suspect there's a problem with it.
An operating system like Windows already includes tools such as checking the disk for errors and the command chkdsk, but there are other tools below that are available for free from hard drive manufacturers and other developers.
Important: Depending on the problem found, you may need to replace the hard drive if it fails any of the given hard drive tests. To do this, you need to follow the tips given in the program.
Seagate SeaTools is a free hard drive testing program available to users in one of two options:
- SeaTools for DOS Supports Seagate or Maxtor drives and works regardless of your operating system, running directly from a CD or USB drive, making this program very reliable.
- SeaTools for Windows is a program that needs to be installed on the Windows operating system. With its help, you can perform basic and advanced testing of any drive from any manufacturer - both internal and external.
Those users who access SeaTools Desktop, SeaTools Online, or PowerMax from Maxtor should note that the above program replaces all three of these programs. Today, Seagate is the owner of the Maxtor trademark.
SeaTools from Seagate are the best in their segment. They are used to check hard drives in professional computer services, but any user can easily use them.
The Windows version of SeaTools runs on operating systems from Windows 10 to Windows XP.

HDDScan is a free program for checking all types of drives, regardless of their manufacturer.
HDDScan includes several tools, including SMART testing and surface inspection.
The program is very easy to use, does not require installation, supports almost all drive interfaces, and seems to be updated regularly.
HDDScan can be used on Windows 10, 8, 7, Vista and XP, as well as Windows Server 2003.

DiskCheckup is a free hard drive checker that works with most drives.
The program displays SMART information such as the number of read errors, the time it takes for the wafer pack to spin up from rest to operating speed, the frequency of errors when positioning the magnetic head unit, and temperature. In addition, it can perform a quick and advanced disk scan.
You can configure the program so that SMART section information is sent by email or displayed when the disk parameters exceed the threshold values recommended by the manufacturer.
Hard drives that have a SCSI connection or implement hardware RAID are not supported by DiskCheckup.
DiskCheckup runs on Windows 10/8/7/Vista/XP and Windows Server 2008/2003 operating systems.

GSmartControl can perform a variety of hard drive tests, providing detailed results and an overall assessment of the drive's health.
GSmartControl can perform three self-tests to troubleshoot a drive:
- Quick check: takes about 2 minutes and is used to identify a seriously damaged hard drive.
- Extended check: Takes about 70 minutes and will scan the entire surface of the hard drive to detect failures.
- Transportation check: This test takes 5 minutes and is designed to look for damage that may have occurred while the drive was in transit.
GSmartControl can be downloaded for Windows either as a portable version or as an installable program. It works on system versions from Windows 10 to Windows XP. You can also get a version of the program for Linux and Mac operating systems and programs in LiveCD/LiveUSB format.

Windows Drive Fitness Test is free hard drive diagnostic software that can work on most drives available today.
Unfortunately, Windows Drive Fitness Test can only test USB drives and other internal drives.
WinDFT can be installed on Windows 10, 8, 7, Vista, and XP operating systems.

Samsung HUTIL is a free utility for diagnosing Samsung hard drives. Sometimes HUTIL is called ES-Tool.
The Samsung HUTIL program is available as an ISO image for subsequent recording on a CD or USB flash drive. This approach makes HUTIL independent of the operating system and, in general, a more convenient tool for testing than programs developed for the Windows operating system. You can also run HUTIL from a boot diskette.
Comment: The HUTIL program will only check Samsung hard drives. It will boot and find non-Samsung discs, but no diagnostics can be performed on such discs.
Since the Samsung HUTIL program runs from a boot disk, it will require a functioning hard drive and an operating system to burn it to a CD or USB flash drive.

The free Western Digital Data Lifeguard Diagnostic (DLGDIAG) program is designed to test only Western Digital branded hard drives.
Western Digital Data Lifeguard Diagnostic can be downloaded as a portable version for Windows or as an ISO file with an image to burn to a bootable disk, and performs a number of tests on the hard drive. Detailed installation instructions from Western Digital can be found at the link below.
Comment: The DOS version of DLGDIAG diagnoses only Western Digital drives, while the Windows version of this program also works with drives from other manufacturers.
The Windows version of the program works on operating systems from Windows 10 to Windows XP
Bart's Stuff Test

Bart's Stuff Test is a free program for Windows that performs stress tests on hard drives.
The program does not provide as many features and does not conduct as thorough testing of the hard drive as other programs on this list.
All things considered, Bart's Stuff Test is a good addition to your disk testing arsenal, especially if you have difficulty testing with ISO image-based tools and want to take advantage of something other than the default tools provided Windows.
Bart's Stuff Test, as stated, only works on operating systems from Windows XP to Windows 95. However, we checked its performance on the latest versions of the system (Windows 10 and Windows 8) and did not find any problems.

Fujitsu Diagnostic Tool is a free hard drive diagnostic tool designed specifically for Fujitsu hard drives.
The Fujitsu Diagnostic Tool (FJDT) is available in a Windows version and a DOS version using a boot diskette. Unfortunately, the DOS version is focused on using floppy disks - images that will run from CD or USB are not available.
Fujitsu Diagnostic Tool provides two tests: a “quick test” (lasting about 3 minutes) and an “all third party test”, the execution time of which will depend on the size of the hard drive).
Comment: Fujitsu Diagnostic Tool performs hard drive testing only for drives manufactured by Fujitsu. If you have a disk from another manufacturer, then you should try to use the manufacturer-independent programs listed at the beginning of the list.
The Windows version of the Fujitsu Diagnostic Tool should work on all operating systems, from Windows 10 to Windows 2000.

HD Tune performs hard drive checks while running Windows. It can work with any internal or external drives, SSD drives or memory cards.
With HD Tune you can perform a performance test, check the health of the drive using Self-Monitoring Analysis mode and Drive Activity Reporting Technology (SMART). In addition, the program can scan the disk for errors.
It supports Windows 7, Vista, XP, and 2000, although HD Tune has been tested to work correctly on Windows 10 and Windows 8.

The Free EASIS Drive Check program, designed to check hard drives, has two built-in checking utilities - checking sectors and reading SMART attribute values.
The SMART attribute check allows you to create a list of more than 40 parameters that describe the operation of the hard drive, and the sector check will check the surface of the media for read errors.
A report on the execution of any of these tests can be seen directly in the program after its completion. In addition, you can configure the program so that the report is sent by email or printed.
According to the description, EASIS Drive Check works on operating systems from Windows 2000 to Windows 7, but its performance has also been tested on Windows 8 and 10.

The error checking program is sometimes called the scandisk program. This is a hard drive scan tool included with the Windows operating system that allows you to search for a variety of errors on your hard drive.
This tool may also try to fix a number of hard drive-related problems.

Macrorit Disk Scanner is a very simple program that checks for bad sectors on your hard drive. It is easy to use, installs quickly, and is also available in a portable version.
The main part of its window is used to visually represent the scanning process and clearly indicate the location of damage.
Especially well implemented in Macrorit Disk Scanner is the visual display of how much time is left until the end of the scan, because Some hard drive checking programs do not show this. In addition, you can select the option to automatically turn off the computer when the scan is completed.
Operating systems that Macrorit Disk Scanner can run on are: Windows 10, 8, 7, Vista, XP, Windows Home Server, and Windows Server 2012/2008/2003.

Ariolic Disk Scanner is very similar to Macrorit Disk Scanner in that it uses read-only to find bad disk sectors. This program has a minimal interface with a single button, and using it, it is easy to understand which parts of the disk contain “bad” sectors.
The program has only a portable version, and its size is slightly more than 1 MB.
The only thing that distinguishes this program from Macrorit Disk Scanner is that Ariolic Disk Scanner shows files that have read errors.
We only tested Ariolic Disk Scanner on Windows 10 and XP, but it should also work on other versions of Windows.
In contact with
Good afternoon
For some reason, many users believe that the heart of the computer is the processor (for some game lovers, the video card). But purely in my opinion, the most important piece of hardware in a computer/laptop is the hard drive (HDD).
Whatever the hardware failure (if it is not related to the disk), by replacing and repairing it, you will restore your work and continue it as if nothing had happened.
But if the hard drive “flies”, then restoring the data is not always easy... Okay, lyrics, on this page I want to collect the most necessary and useful programs for working with the hard drive. I present only the most popular and relevant programs, which I have used myself more than once or twice.
I really like this utility for its clarity and focus on novice users. All you need to do is install the program, after a while you will learn:
- state of the “health” of your disk in percentage terms;
- status about its performance;
- temperature;
- how much actual time it worked (not to be confused with age and date of manufacture).

The utility operates in constant mode (minimized in the tray, next to the clock), and when alarm signals appear, it will notify you in time. What else do inexperienced users need for diagnostics?!
Note : not only work on a PC is supported, but also on laptops, netbooks, etc. SSD drives are also supported.
One of the most renowned utilities for testing and diagnosing disks. The program allows you to test: HDD, FDD, CD/DVD, USB/Flash/SCSI.
Main functions:
- viewing complete information about the drive;
- support for IDE/SATA controllers;
- tests to check the “mechanics” of the disk;
- SMART monitor;
- low-level formatting and much more.

In general, I must admit that the program is not very friendly and simple for novice users. It must be used with caution - here, more than ever, it is correct: “if you don’t know, don’t press!”
Developer's website: http://mhddsoftware.com/
A very popular free program for diagnosing hard drives. Allows for fairly accurate diagnostics of fur. parts of drives, view SMART attributes, identify defective sectors (note: bad blocks), it contains various tests, and other useful functions.

An excellent program for testing disks. Its main advantage over MHDD and Victoria (discussed above) is support for all drives with a wide variety of interfaces: ATA/ATAPI/SATA, SSD, SCSI and USB.
By the way, the program does not work under Windows; to run it, you need to burn bootable media (flash drive or CD/DVD disk), and after booting from it, run the utility.

A very high-quality utility for checking HDDs and SSDs for bad sectors, viewing S.M.A.R.T., for setting up special... parameters (power management, acoustic mode adjustment, etc.).
The hard drive temperature can be displayed on the taskbar (to be aware of how things are going ☺).

Supported drives:
- HDD with ATA/SATA, SCSI, USB, FireWire or IEEE 1394 interface;
- SSD with ATA/SATA interface;
- RAID arrays with ATA/SATA/SCSI interface;
- Flash drives with USB interface.
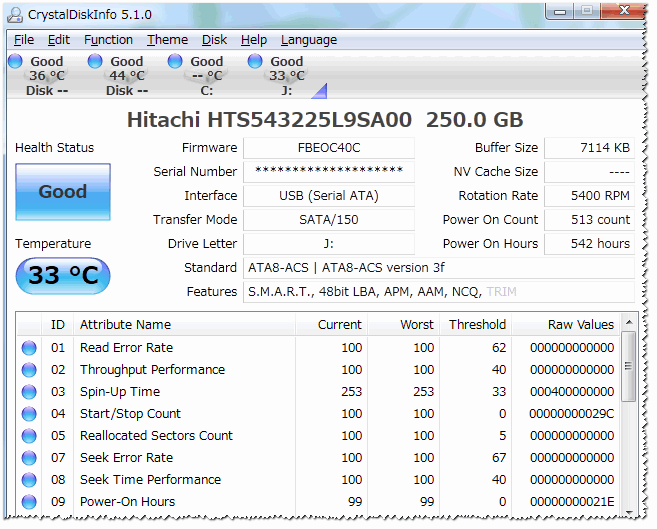
A decent program for monitoring the status of hard drives that support S.M.A.R.T technology.
The program displays detailed information about your drives: interface, total operating time, firmware, serial number, standard, allows you to manage AAM/APM settings (useful when your drive is very noisy), displays S.M.A.R.T. parameters. (reading errors, track search time, number of on-off cycles, performance, spindle starts/stops, sector errors, etc.).
Cleaning HDD from debris
Advanced System Care
One of the best programs for cleaning your computer from junk, fixing errors, editing the registry, removing incorrect shortcuts, etc. Allows you to tidy up your Windows in a few minutes and make it work much faster.
Using the program is very simple: just install and run. In my example below, I did just that - it turned out that there were enough problems (although I regularly use wizards to clean up Windows...).

Also note that after installing Advanced SystemCare, a special manager appears in the upper right corner of the screen: it shows the current CPU and RAM load (in percentage). Thanks to this manager, you can take screenshots, watch disk, memory, processor load, perform quick cleaning, and diagnostics. In general, it replaces the task manager...


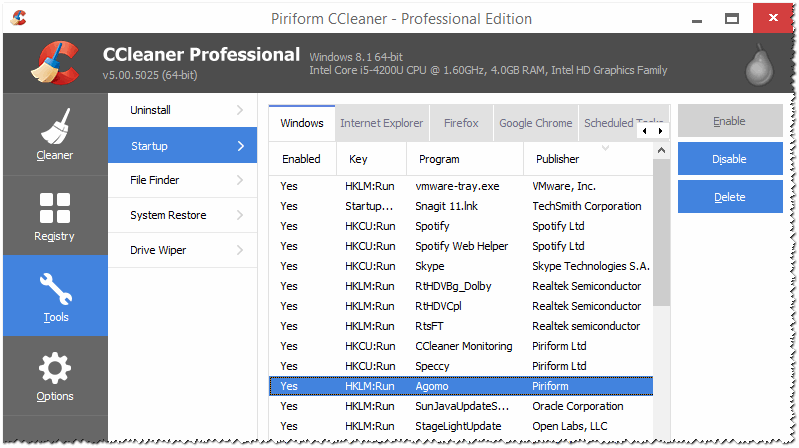
CCleaner
A free utility for comprehensive cleaning of your Windows. Cleans various garbage: temporary unnecessary files, “residues” from deleted programs, browsing history in browsers (all popular ones are supported: Firefox, Opera, Chrome, etc.).
There is a portable version: which does not require installation. The program works in all popular versions of Windows: XP, 7, 8, 10.
Wise Disk Cleaner
This program allows you to deep clean your Windows system and hard drive from various debris. No other utility will find as much garbage as Wise Disk Cleaner finds!
In addition to its main purpose, the program has a built-in defragmenter. Defragmentation carried out after cleaning has a very good effect on the responsiveness and performance of the hard drive.
Wise Disk Cleaner has a convenient and pleasant interface: all the main tabs are located at the top; by clicking on one of them, you can quickly complete the current task. In general, only positive emotions from such software ☺!

Formatting, breakdown - working with sections
A very convenient and multifunctional program for working with hard drives. Its capabilities are more than enough for the average user, here you can: change the partition size (without formatting), move a disk partition, join (merge) partitions (without losing information), delete a partition, format, backup wizard, migration wizard from HDD to SSD and much more.
What especially deserves attention: all operations with disks are performed using a step-by-step wizard, which at each stage will tell you what is being used for what. Also, most disk operations occur without data loss (unless the program warns otherwise).
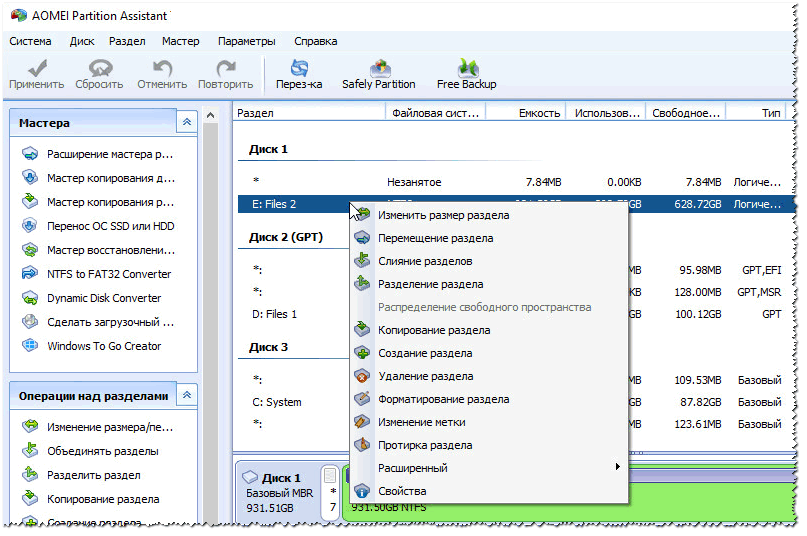
Aomei Partition Assistant - what can be done with the HDD partition
Acronis Disk Director
A very powerful and reliable tool for managing disks and volumes on a computer. Main functions: split and merge disk volumes, disk formatting (all popular file systems are supported: FAT16, FAT32, NTFS, Exts, Ext3, Reiser3, Linux or SWAP), recovery of accidentally deleted volumes, ability to download the program offline (without using Windows - for this you need to prepare a bootable USB flash drive in advance), etc.

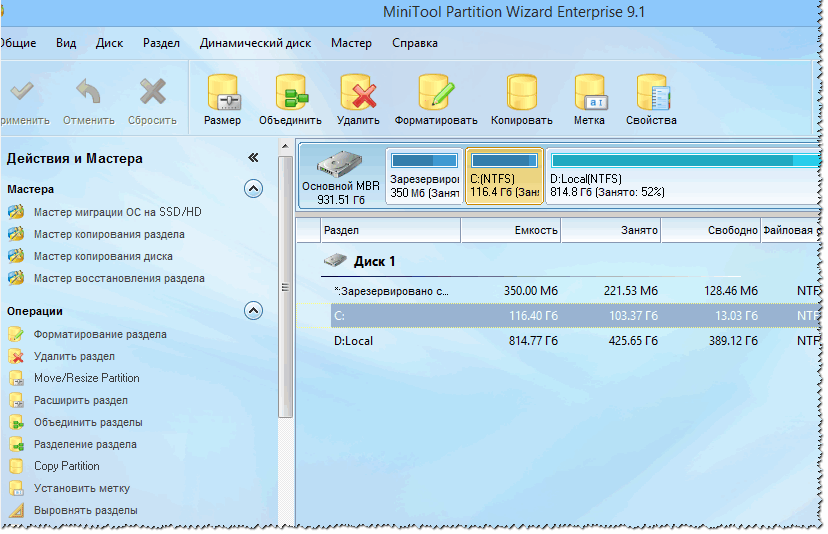
MiniTool Partition Wizard
A very convenient machine for working with a hard drive: it allows you to perform the entire list of operations that an ordinary PC user might need.
Main functions:
- Windows Migration Wizard to another disk/partition (convenient, for example, when migrating Windows from HDD to SSD);
- Partition Copy Wizard;
- recovery wizard;
- merging, formatting, splitting, deleting partitions;
- Russian language support;
- Works in all popular Windows: 7, 8, 10.
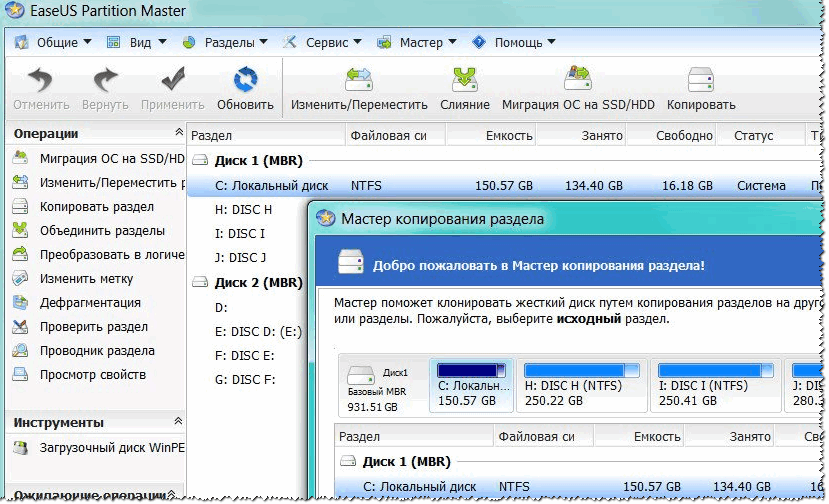
EASEUS Partition Master Free
The best free solution for Windows 10/8.1/8/7/Vista/XP, which will help you create, delete, resize, transfer, expand, split, format, clone partitions of any disks: HDD, SSD, USB drives (flash drives, disks etc.), memory cards, and other storage media.
The program allows you to change the file system (from FAT32 to NTFS) without data loss, change the MBR disk layout to GPT or the reverse operation - GPT disk layout to MBR (also without data loss).
In general, it is a convenient and indispensable manager for working with disks (certainly more convenient than the built-in Windows wizard...).
Defragmentation
If, when opening some files from the disk, your PC begins to think, does it slowly and not immediately, then in the most harmless case, this is to blame fragmentation. To correct this mess, you need to carry out the reverse operation - defragmentation(such a tautology ☻).
Defragmentation- the process of optimizing information storage on disk to ensure a continuous sequence of clusters. In general, if we step back from unclear terms, then after defragmentation your disk starts working faster: reading and writing files speeds up. Thanks to this, your programs become more responsive, and it becomes more pleasant to work on such a PC!
Windows, by the way, has its own defragmentation wizard, but in my opinion, it does not work perfectly... Therefore, I will give a couple of necessary utilities.
Auslogics Disk Defrag
Despite its compact size, this utility will give a head start to many competitors! The program works very quickly, optimizes the file system, which speeds up your work. Needless to say, the program is used by more than 11 million users around the world!
Main functions:
- defragments files and unused space on the HDD;
- When defragmenting, special attention is paid to system files (which affects performance);
- you can defragment specific files (there are not many programs where there is a data feature);
- the ability to work in the background (i.e., unnoticed by you);
- free for home use!

A free and small utility for defragmenting HDDs, USB drives, memory cards, floppy disks. By the way, the program makes it very convenient to set the startup time - you can set up a work schedule so that the disk is analyzed and defragmented when you are not working on the PC.
Main functions of MyDefrag:
- there is a version that works from the command line (does not need installation);
- 2 algorithms for defragmentation;
- there is a task scheduler;
- The standard version of the program is automated and will not take you a minute of time to set up.

A free defragmenter from the manufacturer of the CCleaner utility (Piriform Ltd). The program allows you to work both with an entire disk partition and with individual files and folders.
After analyzing the desired hard drive partition: the program will display a list of fragmented files. You can select the ones you need, and Defraggler will quickly optimize their placement. As a result, you don’t waste time defragmenting the entire disk (in general, in some cases it’s very convenient!).

The page will be updated with new software as you work with the site.
Additions on the topic of the article are welcome!


 Why 0 FPS in wot what to do")


