SpeedFan is a free program that allows you to change the fan speed and temperature in your PC system. You can either set a fixed speed or configure its dynamic changes depending on the temperature inside your computer case. We recommend that only advanced users learn to use SpeedFan; beginners can do a lot of mischief using the SpeedFan program.
How to use SpeedFan
To start using SpeedFan, of course, you need to download and install it. It is recommended to use only trusted sites (for example, get the program here: http://www.softportal.com/software-3121-speedfan.html), otherwise you may receive a damaged version, catch a virus, a Trojan, or encounter several of these troubles at once: Dernaket.ru, Amigo Browser, omiga-plus.com, etc.
So, after downloading and installing, launch SpeedFan.
To begin with, if not selected Russian interface, it would be a good idea to switch to it for greater convenience of further work.
Russification is done very simply: click Configure(this is a button on the first main tab, which for now will be called in bourgeois language - “Readings”), among all the tabs we find Options, and there is already a point there Language. We select our native language, which is already built-in from the very beginning - no need to download any additional localization tools.

- These are cooler sensors detected by the SpeedFan program, they are designated as Fan.
- Here you can track the temperature of the processor (CPU or Temp), hard drive (HDD), video card (GPU).
- When using this zone, you can adjust the rotation speed of the coolers.
Let's move on to mastering the direct functions of the SpeedFan program
First tab "Indicators"(the same former “Readings”) will allow you to see the rotation speed of the fans, the temperature and how stressed the system is.
Second - "Frequencies". There you can overclock the processor and specify the conditions under which the system bus frequency will increase or decrease. Remember that overclocking the processor can be dangerous, even breaking your computer. But a little overclocking can be safe, and performance will increase significantly.
Using SpeedFan contributions "Information" And "SMART“, you can find out the status of the RAM and hard drive.
Then "Charts"— temperature graphs of computer devices are shown. There it is convenient to monitor under what circumstances the temperature rises or falls.
You need to start settings in the tab "Indicators" after going to it and pressing the button Configuration.
A menu with several tabs will open − Fans, Speeds, Voltages, Temperature etc. When you go to each of the tabs, a list will appear in which you need to check the boxes where you need to activate. There you can also edit any of the available parameters.
By changing certain values, we will adjust the reliability, stability, noiselessness and speed of the computer. Let's say, if you lower the fan speed without changing anything else, the result will be as follows: the computer will make less noise, but heat up more.
It would seem that “the nose is out and the tail is stuck,” but this is still not entirely true. By experimenting with the settings, it is quite possible to achieve more comfortable and high-quality computer operation (objectively or exclusively for you) than without using the program. But you should clearly understand all the characteristics of your equipment in order to obtain a similar result, guaranteed and safe for the system.
In the tab "Events" the program's actions are configured when a particular temperature is reached (for example, if the processor heats up to 75 degrees Celsius, immediately turn off the computer).
It makes sense to use SpeedFan only for advanced users; if you are not confident in your abilities, it is better to put the program aside for a while.
There are two main reasons for overclocking the fan. The first one is too high the temperature of the components inside the system unit, not associated with dust contamination of the computer or malfunction of the cooling systems. In this case it is logical increase speed cooling fans within acceptable limits.
The second reason, on the contrary, requires decrease this same speed - increased noise. It is important to find a reasonable compromise in all this - the quietest possible operation with sufficient cooling of the component elements. Therefore, it is necessary somehow change fan rotation speed. How to do this will be discussed further.
Initially, the speed of revolutions is indicated in the settings B.I.OS, based on which the computer motherboard sets the specified parameters, in particular changing the voltage, supplied to the fans, thus controlling the number rpm. However, this speed can be controlled not at all coolers, but only on three outputs, two-output ones will always work on greatest speed.
You can also adjust the speed of the fans installed on the video adapter and the central processor.


This can be done using BIOS(UEFI) or using third-party programs, and some manufacturers produce their own proprietary utilities for monitoring cooling systems for laptops.
Increase speed through BIOS
In order to initialization During system startup, press Del or F2
(or another option, depending on the BIOS). We find there an option related to the cooler speed, usually this CPU Fan Speed and change the value. 
If there is no such item there or it is impossible to make changes, then this can be done using special software.
Some BIOS have options such as Smart CPU Fan Temperature, CPU Smart Fan Control or Noise Control, the inclusion of which will allow you reduce noise when turned on and auto-adjustment rpm during operation, that is, if the load is increased, the rpm increases, otherwise it decreases, until it turns off completely. 
That is, setting up in this way consists of setting a limiting temperature or simply enabling this function in the BIOS.
Using speedfan
The most popular program for adjusting the rotation speed of coolers is SpeedFan. An old and very famous utility, free and easy to use. Finding and downloading it will not be a problem.
The installation process is shown below. Everything is intuitive.


Having installed program we will see the following window. 
The operating principle of all versions is similar.
You can see the current processor load in the field CPU Usage. To enable automatic rotation adjustment, check the box. Automatic Fan speed.
Below is a set of speeds and temperatures set for your fans, where:
- RPM– number of revolutions per minute;
- Fan1– cooler connected to the connector near the chipset;
- Fan2– the cooler on the processor is also called CPUFan,
- Fan4 – second processor fan, if available;
- Fan3– a propeller attached to the AUX0 terminals;
- Fan5– AUX1;
- PWRFan– cooler in the power supply;
- GPUFan– video card fan.
Below in percentage you can change range of smallest and largest rpm, adjusting them by pressing the arrows. This will immediately affect the volume of their work, which you will immediately feel. Just do not turn off the fans completely, there is a risk of burning some of the components.
Speed adjustment using AMD OverDrive and Riva Tunes
Proprietary utility AMD OverDrive will allow you to change settings for AMD platforms. 
Among many other features, you can also programmatically control rotation speed coolers.
You can run this program only on chipsets supported by AMD 770, 780G, 785G, 790FX/790GX/790X, 890FX/890G//890GX, 970, 990FX/990X, A75, A85X. 
After launching the program, click section Fan control and select the necessary characteristics fan speeds.
Another interesting program with the function of regulating the speed of coolers is Riva Tuner. First of all, owners of very hot video cards prefer to use it.
Download and install the program. In our case, this is version 2.21. 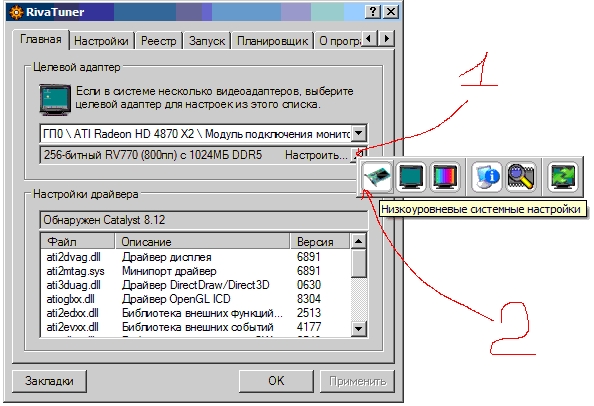
Running it, we find low-level system settings, then open the tab Cooler. The following window opens before us. 
Tick on Enable Low Level Control cooler Creating a preset fan speed, indicating the desired value as a percentage. Let's create several presets. 
Create a task depending on when you want to reduce the fan speed, that is, by adjusting schedule, range temperatures and others characteristics.


This way you can achieve a fine settings cooler speeds depending on changes in temperature of the system unit components.
Some features of SpeedFan 4.52 may seem specific to most users. Meanwhile, this version remains one of the most popular and at the same time relevant.
Increasing fan speed
To increase the rotation speed, you need to use the “Configuration” item and select “Fans”. To change the rotation speed, you need to turn off all devices that have an RPM of 0. Each device is given a PWM value. For example, fan 1 will be given a PWM value of 1. By controlling the value, you can control the speed.
What if SpeedFan does not recognize coolers
- Sometimes the program may crash, resulting in the cooler not being displayed. In this case, you should check the connections and connectors of the motherboard. If you are using a laptop, you can go to the BIOS menu and see the automatic adjustment. The BIOS has a Fan Control item, which can also be called Q-Fan Control or Smart Fan Control. The switches need to be disabled. It should be remembered that some motherboards are quite old and therefore do not support the fan speed control option.
- SpeedFan 4.52 is one of the best versions of this program, which allows you to check the health of your hard drive and shows temperature graphs, which makes it often an indispensable tool for ensuring the correct operation of your computer.
Video: SpeedFan. A great helper in cooling your computer.
SpeedFan- a free program designed to control fan speeds, as well as to control temperatures and voltages in computers with motherboards , having hardware sensors. The program can also display S.M.A.R.T. information and hard drive temperature, if this feature is supported by the hard drive. Also available in possibilities FSB changes for some components and support for SCSI drives. But the main feature of this program is that it can change fan speeds depending on current temperatures (this method is not supported by all sensors), thus reducing noise and energy consumption.
This guide is for any version of SpeedFan.
Setting up the program
Press the button " Configure».
Here we have the first tab – “ Temperatures", displaying the sensors installed on the motherboard and the current temperatures with standard parameters.
Let's start setting up
You can see that all available temperature values that the SpeedFan fog can detect are displayed. The “Chip” column indicates the sensor chip. In this case, you and I have three different chips: one W83782D and two LM75. We can tell the difference between the two LM75s because of their different addresses ($48 and $49). The LM75 chips, in this case, are essentially clones created by the W83782D, and we won’t pay much attention to them, because all temperatures are available directly through the W83782D. Yes, this is not always true. Winbond chips can be configured in such a way that they will actually bury (save) the real temperature received from the main sensor. In this case, you need to work on something with the LM75. So, choose the desired temperature. Approximately (to say), we chose TEMP02.
Select " Desired" (Desired) and " Alarming"(Warning) temperature values unanimously agree with our wishes. Please note that we say: “wishes.” You are free to set any values. But the uneducated should rush to extremes and set the values, roughly speaking, around 15 degrees. This will not bring the desired result.
You see exactly, we first have to choose the temperature, over time we can choose its parameters. That's all, you can rename the name of the temperature (using the mouse alias by pressing “F2”). The new name will be more clearly displayed in the main window.
We have renamed TEMP1 and TEMP2 to CPU1 and CPU0.
It turns out that we have finished renaming and setting parameters in (types of each temperature. Since in our case the highest liquidus in the system is the “Case” temperature, we decided to reflect it in the task pane (checkbox " Show In Traybar»).
About this time we must hide in the main window the temperatures that are unused. In our case, these indicators are LM75. Not every system has unused sensors, but it also happens that there are unconnected sensors on the motherboard that report incorrect values (in particular, -127 or something like that).
Uncheck those temperatures that you feel are not useful or have the wrong values.
There is now a way to organize the temperatures displayed in the main window. Until now, what we have to do is drain the drag&drop to move them to the source or down.
So, the first part of the setup was successfully completed, and the authors of these lines achieved the following result:
Fan settings
In the same manner as in the case of temperatures, we can rename the names of the fans...
... turn off unused ones from the main window...
... and organize.
Ordering speeds
These are the default parameters for the interests of this system. You can set home minimums ( Minimum value) and maximum ( Maximum value) power values for each fan.
Don't forget that not every motherboard has internal reserves to control fan speeds. This, first of all, depends on what sensors may be installed on it and detected by the SpeedFan program. In this case, the same applies to temperatures, voltages and fans. Unimportant (= unimportant) each sensor chip can control all these parameters. SpeedFan displays all the information available to it.
(as) as usual, we can rename...
... remove unused ones from the main window (W83782D has 4 PWM, but you are unlikely to use them to this day) ...
... and organize.
We won't discuss voltage settings here. Ant. describe there, because They can also, by analogy with other parameters, be renamed, hidden and arranged.
Assigning speeds to temperatures
Now the main window looks much better than when the program was first launched. The flame icons have disappeared, and unnecessary values no longer clutter the window :)
So we still have CPU0 speed and CPU1 pressure of 100%.
It is necessary to reduce the fan speed.
Please note that you will not be able to change all speeds. This depends on the sensors and controllers installed on your motherboard.
So, in this case, we have the W83782D, we have the ability to change many parameters.
Going again twenty-five to the settings panel, we can see exactly the temperature of CPU0 is associated with all available speeds, two of which have flags, and the other two are conspicuous by their absence. This happens because we hid such speeds from the main window and the program, assuming that we did not need these speeds, unconsciously unchecked them.
Each PWM can raise or lower the speed of one fan.
Speculatively, each fan can affect any temperature.
Then we tell the program that the speed of CPU0 and the speed of CPU1 (which are related to PWM2 and PWM1) both affect the temperature of CPU0. This means that SpeedFan will try to intensify. Ant. slow down both of these fans when the temperature of CPU0 is very high and try to slow them down when the temperature drops.
This is how we formed the CPU0 temperature until now.
But it is unimportant (=unimportant) what actually happens in this system.
At this point, the temperature of CPU0 changes under the influence of the speed (fan) of CPU0 and the heat of CPU1 changes under the influence of the speed of CPU1.
We change the configuration adequately.
There is one more temperature that our sisters would like to control: the "Case" temperature.
This heat changes virtually under the influence of both fans. Yes, you and I can easily tell the program about this.
Automatic speed option
As you can see, when the “ Automatic Fan Speed", agility does not change automatically. Therefore, we return to the “ tab Speeds» settings panel.
We select the fan speed we need and put a tick in the “ Automatically varied» (Automatic recycling). This needs to be done for all coolers whose speeds are planned to be compared automatically.
Now the speeds of the fans we need will change depending on the temperatures we set in the "tab" Temperatures».
By default, SpeedFan can change each speed from up to 100%.
In the main program window, uncheck the “ Automatic Fan Speed» (Automatic fan speed control), SpeedFan will stop mechanically controlling the speeds.
Setting the desired speeds
The fans in our system were quite quiet previously at 65% power ( Minimum Value). This is good because it still runs at 5700 rpm. Another ventilator is noisier. Therefore, the value of its power is good to differ slightly from the first one.
90% power ( Maximum Value) the second cooler is full to cool the central processor to an acceptable temperature. Around 100% the noise level becomes quite high.
With these settings, the program will dynamically change the speed of the first fan from 65 to 100%, and the speed of the second - from 65 to 90%.
Please note that if " Alarming"(Warning) liquidus has been reached, SpeedFan will set the fan speed to 100% in addition to what we have set so far.
Here we describe the basic settings that you need to make for the successful operation of the program.
Programs don't always work as they should. Users are accustomed to blaming developers for this, but more often it turns out that the application does not work correctly due to the computer on which it is installed.
So, the Speedfan program may provide incorrect information or not see the fans installed on the computer, what should you do then? This problem is encountered very often and there are two solutions to it.
Speedfan may not see the fan or not regulate its speed only because the system itself regulates the rotation of the coolers, and therefore does not allow third-party programs to interfere in this matter. The first reason for automatic adjustment is incorrect connection.
Almost all modern coolers have a cable with 4 holes for installation into the connector. They have been installed on all computers and laptops since almost 2010, so finding another cable will be difficult.

If you install a cooler with a 4 pin wire into a suitable hole, there will be no free “bayonet” left in the connector, and the system will automatically adjust the fan speed.
If possible, you should replace the fan with a cooler with a 3 pin wire. This solution will help if the connector itself is designed for 4 pin.

Working in BIOS
Few people would risk working in a system with a BIOS, much less changing any parameters there, but it’s worth mentioning anyway. Automatic adjustment can also be disabled in this menu during system boot. The CPU Fan Control parameter is responsible for the speed of the fans; if you disable it, the Speedfan program will begin to see the fan and will be able to change its rotation speed
The solution has several disadvantages. The user can disrupt the operation of the system, since working with the BIOS is recommended only for professionals. The menu itself may not have the required parameter, since it is only available in one BIOS version, so there is a high probability that such an item simply will not be found.
It turns out that the easiest way to solve the problem is to change the fan and install it correctly. If the user decides to change some parameters in the BIOS, he may simply break the computer. Unfortunately, there are no other ways to quickly and safely solve the problem; you can contact a service center, but this is everyone’s decision.


