Automatic startup recovery for Windows 8/10 - detailed description.
Startup Repair or Automatic Repair- this is the same recovery utility Windows, but named differently according to the version of Windows. So in Windows Vista and Windows 7 it is called " Startup Repair", and in Windows 8 it is called " Automatic Repair", and in Windows 10 it is again called " Startup Repair».
This article is for Windows 10 and Windows 8, if you need Windows 7 or Vista startup repair,
So now the questions we usually ask are:
- What is it: Windows 10 startup recovery?
Both the features are the same and it is a very useful and effective Windows repair tool. The main job of this feature is to repair Windows when something prevents it from starting operating system.
- What does Startup Repair or Automatic Repair actually do in Windows?
Startup or Automatic Repair is the only recovery tool you have, since Windows that require immediate recovery run it. This tool is designed to repair only certain glitches such as missing or corrupted system files that were mainly used to boot the Windows operating system.
- Why does "Startup Repair" or "Automatic Repair" say " can't fix«?
Indeed, this function cannot show you what is causing the problem for windows to start. It will not help you recover your personal files and documents. It also cannot detect or repair hardware failures and does not help combat virus attacks or damage.
How to use Startup Repair and Automatic Repair?
When you turn on your computer and it displays your logo screen BIOS, quickly press the " Shift" and press the key several times F8.
This may not work the first time. Just restart your computer and try again. You will eventually be taken to recovery mode and you will see the next step below.
If you can't open it with the Shift and F8 keys, the only option is to use Windows Disc or Windows USB Pendrive. This will also help if Windows 7 startup repair does not start.
To open startup or automatic repair from the Windows disk:
Use only a boot disk that matches your current operating system. For example, use the Windows 8 installation disc if you installed Windows 8 on your computer. Use the Windows 10 installation disc if you are using Windows 10.
First, you will need to boot your Windows drive or flash drive using boot sequence priority. If you don't know how to do this, follow the link below. restoring windows 7 startup via command line (win 8/10):
- Immediately after the download has been completed, you will be able to see the first setup menu item and in this you need to click on “ Further", then click " Restore your computer" to launch the startup repair feature.
- After this you will see three options. You will need to select the second one, called " Troubleshooting" and then right below the troubleshooting menu select the third option " Additional options».

Although the Windows 10 operating system is constantly being improved and polished, it still contains more errors than in previous versions. For example, a user may encounter a problem when loading the operating system: “Preparing Automatic Repair” appears on the boot screen, but no repair occurs and Windows 10 does not start. What to do in this case, read within the framework of this article.
About the error
Preparing Automatic Repair occurs when for some reason Windows 10 is damaged. Essentially, the "preparation" feature is supposed to restore damaged files from saved restore points or Windows installation files on a connected external storage device. But in the absence of such, the window simply freezes and after a while, a reboot occurs. And the cycle repeats itself, turning into a closed loop. Break the loop by turning off the power for a while and read the instructions for fixing it.
How to fix?
There are several effective tips for eliminating this problem.
Enabling XD-bit in BIOS
As long as the XD-bit feature (also known as No-Execute Memory Protect) is disabled in the BIOS (UEFI) settings, the user is faced with the Preparing Automatic Repair loop.
Interesting to know! The No-Execute Memory Protect function provides additional protection against hacker attacks, viruses and similar threats at the hardware level (hardware support for prohibiting the execution of program code from the data area). For the first time, such a function was acquired in processors: AMD Athlon 64, Sempron based on them, Intel Pentium 4 of the latest modification and Celeron based on them.

Increasing the space of the “System Reserved” section
The error may occur due to the “System Reserved” partition having less space than it should have (at least 250 MB is needed). To increase the partition space, use the boot utility MiniTool Partition Wizard. You may need a different computer or:
- Download the utility (ISO file).
- Mount it on a virtual disk (RMB on the file → open with → Explorer).

- Connect a formatted FAT32 flash drive, open the virtual disk and drag files to the flash drive to write.

- Also, to write the utility to a flash drive from an image, you can use any convenient program.

- Restart your computer and boot from the flash drive (the article will help with this).
- The open program will allow you to work with hard drives.
 Right-click on the system drive “C:” and click “Shrink”. Mark the 250 MB area. This will create 250 MB of unallocated area.
 - Move the System Reserved partition next to the unallocated space. Then right-click on System Reserved and perform the Extend function (Combining an indivisible area with a System Reserved volume).
- Restart your computer and check if Windows is working.
System Restore
You can restore Windows 10 using a boot disk or flash drive with a Windows distribution:

Reinstalling Windows
If none of the tips described above helped you start Windows, reinstall it using
Hello, our dear readers! Today we will talk about restoration Windows 10 performance.
After a break, I decided to write another article. In it we will continue to study the features of the Microsoft Windows 10 operating system. Since we have not yet studied this new product well enough, today we will devote our time to solving another problem. Namely, Windows 10 does not load when booting. These are the things...
We will assume that our hardware is in good working order, the hard drive of the computer has no physical surface damage, the system unit is intact, it has not been hit with a sledgehammer, and all connectors for connecting peripherals have not been torn out and are in their proper places.
Yes, yes, dear reader, don’t smile; This has happened, I have seen computers like this. Sometimes people can’t cope with the influx of feelings... 🙂 🙂 :), and then morning comes... L L L But I hope it’s not like that for you. And everything is fine.
Welcome to the article summary:
(helps with problems starting Windows 10)
Windows users often encounter the Blue Screen of Death problem. What is it? The fact is that damaged system files can lead to a critical error that prevents the computer from starting to work correctly. In this case, a “blue screen” appears. But don't panic! After all, you can fix the problem yourself. Let's figure out exactly how.
Causes of blue and black screens
In Windows 10, you may encounter the following error messages: “The computer is not starting correctly,” “The system requires repair,” etc. The reason for their appearance lies in damaged system files, due to which Windows could not boot.
The system may be damaged due to incorrect actions of the user himself, who made changes to the registry or files on drive C. Or the cause of the breakdown may be a virus. The error also sometimes occurs due to incompatibility with third-party device drivers or enabled Fast Boot. However, most often a critical error appears due to an interrupted update or an incorrect shutdown of the computer. For example, the computer shut down forcibly because the power was lost or a power surge occurred. Processes and files controlled by them are terminated, after which their reuse becomes impossible.
If damaged, the system first tries to recover twice on its own, rebooting the computer each time. If the error is not resolved after this, control is given to the user. Sometimes it happens that the system freezes and reboots a large number of times, after which a black screen appears. In this situation, you must abort the procedure and continue the recovery manually.
Video: the danger of the Blue Screen of Death in Windows 10
Automatic system recovery
First, give the computer a chance to figure out the error on its own. Keep in mind that the automatic recovery procedure may take more than an hour. Do not interrupt it under any circumstances, as this can lead to even more tragic consequences. Proceed to manual recovery only if the system freezes or one of the messages appears: “The computer is not starting correctly,” “Windows seems to have loaded incorrectly.”
The appearance of a “blue screen of death” indicates the presence of a critical error in the system
Reboot
This method is suitable for you if the system displays a message with a choice of two options: “Reboot” and “Advanced options”. If it is not there, then you will have to use other methods.
What should be done:
- When you receive the notification, go to the Advanced Options section.
Start System Restore by going to Advanced Options
- Select the troubleshooting block.
Open the “Troubleshooting” tab
- Select the section with additional parameters again.
Select "Advanced Options"
- Go to the Boot Options tab.
Open the "Boot Options" section
- In the list that opens, click “Restart”.
Click Reboot
- A list with download options will open. Select option 6 - command line support mode. Wait until the system restarts and the command prompt appears.
Select reboot with command line support
- On the command line, run three commands in sequence:
- sfc /scannow;
- dism /Online /Cleanup-Image /RestoreHealth;
- shutdown -r.
Commands take time to complete, please wait for them to complete.
Video: how to fix the Blue Screen of Death in Windows 10
Deactivating Quick Launch
The reason for the impossibility of recovery may be fast boot, activated by default. Since in this case there is no access to the system, you will have to deactivate the function through the BIOS:

If this method does not work, move on to the next one.
Deactivating automatic recovery
It happens that the system resorts to recovery without any reason, by mistake. Therefore, it is worth trying to prevent it from calling the recovery procedure by following these steps:
- When the message appears, go to advanced options and invoke Command Prompt.
From the Advanced Options menu, open Command Prompt
- Using the bcdedit command, find the string resumeobject and copy its value.
Run bcdedit to get to Windows Boot Manager
- Run the command bcdedit /set (X) recoveryenabled, where X is the previously copied line, enclosed in curly braces. After that, exit the command line with the exit command.
Run bcdedit /set (X) recoveryenabled to disable automatic recovery
Ready! Now try booting the system.
Manually running diagnostics
Going to the command line using the method described in the paragraphs “Deactivating automatic recovery” or “Reboot”, run the following commands in sequence:
- chkdsk /r c:;
- sfc /scannow.
Run the command chkdsk /r c;, sfc /scannow
These commands scan system files and fix any errors found. After executing them, write exit to exit the command line and check if the problem goes away.
Manual system recovery
If none of the described methods help resolve the problem, you will have to return the system to working condition manually. There are several ways to do this.
Restore point
This method is good because your data (photos, music, archives and other files) will not be deleted or changed. System settings, updates, and driver versions will be rolled back to the state they were in at the time the restore point was created. If it was not created automatically or manually in advance, then you will not be able to use the method.
Follow these steps:

After this, the rollback procedure will begin, which can last about an hour. Don't interrupt it - it will lead to big problems. As a result of the rollback, system files are regenerated, so no errors should occur.
Reset to factory settings
This method allows you to reset all system settings, installed programs and created tasks, and at the same time save the user’s personal data that is not stored in the system partition. This method replaces reinstalling the system, allowing you to complete it much faster.
Do the following:

The rollback procedure will begin, which may last more than an hour. Do not interrupt it, otherwise the system will be damaged so much that a direct reinstallation cannot be avoided. At one stage you will be asked whether to save your personal data or not. If you select the “Don’t save” option, you can get a completely clean Windows 10.
Choose whether to save your personal data or not
Manually entering the recovery menu
To manually enter the recovery menu, you will need recovery media. An installation flash card with at least 8 GB of memory will be used as it.
To create installation media, follow the instructions:
- Insert the flash card into your work computer, find its icon in Explorer, right-click on it and select the “Format” function. Please note that you can create media in any version of Windows, but the “Format” function is present only in Windows 10. In previous systems, you will have to use a third-party program, for example, USB Disk Storage Format Tool. The formatting format is FAT32.
Before formatting the flash card, select the FAT32 file system format
- After formatting is complete, go to the Microsoft website to the Windows download page and download the installation program.
Go to the Microsoft website and download the system installer
- Launch the downloaded program. Check that you want to update another device.
Select "Create installation media"
- When asked to select the characteristics of the system to be recorded, select the specifications that match the characteristics of the system that needs to be restored.
Specify the characteristics of the system you want to restore
- Specify which media to use and wait for the recording to complete. Done, the installation media has been created.
Specify the media - flash card or disk
- After the operation is completed, run the flash card on a non-working computer. To do this, enter the BIOS (how to do this is described in the first step of the “Deactivating Quick Startup”) and change the boot order so that the connected media moves the hard drive from the first place.
Install the installation media first
- Exit the BIOS and wait for the installation window to appear. Go through the first step of selecting a language, and on the second, interrupt the installation procedure by clicking “System Restore.”
Click "System Restore" in the second step of Windows installation
After completing these steps, you will be in the recovery menu and can use all the instructions described above.
Generating a system image
If you have another computer with the same Windows 10 specifications as the non-working computer, you can capture a system image. This will create a restore point and you will be able to use the method already described above for fixing a Windows error using a restore point.
To generate a system image, follow these steps:
- In the Control Panel menu, go to File History.

Specify the media on which the system image will be written
The appearance of a blue or black screen with an error indicates the presence of failures or damaged files in the system. You can fix the problem using the automatic system recovery options. If this does not work, use one of the manual recovery methods. Follow the instructions from the article and you will definitely succeed!
Or a built-in utility that says that . I will give the most common causes of the problem and a probable solution for each of them. As you try out the tips, you will be able to draw your own conclusions about what causes the circular reboot and the inability of Windows to restore itself.
Just a small note: the registry option is ideal for Windows 7, because in Windows 10 the saving folder with the registry backup is sometimes filled with zero files. Why dont know. But this means that the registry files we will be accessing are simply empty in Windows 10. Warm greetings Microsoft!
Hello. I think there are quite a few of those who have at least once encountered the problem of starting Windows and tried to fix it using a boot disk or the system itself:
I came across a repeated message that the startup repair tool is powerless. Almost no resource I know has offered any clear solution to this problem. And, except for sending the user to reinstall Windows, they do not advise anything.
Reasons for a circular reboot
- Windows shuts down incorrectly due to power issues
- Incorrect start of antivirus software
- Your computer has broken device drivers or system files
- hard drive “very tired”
- the registry is damaged
- Windows incorrectly detects system volume size
- an “extra” device is connected to the USB port (remove all flash drives)
In general, the problem can lie anywhere...
Based on the first two errors, the magic wand may be the key F8, which will cause a menu to appear with . From there it's worth a try Normal Windows boot. Sometimes this simple method helps out in a situation.
For further work we will need from Windows. Read the article very carefully; programs for checking the status of the disk and file system that you will use will be useful to you. And some immediate advice to users:
Did you know that Microsoft technical support specialists officially recommend running the system restore tool? AT LEAST 3 TIMES(!) ? Even if you fail! That is, the remedy can work on both the fifth and the eighth, since it doesn't know how to solve problems(if there are several) en masse. Only step by step, starting at the user's command. So, we will repeat everything that the startup recovery tool is designed to do manually.
Where do we start?
If in Windows, after turning on or rebooting, nothing but the recovery tool starts, let’s try to show the error a little differently. To do this, let's try to turn off the circular reboot itself:
- Opening the repair console cmd
- enter the command
- reboot and check if the system behavior has changed
Let's try to determine the reason by name.
- In the repair console, we go to a file that is created specifically when the system has problems loading. We write:
Where X– the letter of the system volume where the non-bootable Windows is located. Notepad will open, in which you should find an entry like
…Boot critical file c:windowssystem32something_somewhere is corrupt…
This file (or files) is the cause of the problem. The path pointing to the broken file/driver can be anything. Just take a closer look. All you have to do is find this file and delete it. For example, the log stated that...
Boot critical file c:windowssystem32driversvbfsoc.sys is corrupt
In the console we type by type:
Cd X:\Windows\System32\drivers\del vbfsoc.sys
Do not close the console and enter the launch commands one by one.
I/O system lost boot device
Happens. After updates or system failure. In general, the computer searches for a boot device on all connected to it - cards, flash drives, external drives, etc. Unless on a keyboard or mouse. But we agreed that there is nothing “extra” regarding the ports? And if so...
- tuck a bootable USB flash drive into the port or insert a bootable disk into the drive
- Let's boot through the BIOS or the quick launch menu from this boot device
- let's go to the cmd console

after the language selection window, press Shift + F10 - the console will appear
- enter a command to help “remember” the disks:
If there is no reaction, we repeat the procedure, but “kick” the computer harder:
Bootsect /nt60 all
We replace the registry completely
I offer you another solution to the problem of correcting Windows registry entries, which often cause a circular failure of the recovery tool. In general, the principle is simple - we will substitute a non-working copy of Windows files from registry backup. In fact, we will do what Windows itself is trying to do - only we will do it manually and for sure. Works on any version of Windows. Or it doesn’t work... The approach is radical, but sometimes it helps.
Some recently installed programs will have to be sacrificed.
BEFORE YOU START.
- I hope that all the funds have already been used by you; For some people, downloading helps a lot Latest configuration with working parameters
- try to follow the advice carefully, otherwise, after rash actions, other means will turn out to be completely useless - the system will be truly broken irrevocably
- I don't give any guarantees, but it's worth checking
- if everything was done correctly, but the problem is not solved...
THE REASON FOR THE ERROR IS NOT IN THE REGISTRY
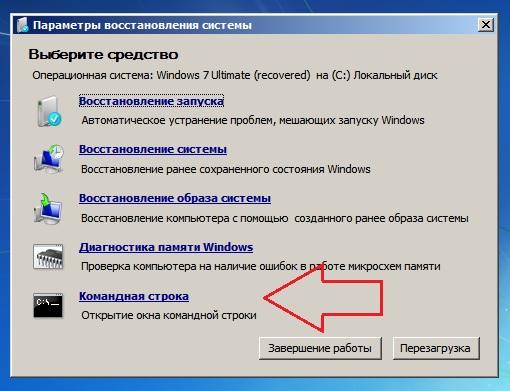
Launch the startup repair tool.
Apparently, since you are reading this article, again. Once again we come across a message that
The startup repair tool cannot automatically repair this computer
Windows can't automatically fix problems with this computer
and go get additional tools to work in Show additional system recovery options. We need a command console:
The console will open from X. Let me remind you that this is the letter of the media on which the Windows boot (installation) files are located. Let's go to the section with the installed system. This is usually section C. If there are several partitions, and even more so systems, you will have to navigate by the space occupied, directories, and accounts. But even in this case, Windows’ imagination during installation is usually enough for the letters C and D.
- enter the required disk with a command similar to:

My system drive turned out to be D
- Let's check its contents. The fastest way to do this is to enter the command:
if folders appeared like Program Files, Desktop and others, you are in the right place. Another way to detect the disk on which Windows is installed is to quickly enter a command to search the loader editor for suitable files:
Bcdedit | find "osdevice"
the console will immediately return a response with the partition letter in the manner of:
Osdevice partition: D
- So, we have decided on the location of Windows; go to the system directory:
where we will again display its contents for better navigation using the already known dir command and with Let's create a folder that will contain the files that we will be working with now (in case something goes wrong). I named the new folder backup– arbitrary name:
MD backup

- and copy all the contents of the directory into this folder:
 If the first attempt does not work and you have to rewrite the content, press A in response to the console question.
ATTENTION. At this stage, you should not experience any errors. If something goes wrong, repeat the work from the very beginning step by step.
- We are now interested in the content:
Its content is the same for almost all users and looks something like this (again, the dir command helps):

The main thing is that there are no empty folders with 0 bytes of content.
- Copy the contents of the RegBack folder with the command (follow the syntax):
and click on Enter will copy the contents to the directory where the folder is being viewed from (Windows\System32\config). If the console asks for confirmation, press Y(for all questions) or A.
- Close the console and reboot.
What have we done?
We have just completely replaced these files, if you look at them from Windows Explorer:
All these methods do not require any programs and are available from the same cmd console.


