Can't boot Windows 8 or Windows 8.1 in Safe Mode? Are you pressing F8 or Shift+F8 but it doesn't do anything? Loading the new operating system from Microsoft has become so fast that it is not always possible to interrupt it with keystrokes.
You can enter safe mode in Windows 8 or 8.1 in 5 different ways, any of them will allow you to run the system on Windows 8-8.1 safely!
Safe Mode in Windows 8 and Windows 8.1 is practically no different from that in earlier versions of the OS.
The operating system still loads only the most basic drivers and services. The only noticeable difference is that the minimum screen resolution in Safe Mode has increased from 800x600 pixels to 1024x768 pixels.
1. Use the System Configuration tool (Msconfig.exe)
As with , the easiest way to boot into Safe Mode is to use the System Configuration program, also known as msconfig.exe.
Launch it, go to the “Boot” tab and in the boot options activate the “Safe Mode” option. Then click on the "OK" button.
Next, you will see a message stating that you need to restart your computer. Click Restart or Quit Without Reboot, depending on whether you want the computer to restart now or later.

The next time you start Windows 8 (Windows 8.1), it will boot into Safe Mode.
2. Use the combination Shift + Restart
Click the power button on the Windows login screen or in the Settings Charm. Then press and hold the SHIFT button on your keyboard and click Restart.

Windows will prompt you to select an option. Select "Diagnostics".

On the Diagnostics screen, click the Advanced Options button.

On the More Options screen, click Boot Options.


When your computer restarts, a list of 9 options will appear on the screen, including three types of Safe Mode.

Press F4 on your keyboard to enable Safe Mode, F5 to enable Safe Mode with Network Driver Support, and F6 to enable Safe Mode with Command Prompt Support. After this, Windows 8/Windows 8.1 will be downloaded according to your selection.
3. Boot into safe mode using CD/DVD to restore system (Windows 8 only)

On Windows 8, but not Windows 8.1, you can . So, if you have such a disk, you can boot from it.
After booting from the recovery disk, you will be prompted to select a keyboard layout. Select the one you want to use. You will then see the options screen. All further steps will be identical to those described in method 2.
4. Boot into USB Safe Mode to Restore System

Windows 8 and Windows 8.1 allow . Detailed instructions can be found at the link. Using such a disk you can also boot the OS in safe mode. To do this, boot from your System Recovery USB drive and follow the instructions from the previous method.
5. Use F8 or Shift + F8 (does not work when using UEFI BIOS and SSD)
In the case of Windows 7, just press F8 just before starting the operating system to get to a menu with additional boot options, from where you can boot the operating system in safe mode.

For Windows 8 and 8.1, some sites advise using the keyboard shortcut Shift + F8, which launches recovery mode, allowing you to boot into safe mode. However, the problem is that neither Shift + F8 nor just F8 often work.
In a post on its official blog, Microsoft explains that this behavior is due to the very fast boot process. Steve Sinofsky once said: “Windows 8 has a problem. It loads too quickly, so quickly that you actually don't have time to interrupt it when you turn on your PC. The operating system simply does not have time to detect pressing the F2 or F8 keys.”
In general, if you have a modern computer with a UEFI BIOS and an SSD, you are unlikely to be able to interrupt the boot process with keystrokes. On older PCs with a classic BIOS and no SSD, pressing these keys still works.
Have a great day!
So, a computer or laptop with the Windows 8 operating system installed does not boot. There may be various reasons. Let's figure out what ways you can return your computer to working condition.
To complete all subsequent actions, you you will need a bootable flash drive or disk, from which you installed the system, or system recovery disk.
If neither one nor the other is available, then we look for a friend’s work computer and create a bootable USB flash drive with Windows 8 on it, or you will need a computer with a working Windows 8 OS installed to create a system recovery disk.
We insert the flash drive into the computer and when the system starts, go to Bios, press F2 or Del. Now we need to change the device boot priority so that the computer boots from the USB flash drive. How to do this, read the article installing Windows 8 from a flash drive.
Then the message will appear “Press any key to boot from USB...”, press any button on the keyboard to start from the flash drive. A language selection window should now appear.

In the window "Select action" go to the "Diagnostics" section.

Here you can select the “Restore” option, and all your personal files: photos, music, videos and applications from the Windows Store will not be affected. The computer settings will be reset to default, and installed programs will be removed from the Program Files folder.
If you select "Return to original state", then you can select or delete files only from the system disk, or from all disks. In the second case, this will be tantamount to reinstalling the operating system. Next you will need to choose whether to simply delete files or completely clean the disk. If you choose the second option, the data on your hard drive will be almost impossible to recover.

Now let's go to the section "Extra options". Here you can do the following:
"Automatic System Restore"– the system itself will try to solve the problem that is preventing Windows from loading normally;
"System Restore"– this is recovery from a checkpoint. In the second case, a window will appear where you will need to select a restore point for the system. Thus, you will return it to the date when the system worked stably. You can read about what a restore point is and how to roll back the system to a working state by following the link.

Go ahead. Go to the section "Boot Options". A list of what we can do will appear. Here we will be interested in the point "Enable Safe Mode", press "Reboot". I have already written about how to enter safe mode in Windows 8.

Now, using the F4, F5 and F6 keys, we select which safe mode we will enable: normal, with loading network drivers (there will be access to the Internet) or with command line support.

In safe mode, you can use a restore point to return the system to a working state; you can check your computer for viruses using the Dr.Web CureIt utility, which will help you find and remove them. If problems with your computer started after installing the program, after "Programs and Features" remove it from your computer. You can also roll back the installed drivers that caused the problems to their previous state, or even remove them from the computer.
I hope the problem: a computer or laptop with Windows 8 installed will not start, after this it will be solved, and you will then be able to use a computer with a working operating system.
Rate this article:Hello dear blog visitors.
No matter how opposed you are to the new Windows 8 OS, time inexorably runs forward, and sooner or later, you still have to install it. Moreover, even ardent opponents are starting to switch, and the reason, most often, is one - developers stop releasing drivers for old OSes for new equipment...
In this article I would like to talk about typical errors that occur when installing Windows 8 and how they can be solved.
Reasons why Windows 8 won't install.
1) The first thing you need to check is that your computer settings meet the minimum operating system requirements. Any modern computer, of course, corresponds to them. But I personally witnessed how they tried to install this OS on a fairly old system unit. As a result, in 2 hours we just exhausted our nerves...
Minimum requirements:
1-2 GB of RAM (for 64 bit OS - 2 GB);
1 GHz or higher processor + PAE, NX and SSE2 support;
Free space on your hard drive - at least 20 GB (preferably 40-50);
Video card supporting DirectX 9.
By the way, many users say that they install the OS with 512 MB of RAM and, supposedly, everything works fine. Personally, I haven’t worked on such a computer, but I assume that it can’t do without slowdowns and freezes... I still recommend that if your computer does not meet the minimum system requirements, install an older OS, for example Windows XP.
2) The most common mistake when installing Windows 8 is an incorrectly written flash drive or disk. Users often simply copy files or burn them like regular discs. Naturally, the installation will not start...
3) Also, very often, users simply forget to configure the BIOS - and it, in turn, simply does not see the disk or flash drive with installation files. Naturally, the installation does not start and the old operating system boots normally.
To set up BIOS, use the articles below:
It would also be a good idea to reset the settings to optimal. I also recommend going to the website of your motherboard manufacturer and checking if there is a BIOS update; perhaps your old version had critical errors that the developers have fixed (more details).
4) In order not to go too far from the BIOS, I will say that very, very often errors and failures occur due to the fact that the BIOS includes an FDD or Flopy Drive drive. Even if you don’t have it and never had it, the checkbox may well be enabled in the Bios and need to be disabled!
Also, during installation, check and disable everything else unnecessary: LAN, Audio, IEE1394, FDD. After installation, simply reset the settings to optimal ones and you will work calmly in the new OS.
5) If you have several monitors, a printer, several hard drives, RAM sticks - turn them off, leave only one device at a time and only those without which the computer cannot work. That is, for example, a monitor, keyboard and mouse; in the system unit: one hard drive and one stick of RAM.
There was such a case when installing Windows 7 - the system incorrectly detected one of the two monitors connected to the system unit. As a result, a black screen was observed during installation...
6) I also recommend trying to test the RAM sticks. More details about the test here: . By the way, try taking out the strips, blowing dust out of the connectors for their insertion, and rubbing the contacts on the strip with a rubber band. Failures often occur due to poor contact.
7) And lastly. There was one such case when the keyboard did not work during the installation of the OS. It turned out that for some reason the USB to which it was connected did not work (in fact, apparently there were simply no drivers in the installation distribution, after installing the OS and updating the drivers, the USB started working). Therefore, I recommend that you try using PS/2 connectors for the keyboard and mouse when installing.
Best…
Windows 8 RecoveryFirst of all, let's perform the initial configuration of Windows 8 system protection settings. Make sure that system recovery is enabled for the partition on which Windows 8 is installed, usually (C:). We will indicate the amount of disk space required for the normal functioning of System Protection. Next, we’ll learn how to create a restore point in a normally functioning Windows 8, as well as how to roll back using it. Let's also consider the case when, due to a system failure, we will NOT be able to boot Windows 8, but we will still get to restoring the system, even if the keyboard shortcut Shift+F8 does not work at boot. We'll do this using the Windows 8 recovery disc or Windows 8 installation disc we created.Let's look at how Windows 8 is restored without deleting user files (Refresh Your PC). Launch you can directly from a running system, as well as if your Windows 8 does not boot. Windows 8 will be reinstalled, personal data will not be affected, applications from the Windows Store will be saved, and the programs you have installed will be removed. We will need a Windows 8 installation disk or a Windows 8 image that we created. I will show you how to create a Windows 8 image and then restore our operating system from it using Refresh Your PC, even if it won’t boot at all.

In fact, using Windows 8, you can create two recovery images; one image works with the Refresh Your PC tool. When using the Refresh Your PC tool, Windows 8 is completely restored, but your personal files remain intact, but installed programs are removed and system settings are reset to their original settings. So, if you create an image using the command line, as described below in the article, then Refresh Your PC will use this image to restore, and not the Windows 8 installation disk. This means that the programs and system settings you installed will NOT be reset , but will be returned at the time the image was created. But you should know that an image created in this way will not be suitable for recovery in the event of a complete disk format (C:) or accidental deletion of the system partition. To create a backup image of Windows 8 entirely, the second method is suitable.
The second image is created using a tool already familiar to us from the Control Panel, called “Windows 7 File Recovery”. Using this image, you can restore Windows 8 completely to a blank hard drive. How does this happen, for example, you created an image of Windows 8 on disk (D:), then completely removed Windows 8 from disk (C:) and installed Windows 7, used it and didn’t like it, you take and restore Windows 8 with all your programs and files from the image and that’s it.


How to create a Windows 8 restore point and roll back using it
In fact, the system restore tool in Windows 8 differs from the recovery tool that was in Windows 7 and I must say there is something to write about here. Moreover, computers with Windows 8 installed have been sold for a long time and people are actively using the new operating system, and many times I have had to use almost all the available Windows 8 system recovery functions in practice. So, I'm telling you what I know.
Of course, most often with various problems with a new operating system, you will have to use a simple rollback using a restore point. Therefore, first of all, let's make sure that we have system recovery turned on.
Options


Recovery 
Setting up System Restore 
First of all, System Restore must be enabled for the partition where Windows 8 is installed, usually (C:). As you already know, the operating system itself creates restore points before any significant events for it; for example, a restore point will be created by Windows 8 before installing any program or driver. And if this program or driver works with errors and disrupts the stable operation of the operating system, then we can use a restore point and roll back to the time when Windows 8 was working normally and the incorrect program had not yet been installed into our operating system. Why not a time machine? Even if you infect your operating system with a virus, rolling back using a restore point will often save you from finding and removing the malware.
Setting up system recovery. In this window, select our Local disk (C:) (System) and click on the Configure button,

check the Enable system protection item and specify the Maximum usage of approximately 15%, this figure is quite enough for the normal operation of System Partition Protection with Windows 8 installed. Apply and OK. If you wish, you can enable System Protection for other partitions. 
Now let's create a restore point ourselves, and I advise you to do this periodically. For example, before an upcoming search for something on the Internet or before installing a new program.
Click Create.

Let's come up with a name for our recovery point. For example, January 13, installation of a new program. Create again and a Windows 8 restore point is created. 
Now let’s imagine this situation: immediately after installing some program, we had problems: the Internet disappeared, freezes appeared, and so on. Of course, we will decide to apply our restore point created before installing the program.
Settings->Control Panel->Recovery->Run System Restore 
In the window that appears, System Protection offers us to use a restore point, but I suggest refusing and choosing a restore point yourself, check the box: Select another restore point and click Next.

Check the Show all available recovery points checkbox and all available recovery points will open. For example, we decided to use a restore point created on January 11, on that day I installed Microsoft Office Word 2007
Select the restore point with the left mouse, then click on the option Search for affected programs 
and you will be presented with a list of everything that will be deleted along with your program.
If you are not happy with this, select a different restore point. But I, for example, agree, select the restore point of January 11 and click Next. 
Ready. 
How to roll back using a restore point if Windows 8 won't boot
Now another question. For example, you and I cannot boot into a normally working Windows 8, how then can we get to the menu for additional boot and system recovery options?
You can do this in several ways: using the keyboard shortcut Shift+F8 or using the recovery disk we created or the Windows 8 installation disk.
In the previous Windows 7 operating system, you could press F-8 during the initial phase of booting the computer and get into Troubleshooting (Recovery Environment), then from there start System Restore. In Windows 8, the F-8 key was abolished, but the keyboard shortcut Shift+F8 appeared, which is very difficult to use, since in the new Windows 8 operating system the system boot time is greatly reduced and the user, even if he wants, will not have time to press the keys at the right time. If you want, try it, you can do it like this: during the initial phase of booting the computer, hold down the Shift key and often press F8. We enter this menu, Select Action, Diagnostics,

further Additional parameters

System Restore. 
Select Windows 8 
System recovery starts.


Click Finish and the system will be rolled back to this restore point.

Creating and using a Windows 8 recovery disc
If you are unable to enter the advanced boot options menu using Shift+F8 (personally, I refused to try to hammer on the keyboard), then this can be done from the Windows 8 recovery disk. Believe me, friends, the Windows 8 recovery disk will be useful to you more than once . Let's create it in our Windows 8, then boot the computer from it and enter the advanced boot options menu and then into Windows 8 system recovery.
To make a Windows 8 recovery disk, select:
Settings->Control Panel->Recovery->Create a recovery drive

Further. You can create a Windows 8 recovery flash drive, then at this moment you need to connect the flash drive (the information on it will be deleted). If we want to create a recovery disk, click Create a system recovery disk on a CD instead. 
Create a disk. A minute and our recovery disk is ready.

Now let's imagine the situation. For some reason, you and I cannot download Windows 8; the download ends with an error or a blue screen of death. What to do and how to get into system recovery. This is where the Windows 8 recovery disk you created will come in handy. We insert it into the drive and boot our computer from this disk. If you don’t know how to boot a computer from a disk or flash drive, read our articles: BIOS: Booting from a disk, Booting from a disk in a laptop or How to boot a laptop from a flash drive and also Booting from a flash drive in the BIOS.
In the initial window, select Diagnostics. 
Extra options
System Restore 
Select Windows 8 
Start system recovery. 
Further. Select the restore point we need.

The Windows 8 system is now restored to the desired restore point. Instead of a recovery disk, you can use the Windows 8 installation disk. 
How to restore Windows 8 without deleting user files (Refresh Your PC) from a running operating system
When you need to use this tool, of course, if your operating system is unstable, and most importantly, rolling back using a restore point did not help you.
When using this tool, a complete reinstallation of Windows 8 will occur, but without deleting your data. You will need a Windows 8 installation disk or a Windows 8 image that we prepared in advance.
First, we will restore Windows 8 directly from a running operating system using the Windows 8 installation disc.
Files in user profiles will remain intact (documents, photos, music, downloads), including those on the desktop, you will also not lose applications from the Windows Store, and network settings will remain unchanged.
But the programs you installed from the Program Files folders will be deleted. All system settings and services will be reset to default settings.
So, let’s put recovery into practice without deleting user data (Refresh Your PC). You can do this from a running Windows 8, or by booting from a recovery disk or Windows 8 installation disk. First of all, let’s launch Refresh Your PC from a running system.
Settings->Change computer settings->

General->Recover PC without deleting files. Begin

We read the warning.

If you have not yet inserted the Windows 8 installation disc into your drive, now is the time to do so. 
Click Restore.

Virtually no further action will be required from you. Of course, the recovery will NOT take a few minutes, in my case it took about 40 minutes.

And here we have our updated Windows 8, all our personal files are safe and sound, system settings are reset to default, personal programs will have to be reinstalled again.
How to apply Windows 8 recovery without deleting user files (Refresh Your PC) if your Windows 8 won't boot
So our computer or laptop does not boot, rolling back using a restore point did not help, and we decided to use the Windows 8 recovery tool without deleting user data (Refresh Your PC). Here we again need an installation disk with Windows 8. Let's boot our computer from the Windows 8 installation disk. So, the additional boot menu that is already familiar to us Select the action Diagnostics
Next Restore Your files will remain in place.

We read the warning we are already familiar with and click Next. 
Windows 8.

Everything is ready and restored. 
The recovery process is underway

our PC. As in the previous case, the recovery took about 40 minutes, all personal data remained in place, system settings were reset to default, and the programs we installed were deleted.
How to apply Windows 8 recovery without deleting user files (Refresh Your PC) if the operating system does not boot and you do not have a Windows 8 installation disk
Everything is the same as in the previous case, if serious problems arise, we boot from the recovery disk and try to roll back using the restore point, but this does not help. Then we decide to use Refresh Your PC and again the problem is, we do not have a Windows 8 installation disk and the following error appears: To continue, insert the Windows installation disk or system recovery media.

This situation may turn out to be hopeless; no, you can, of course, try to enter safe mode and correct the situation there, for example, remove the latest installed programs and drivers, which in your opinion could have caused the crash, or you can do something else.
Creating a Windows 8 recovery image for Refresh Your PC
You need to create an image of your Windows 8 in advance and use it when restoring, not the Windows 8 installation disk, and the Refresh Your PC tool will use this image for recovery, and not the Windows 8 installation disk. This means that the system settings you installed will NOT be reset , but will be returned at the time the image was created.
How to create a Windows 8 recovery image.
It’s very simple, we’ll use the Recimg.exe command line tool. Right-click on the Start menu and select Command Prompt (Admin), 
enter the command
recimg /createimage D:\backup, which means creating a Windows 8 recovery image on drive D in the backup folder.
Image creation and registration have been successfully completed.
It is located, as we planned, on drive D: in the backup folder and is called CustomRefresh.wim 
Well, now let's try to restore our Windows 8 from the Windows 8 recovery image we created.
Load into the additional boot menu Select an action using the keyboard shortcut Shift+F8 or the Windows 8 recovery disk. Diagnostics,
Recover Your files will remain in place. Further
Windows 8
Restore
Let me remind you once again that a Windows 8 image created in this way is not suitable for recovery in the event of a complete formatting of the disk (C:) or accidental deletion of the system partition.
Creating a full Windows 8 recovery image
Using this image, you can restore Windows 8 even after completely formatting the system partition (C:). How it all works. If you created an image of Windows 8 on the drive (D:), then completely removed Windows 8 from the drive (C:) and installed Windows 7, used it and didn’t like it, you take and restore Windows 8 from the image and that’s it. So let's create an image.
Options. Control Panel 
Windows 7 File Recovery

Creating a system image
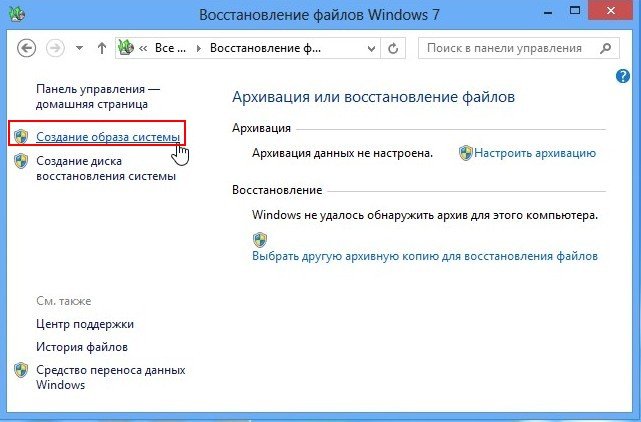

You can choose to create an image on DVD discs, but keep in mind that you will need a lot of them. I suggest creating an image on local drive D: Next 
Archive

Archiving completed successfully. If you have not yet created a Windows 8 recovery disk, I suggest you create it, as it will be very useful to you.

And here is our huge image, as expected on disk D:

Recovery from image
Now let’s imagine a situation: Windows 8 won’t boot at all and none of the recovery methods described above helps us. Or, while working in Acronis Disk Director, we accidentally formatted a partition with Windows 8 installed. In this case, we can use our image to correct the situation. Boot from a recovery disk or Windows 8 installation disk.
Diagnostics

Extra options

Restoring a system image

Windows 8 

You are automatically prompted to select the most recent Windows 8 image (recommended) or select the one you need. Further


We are reminded once again that if we created an image of the C: drive, then the C: partition will be completely formatted, replacing all files from the contents of the image.
Ready. 

How to perform a full restore of Windows 8 without saving user data and installed applications.
And lastly, it is impossible to completely restore Windows 8 without saving user data and installed applications (equivalent to installing Windows 8 again) if you do not have a Windows 8 installation disk.
If you have a Windows 8 installation disk, then you can perform a full recovery either from a running system or by booting from a boot disk.
Restoring Windows 8 without saving user data from a running system.
Options. Changes in computer settings.
Are common. Removing all data and reinstalling Windows.

All your personal files and applications will be deleted. The computer settings will be set to default values.

Here you have a choice: when restoring to its original state, you can delete all files only from the system drive (C:) or clean up all other drives (takes more time).

A simple user can select Just delete my files 
Reset. All.

Recovering Windows 8 without saving user data using the Windows 8 installation disc
Boot from the Windows 8 disk.
Diagnostics,
Return to original state.

A familiar warning. All your personal files and applications will be deleted. The computer settings will be set to default values. Further

Windows 8
Only the disk on which the system is installed. 
If your operating system does not boot, then your main task is to identify the cause and, if possible, eliminate it. There are two possible scenarios: damage to the computer hardware and the need to replace a component, or simply a system failure, which can be solved by a simple rollback. Let's look at how to determine what caused the error, as well as how to fix the problem.
Attention!
All of the steps below are strongly recommended only if you fully understand everything stated, so as not to harm your computer.
If after turning on the computer nothing happens and you do not see the OS loading process, then most likely the problem is a malfunction of some components of the device. The first step is to check whether all computer components are connected. To do this, disconnect the computer from the network and turn off the power supply using the toggle switch on the back wall. Open the case.
Reason 1: Hard drive failure
If after performing the steps described above the problem does not go away, then proceed to checking the hard drive. Very often the cause of the problem is a media failure. You can check its functionality only by connecting the component to another computer. There are three possible scenarios here.

Option 1: HDD is detected by another computer and Windows boots
Everything is fine! Your hard drive is working fine and the problem is not there.
In this case, you need to check the disk for bad sectors. You can do this using a special program Crystal Disk Info. It is completely free and will help you perform a complete diagnostic of your hard drive. Run it and pay attention to points such as Remapped sectors, Unstable sectors, Uncorrectable sector errors. If at least one of these points is highlighted in yellow, then there are bad sectors and they need to be corrected.

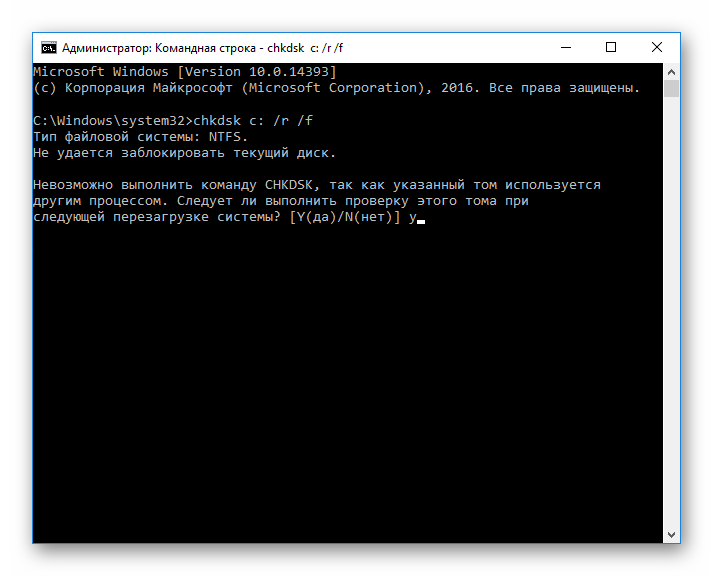
To recover bad blocks, run "Command line" on behalf of the administrator. To do this, use the key combination Win + X open the context menu and select the appropriate item.

Then enter the following command:
Click Enter. You will be prompted to perform a recovery after rebooting the system. Enter Y and press again Enter. After this, restart your computer.
Option 3: HDD is not detected by another computer
This is the worst option. In this case, you will have to purchase a new hard drive, since the old one most likely cannot be restored. But before you do anything, consult a service center. Perhaps your hard drive can still be returned to working condition. Otherwise, they will recommend you which drive is better to take and offer replacement services.
Reason 2: Some components are not connected
If your hard drive is working properly, then check the following components:
- Hard drive power cable;
- A cable that connects the hard drive and the motherboard;
- Are the memory modules seated tightly in the connectors?

Reason 3: Motherboard failure
If the steps taken above did not have any result, then the problem is not with the cables and the hard drive, but with the motherboard. It is better to entrust this problem to specialists and take the computer to a service center.

The system tries to boot, but nothing happens
If you turn on your PC and see any signs that the system is trying to boot, then this is a great sign. In this case, you can avoid costs and solve the problem yourself.
Reason 1: Error starting explorer.exe
If the system boots, but you only see a black screen and a cursor, then the problem arose when the explorer.exe process was launched, which is responsible for loading the graphical shell. Here you can either start the process manually or perform a system rollback - at your discretion.


